Deprecated: Audience Manager is sunsetting and we recommend switching to Customer Data Platform.
If you want to add to Audience Manager data from forms on your website like name, surname, email address, and more, you need to set up a custom tag. When a visitor fills out the form, the tag will capture these pieces of information and send it to Audience Manager.
Before you start
Here are some things to know before you begin the process:
- Data is saved after a visitor submits the form.
- Passwords and credit card data are not saved. But if you use a custom-made form, make sure that sensitive data are not collected.
- Data is saved as attributes. The form label is used as an attribute name, for example, the input field
nameis saved asnameattribute. - If there is an attribute with the same name as the form field, it’ll be replaced with the new attribute.
- When collecting the email address, Audience Manager uses it as a profile ID and saves as an
emailattribute. If your form has a different label for an email address, then Audience Manager will also save this second attribute, for example,email_address.
Find the form ID
Before you set up the custom tag, you need to find the form ID for the forms that you’ll want to track.
The form ID is the CSS attributes of the form and you can find it using an inspector in your website browser or a debug mode under Event log > Variables. For example, a code with this element could look like this:
<form class="et_pb_contact_form clearfix" method="post" action="https://clearbank/contact/" name="contact form" id="CF-123">. 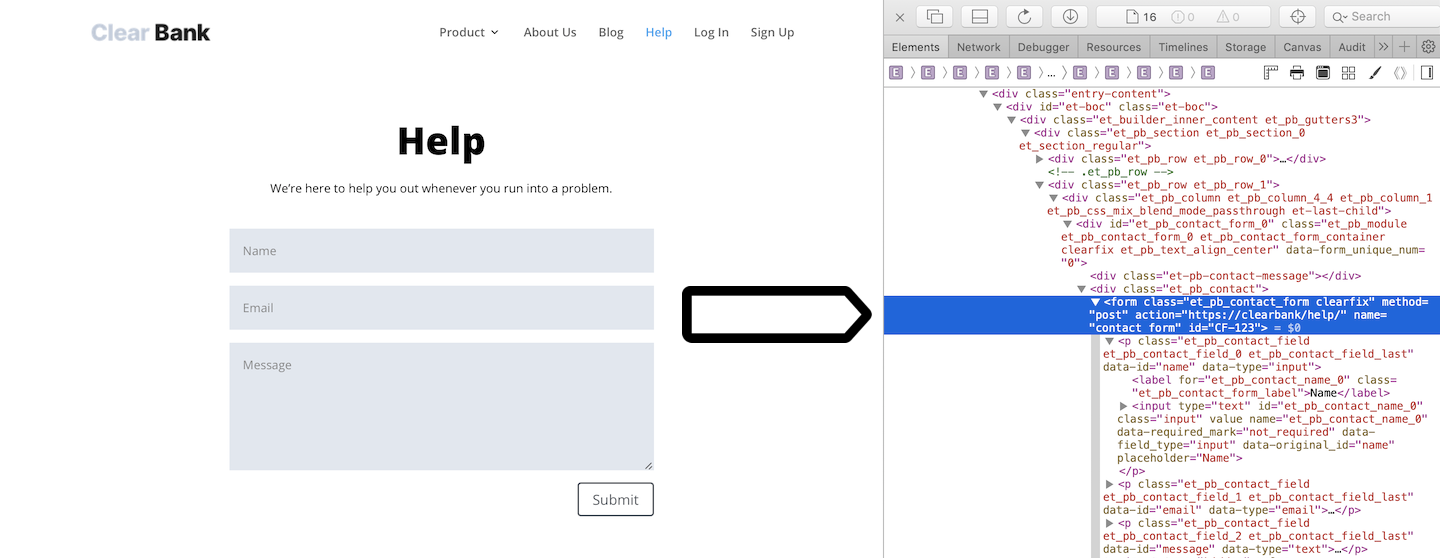
Set up form tracking
Once you have the form ID ready, you can move on to creating the tag with the trigger.
To set up a tag for tracking data from forms, follow these steps:
1. Go to Menu > Tag Manager.
2. Navigate to Tags.
3. Click Add new tag.
4. Name the tag and choose the following type: Audience Manager form tracking.
5. Click Next.
6. In Form data tracking, add the form ID.

7. Optionally, click Include only specific fields and define the fields that you want to track. The tag tracks all fields by default.
8. Optionally, toggle Use form labels as attribute names.
Tip: If several forms on your website have the same label, the tag will collect data from all those forms and store it as one attribute. But if your website runs in many languages and labels are different in each language, the data won’t be merged into one attribute.
9. In Tag triggers, click Choose existing trigger.
10. Choose the following type: All page views and click OK.
11. Click OK to save the tag.
12. Test your tag in debug mode.
13. When you’re happy how the tag works, click Publish.
After publishing the tag, Piwik PRO will start collecting data from forms and send it to Audience Manager.