Traffic from AI agents such as ChatGPT, Claude, or Perplexity is becoming increasingly common. Right now, Piwik PRO doesn’t have a built-in option to track them separately, but we’ve prepared a workaround. With a simple setup in Tag Manager, you can detect AI visits and label them clearly in your reports.
In this article, we’ll show you how to set it up.
Before you start
Here are a few things to know before you start:
- This solution uses a custom HTML tag.
- The tag must fire before the main Piwik PRO tracking tag.
- The tag doesn’t collect or store data on its own. If a visitor doesn’t give consent, no information is sent to the server.
Add a tag to detect AI traffic
To add a tag responsible for detecting traffic from AI agents, follow these steps:
1. Log in to Piwik PRO.
2. Go to Menu > Tag Manager.
3. Navigate to Tags.
4. Click Add a tag.
5. Select the Custom code tag template.
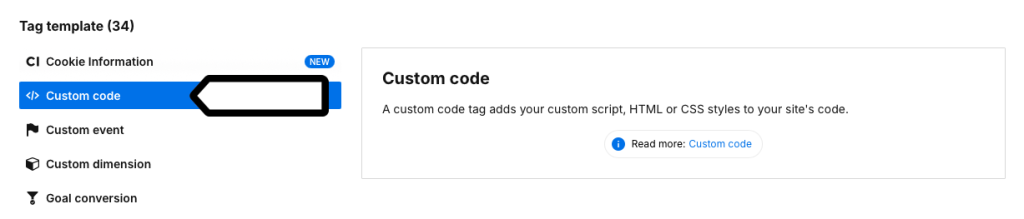
6. Click Next.
7. Name your tag.
8. In Tag code, paste the following script:
<script>
const aiAgents = [
{
name: "ChatGPT",
utmSources: ["chatgpt"],
referrers: ["chat.openai.com"]
},
{
name: "Claude",
utmSources: ["claude"],
referrers: ["claude.ai", "poe.com"]
},
{
name: "Perplexity",
utmSources: ["perplexity"],
referrers: ["perplexity.ai"]
},
{
name: "Gemini",
utmSources: ["gemini"],
referrers: ["gemini.google.com"]
},
{
name: "Copilot",
utmSources: ["bingchat", "copilot"],
referrers: ["bing.com", "copilot.microsoft.com"]
},
{
name: "Meta AI",
utmSources: ["meta_ai"],
referrers: ["facebook.com", "meta.ai"]
},
{
name: "You.com",
utmSources: ["youassistant"],
referrers: ["you.com"]
},
{
name: "Poe",
utmSources: ["poe"],
referrers: ["poe.com"]
},
{
name: "HuggingChat",
utmSources: ["huggingchat"],
referrers: ["huggingface.co", "huggingchat.com"]
}
];

var _paq = window._paq || [];
const parsedUrl = new URL(document.location.href)
const utmSource = parsedUrl.searchParams.get("utm_source");

for (const agent of aiAgents) {
if (
(utmSource && agent.utmSources.includes(utmSource.toLowerCase())) ||
(document.referrer && agent.referrers.some(r => document.referrer.includes(r)))
) {
const customURL = document.location.origin+document.location.pathname+"?utm_medium=AI&utm_source="+agent.name;
_paq.push(["setCustomUrl", customURL]);

}
}

</script>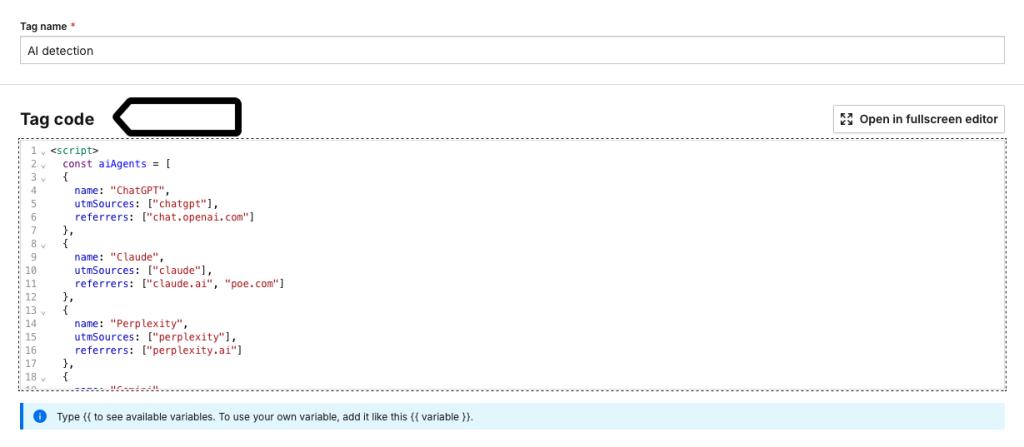
Note: The script checks the referrer or utm_source. If it detects a known AI agent, it removes any existing campaign parameters and replaces them with utm_medium=AI and utm_source=<AI agent name>. It already covers most popular AI models and can be easily extended.
We know that removing campaign parameters may look concerning, but these aren’t real, user-created campaigns. They’re auto-generated by AI tools and add noise rather than value.
9. Click Add a trigger.
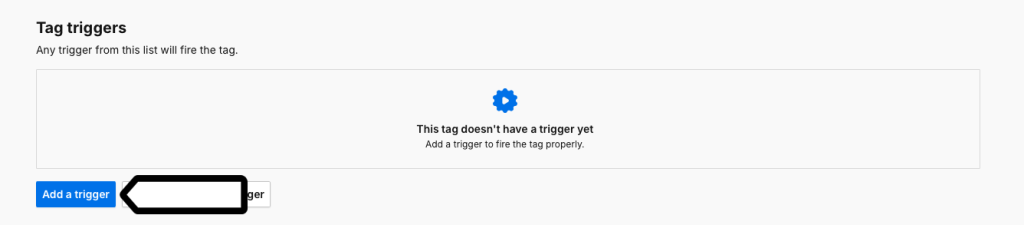
Note: You can add the default All page views trigger, or create a trigger that fires on the first page view of a session (recommended).

10. Click Add to finish adding your tag.
11. Publish the changes.
12. Done! You’ve added a tag.
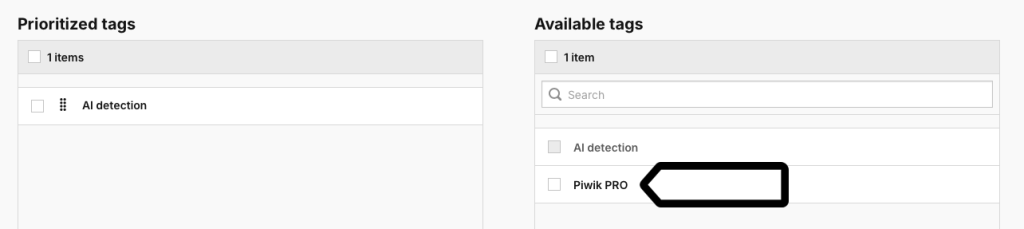
Set the tag priority
Now, let’s set the tag priority. Make sure your AI tag runs before the main tracking tag, otherwise, the fix won’t work. To set it up, follow these steps:
1. Go to Menu > Tag Manager.
2. Navigate to Settings > Tag priority.
3. Select your tag.
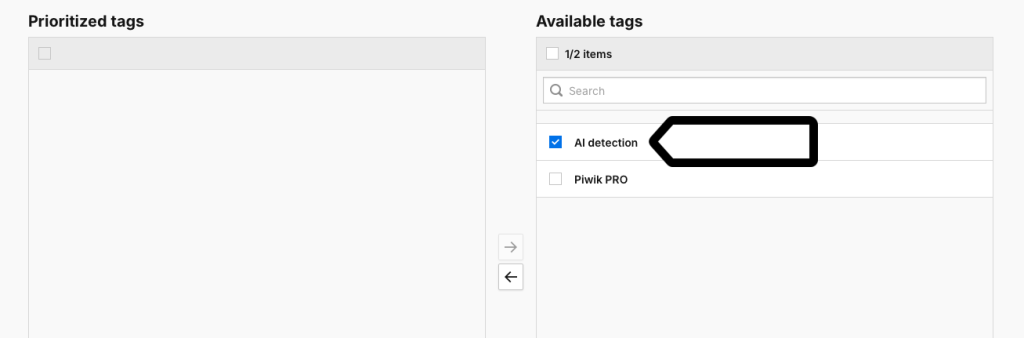
4. Move it from Available tags to Prioritized tags using arrows.
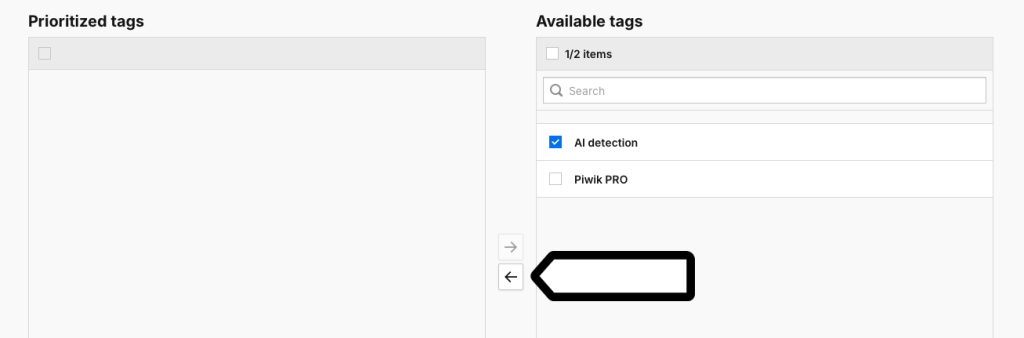
Note: It’s very important to keep the Piwik PRO tracking tag in the non-priority list. This ensures the AI tag always fires before the tracker.
5. Click Save.
6. Publish your changes.
7. All set! Piwik PRO now detects traffic from AI agents. Within about two hours, you’ll see it in Menu > Analytics > Reports > Campaigns with Source / medium = AI and the AI agent’s name.