One of the most frustrating moments for a website user is when they click on a button and nothing happens. Click, click, click. Still, nothing happens. They get annoyed and keep clicking even harder. With Piwik PRO, you can start detecting these situations by tracking so-called rage clicks, error clicks, dead clicks and mouse shakes.
In this article, we’ll show you how to set them all up.
Rage clicks
Rage clicks are like punching your mouse or touchpad because it doesn’t do what you want. They are triggered when a visitor clicks an element on your website multiple times, rapidly.
In most cases, rage clicks signal that your website isn’t responding the way your visitor expected, so you may want to take a closer look at it.
To set up rage click tracking, follow these steps:
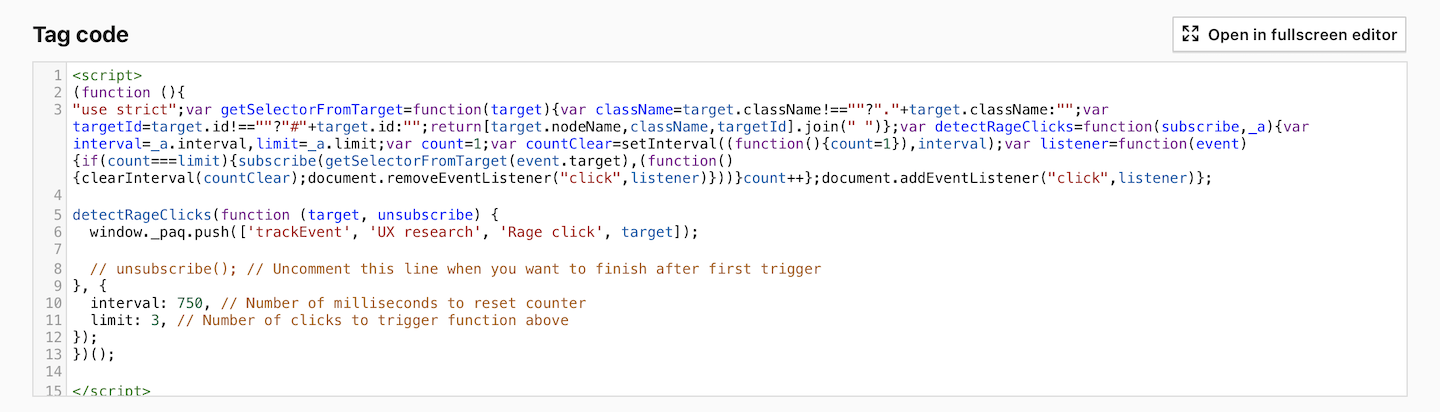
1. Here’s the code that you’ll use:
<script>
  (function() {
    "use strict";
    var getSelectorFromTarget = function(target) {var className = target.className !== "" ? "." + target.className : "";var targetId = target.id !== "" ? "#" + target.id : "";return [target.nodeName, className, targetId].join(" ")};
    var detectRageClicks = function(subscribe, _a) {var interval = _a.interval, limit = _a.limit;var count = 1;var countClear = setInterval((function() {count = 1}), interval);var listener = function(event) {if (count === limit) {subscribe(getSelectorFromTarget(event.target), (function() {clearInterval(countClear);document.removeEventListener("click", listener)}))}count++};document.addEventListener("click", listener)};

    detectRageClicks(function (target, unsubscribe) {
      window._paq.push(['trackEvent', 'UX research', 'Rage click', target]);
      // unsubscribe(); // Uncomment this line when you want to finish after first trigger
    }, {
      interval: 750, // Number of milliseconds to reset counter
      limit: 3, // Number of clicks to trigger function above
    });
  })();
</script>
Parameters
// unsubscribe(); //
Uncomment this line when you want to finish after the first trigger.
interval: 750,
Number of milliseconds to reset the counter.
limit: 3,
Number of clicks to trigger the function above.
window._paq.push([‘trackEvent’, ‘UX research’, ‘Rage click’, target]);
Custom event details.
2. Go to Menu > Tag Manager.
3. Navigate to Tags.
4. Click Add a tag.
5. Name the tag (Example: Rage clicks) and select the following type: Custom code.
6. Click Next.
7. In Tag code, paste the code prepared in step 1.
8. In Advanced tag settings > Consent type, select the following type: Analytics.
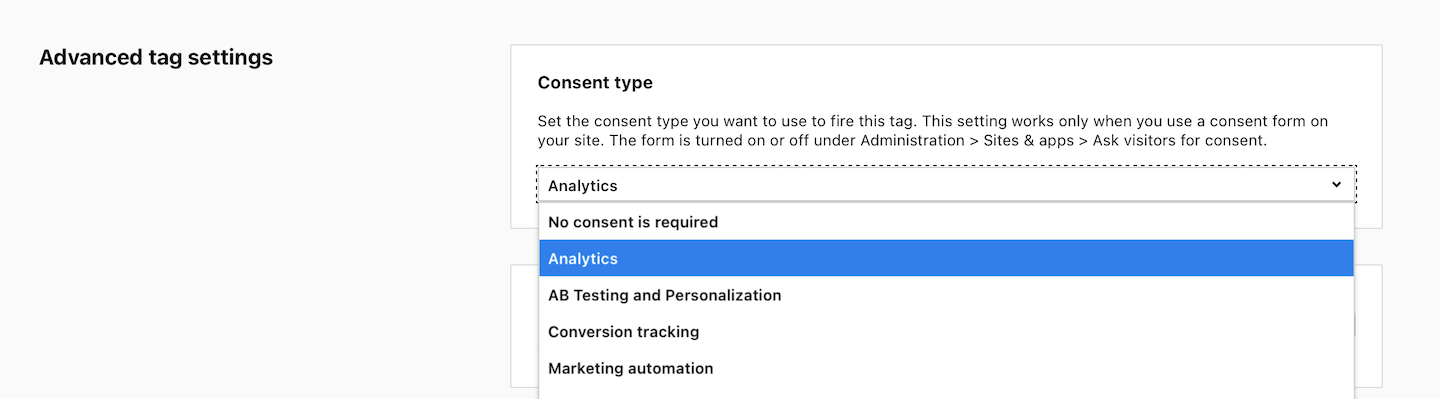
Note: Set it up if you use a consent form on your site. This tag will only fire for visitors who accept the selected consent type.
9. In Tag triggers, click Choose existing trigger.
10. Select All page views and click Save.
11. Click Save to save the tag.
12. Test your tag in debug mode.
13. When you’re happy with how the tag works, click Publish.
14. In the next steps, you’ll need to set up reporting for rage clicks.
15. Go to Menu > Analytics.
16. Navigate to Custom reports
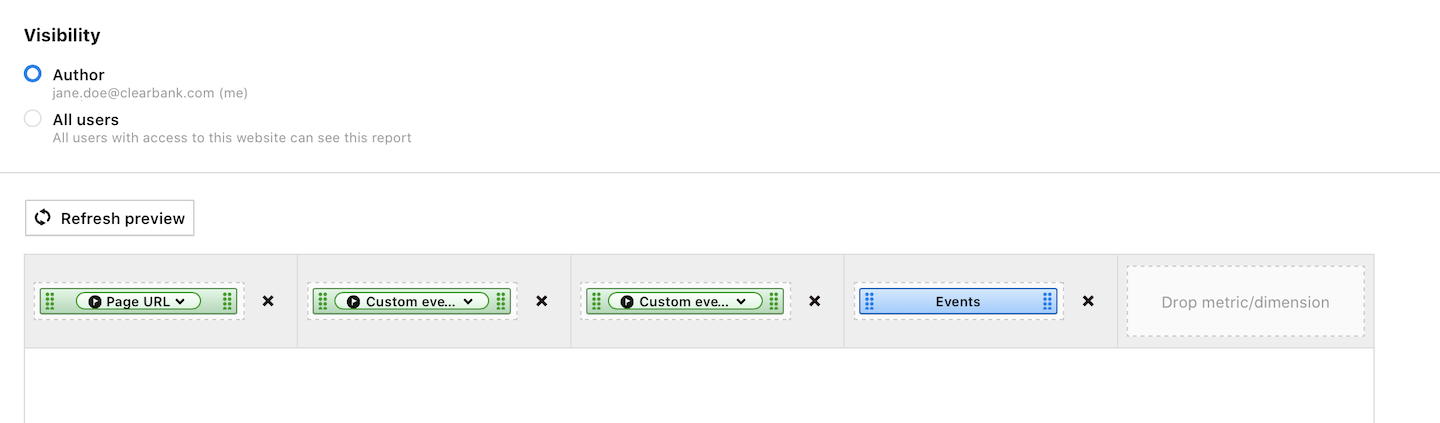
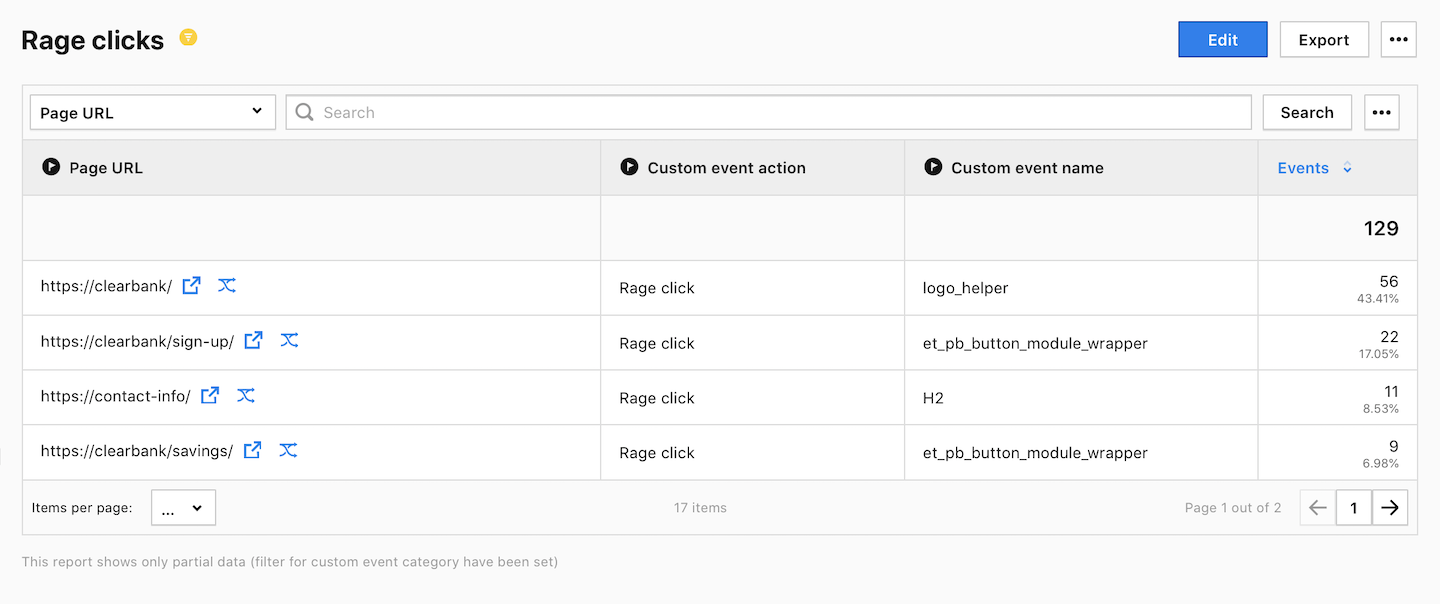
17. Create a custom report with the following setup:
- Report type: Table
- Dimensions: Page URL, Custom event action, Custom event name
- Metrics: Events
- Filter: Custom event category is UX research
Note: You can use one custom report for rage clicks, error clicks, dead clicks and mouse shakes.
18. Click Save.
19. All done!
Note: This setup works both for mobile and desktop devices.
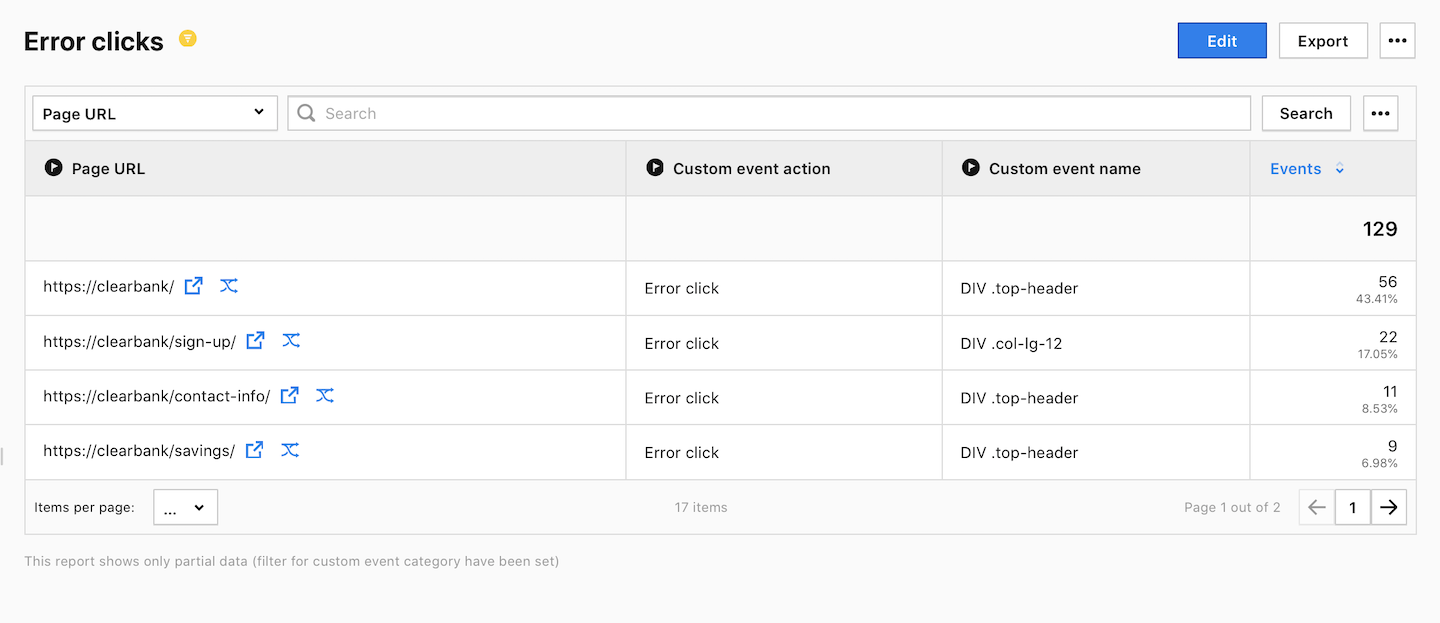
Error clicks
Error clicks are when visitors click and run into JavaScript errors. They don’t need to click repeatedly; just one click can reveal an issue. Visitors often don’t notice that something’s broken, but for you, it’s a sign that a certain part of JavaScript isn’t working.
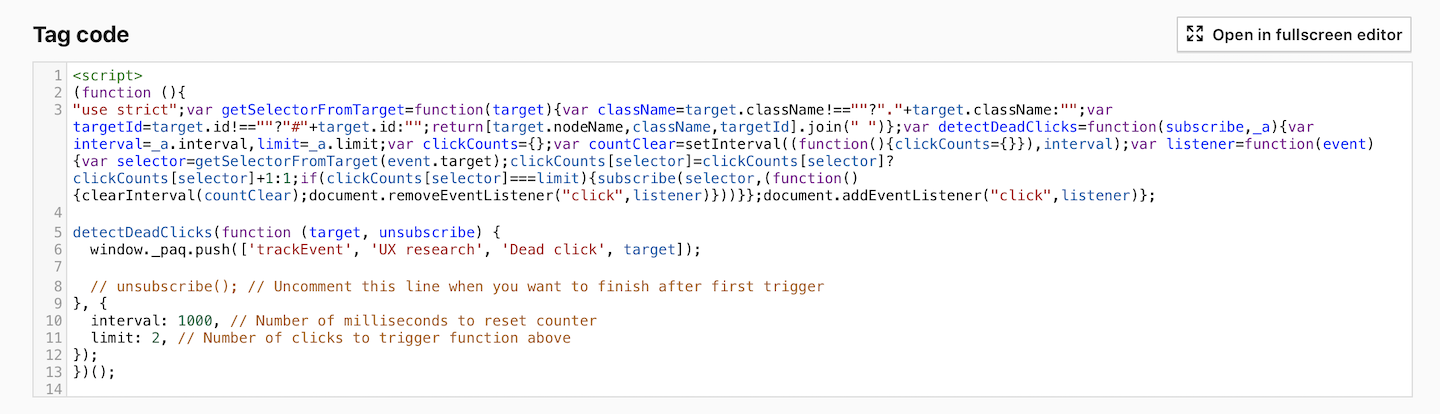
To set up error click tracking, follow these steps:
1. Here’s the code that you’ll use:
<script>
  (function () {
    "use strict";var getSelectorFromTarget=function(target){var className=target.className!==""?"."+target.className:"";var targetId=target.id!==""?"#"+target.id:"";return[target.nodeName,className,targetId].join(" ")};var detectErrorClicks=function(subscribe){var error;window.onerror=function(msg){error=msg};var listener=function(event){var selector=getSelectorFromTarget(event.target);setTimeout((function(){if(error){subscribe(selector,error,(function(){document.removeEventListener("click",listener)}))}error=undefined}),0)};document.addEventListener("click",listener)};

    detectErrorClicks(function (target, error, unsubscribe) {
      console.log('Error detected:', error);
      window._paq.push(['trackEvent', 'UX research', 'Error click', target]);
      // unsubscribe(); // Uncomment this line when you want to finish after first trigger
    });
  })();
</script>
Parameters
console.log(‘Error detected:’, error);
window._paq.push([‘trackEvent’, ‘UX research’, ‘Error click’, target]);
Custom event details.
2. Go to Menu > Tag Manager.
3. Navigate to Tags.
4. Click Add a tag.
5. Select the following tag template: Custom code.
6. Click Next.
7. Name the tag (Example: Error clicks).
8. In Tag code, paste the code prepared in step 1.

9. In Advanced tag settings > Consent type, select the following type: Analytics.
Note: Set it up if you use a consent form on your site. This tag will only fire for visitors who accept the selected consent type.
10. In Tag triggers, click Choose existing trigger.
11. Select All page views and click Save.
12. Click Save to save the tag.
13. Test your tag in debug mode.
14. When you’re happy with how the tag works, click Publish.
15. In the next steps, you’ll need to set up reporting for error clicks.
16. Go to Menu > Analytics.
17. Navigate to Custom reports
18. Create a custom report with the following setup:
- Report type: Table
- Dimensions: Page URL, Custom event action, Custom event name
- Metrics: Events
- Filter: Custom event category is UX research
Note: You can use one custom report for rage clicks, error clicks, dead clicks and mouse shakes.
19. Click Save.
20. Done!
Note: This setup works both for mobile and desktop devices.
Tip: You can also track JavaScript errors by enabling this option Menu > Tag Manager > Piwik PRO tag > Track JavaScript errors. Errors will appear in the custom event report under Menu > Analytics > Reports > Custom events.
They will include the page URL and error details. The setup described above shows which element caused the error, so it’s worth using both to get all the details.
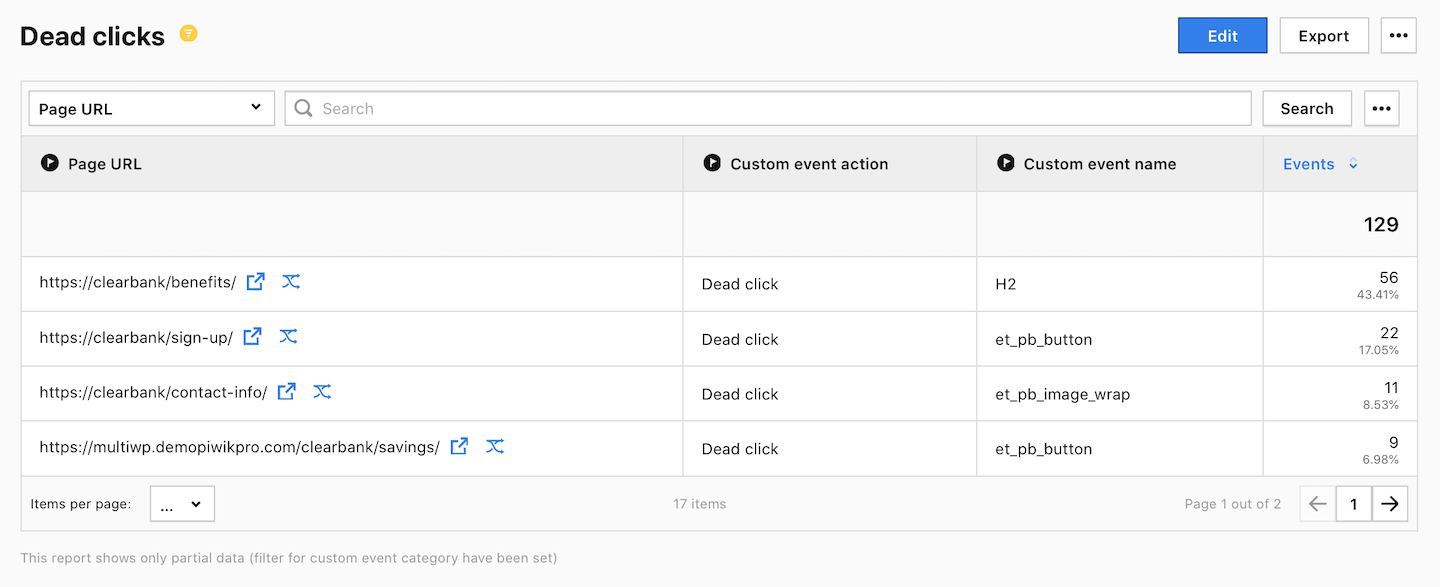
Dead clicks
Dead clicks are when visitors click and nothing happens. They click on the image to zoom it in, but it stays still. Or they think some text is a link, but it’s not. In these annoying situations, people often end up clicking twice in a hurry. To stop this from happening and make visitors happier, you can find and fix these dead clicks.
To set up dead click tracking, follow these steps:
1. Here’s the code that you’ll use:
<script>
  (function () {
    "use strict";var getSelectorFromTarget=function(target){var className=target.className!==""?"."+target.className:"";var targetId=target.id!==""?"#"+target.id:"";return[target.nodeName,className,targetId].join(" ")};var detectDeadClicks=function(subscribe,_a){var interval=_a.interval,limit=_a.limit;var clickCounts={};var countClear=setInterval((function(){clickCounts={}}),interval);var listener=function(event){var selector=getSelectorFromTarget(event.target);clickCounts[selector]=clickCounts[selector]?clickCounts[selector]+1:1;if(clickCounts[selector]===limit){subscribe(selector,(function(){clearInterval(countClear);document.removeEventListener("click",listener)}))}};document.addEventListener("click",listener)};

    detectDeadClicks(function (target, unsubscribe) {
      window._paq.push(['trackEvent', 'UX research', 'Dead click', target]);
      // unsubscribe(); // Uncomment this line when you want to finish after first trigger
    }, {
      interval: 1000, // Number of milliseconds to reset counter
      limit: 2, // Number of clicks to trigger function above
    });
  })();
</script>
Parameters
// unsubscribe(); //
Uncomment this line when you want to finish after the first trigger.
interval: 1000,
Number of milliseconds to reset the counter.
limit: 2,
Number of clicks to trigger the function above.
window._paq.push([‘trackEvent’, ‘UX research’, ‘Dead click’, target]);
Custom event details.
2. Go to Menu > Tag Manager.
3. Navigate to Tags.
4. Click Add a tag.
5. Name the tag (Example: Dead clicks) and select the following type: Custom code.
6. Click Next.
7. In Tag code, paste the code prepared in step 1.
8. In Advanced tag settings > Consent type, select the following type: Analytics.
Note: Set it up if you use a consent form on your site. This tag will only fire for visitors who accept the selected consent type.
9. In Tag triggers, click Choose existing trigger.
10. Select All page views and click Save.
11. Click Save to save the tag.
12. Test your tag in debug mode.
13. When you’re happy with how the tag works, click Publish.
14. In the next steps, you’ll need to set up reporting for dead clicks.
15. Go to Menu > Analytics.
16. Navigate to Custom reports.
17. Create a custom report with the following setup:
- Report type: Table
- Dimensions: Page URL, Custom event action, Custom event name
- Metrics: Events
- Filter: Custom event category is UX research
Note: You can use one custom report for rage clicks, error clicks, dead clicks and mouse shakes.
18. Click Save.
19. All done!
Note: This setup works both for mobile and desktop devices.
Mouse shakes
Mouse shakes are rapid movements that visitors make with their mouse or touchpad when they are upset. It’s hard to tell what’s causing them to get upset, but you can track the pages where this reaction occurs.
To set up mouse shake tracking, follow these steps:
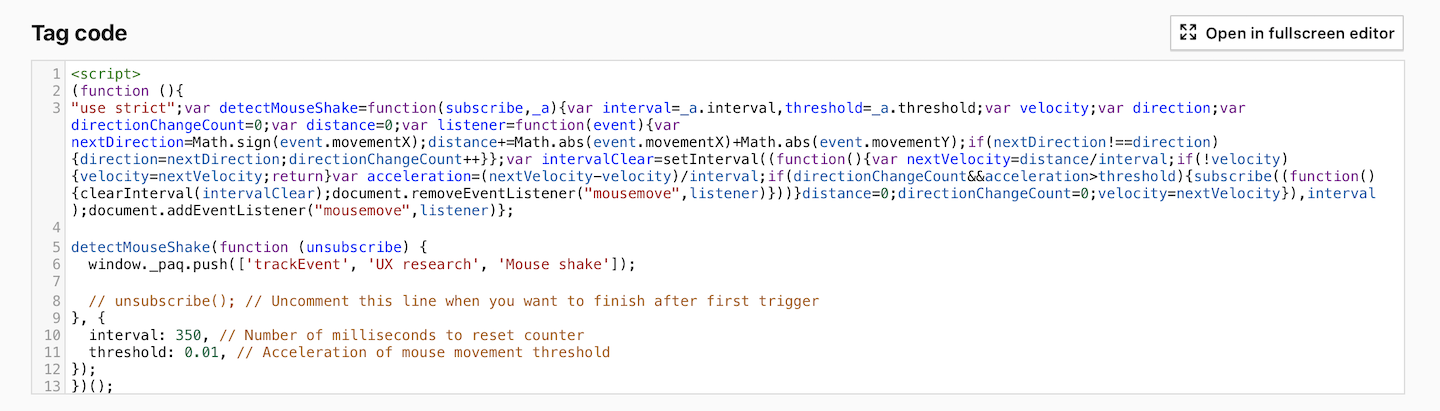
1. Here’s the code that you’ll use:
<script>
  (function () {
    "use strict";var detectMouseShake=function(subscribe,_a){var interval=_a.interval,threshold=_a.threshold;var velocity;var direction;var directionChangeCount=0;var distance=0;var listener=function(event){var nextDirection=Math.sign(event.movementX);distance+=Math.abs(event.movementX)+Math.abs(event.movementY);if(nextDirection!==direction){direction=nextDirection;directionChangeCount++}};var intervalClear=setInterval((function(){var nextVelocity=distance/interval;if(!velocity){velocity=nextVelocity;return}var acceleration=(nextVelocity-velocity)/interval;if(directionChangeCount&&acceleration>threshold){subscribe((function(){clearInterval(intervalClear);document.removeEventListener("mousemove",listener)}))}distance=0;directionChangeCount=0;velocity=nextVelocity}),interval);document.addEventListener("mousemove",listener)};

    detectMouseShake(function (unsubscribe) {
      window._paq.push(['trackEvent', 'UX research', 'Mouse shake']);
      // unsubscribe(); // Uncomment this line when you want to finish after first trigger
    }, {
      interval: 350, // Number of milliseconds to reset counter
      threshold: 0.01, // Acceleration of mouse movement threshold
    });
  })();
</script>
Parameters
// unsubscribe(); //
Uncomment this line when you want to finish after the first trigger.
interval: 350,
Number of milliseconds to reset the counter.
threshold: 0.01,
Acceleration of mouse movement threshold. If you want to make it more sensitive, set the threshold to 0.009 or lower. Otherwise, set it to 0.011 and above.
window._paq.push([‘trackEvent’, ‘UX research’, ‘Mouse shake’]);
Custom event details.
2. Go to Menu > Tag Manager.
3. Navigate to Tags.
4. Click Add a tag.
5. Name the tag (Example: Mouse shakes) and select the following type: Custom code.
6. Click Next.
7. In Tag code, paste the code prepared in step 1.
8. In Advanced tag settings > Consent type, select the following type: Analytics.
Note: Set it up if you use a consent form on your site. This tag will only fire for visitors who accept the selected consent type.
9. In Tag triggers, click Choose existing trigger.
10. Select All page views and click Save.
11. Click Save to save the tag.
12. Test your tag in debug mode.
13. When you’re happy with how the tag works, click Publish.
14. In the next steps, you’ll need to set up reporting for mouse shakes.
15. Go to Menu > Analytics.
16. Navigate to Custom reports.
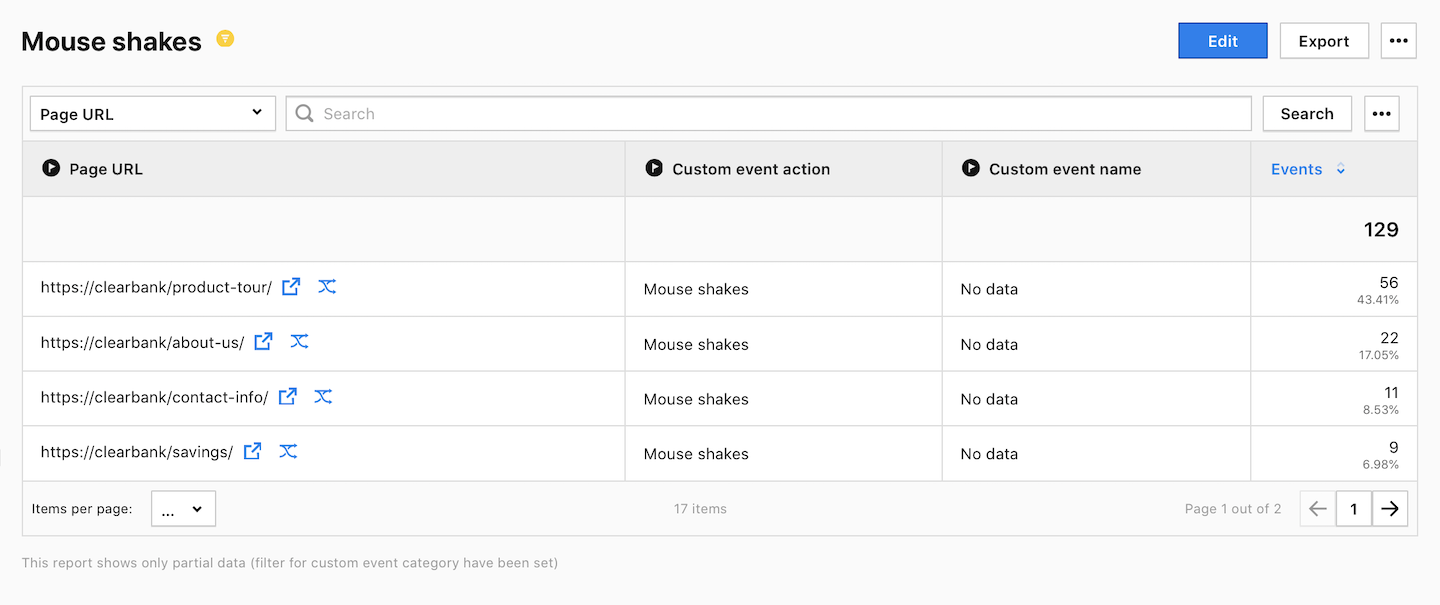
17. Create a custom report with the following setup:
- Report type: Table
- Dimensions: Page URL, Custom event action, Custom event name
- Metrics: Events
- Filter: Custom event category is UX research
Note: You can use one custom report for rage clicks, error clicks, dead clicks and mouse shakes.
18. Click Save.
19. Done!
Tip: You can merge all the codes described above and use them in one custom tag because they all use the same setup and trigger. Just make sure you use the same name for the custom event category. For example, UX research.