If you use Cookiebot as your consent manager, you can set up Piwik PRO to collect data based on the visitor’s consent. The consent types used by Cookiebot differ from those used by Piwik PRO, so you’ll need to map them and run a JavaScript code on each page of your website.
In this article, we’ll show you how to do it.
Set up Piwik PRO
In the first step, you’ll need to set up your consent management tool in Piwik PRO so that it doesn’t display our consent form but still uses the consent management mechanism in Tag Manager. In the next steps, you’ll integrate Cookiebot into that mechanism.
To set up Consent Manager in Piwik PRO for your integration, follow these steps:
1. Log in to Piwik PRO.
2. Go to Menu > Administration.
3. Navigate to Sites & apps.
4. On the left, pick the site or app you want to set up.
5. Navigate to Privacy.
6. Turn on Consent management tool.
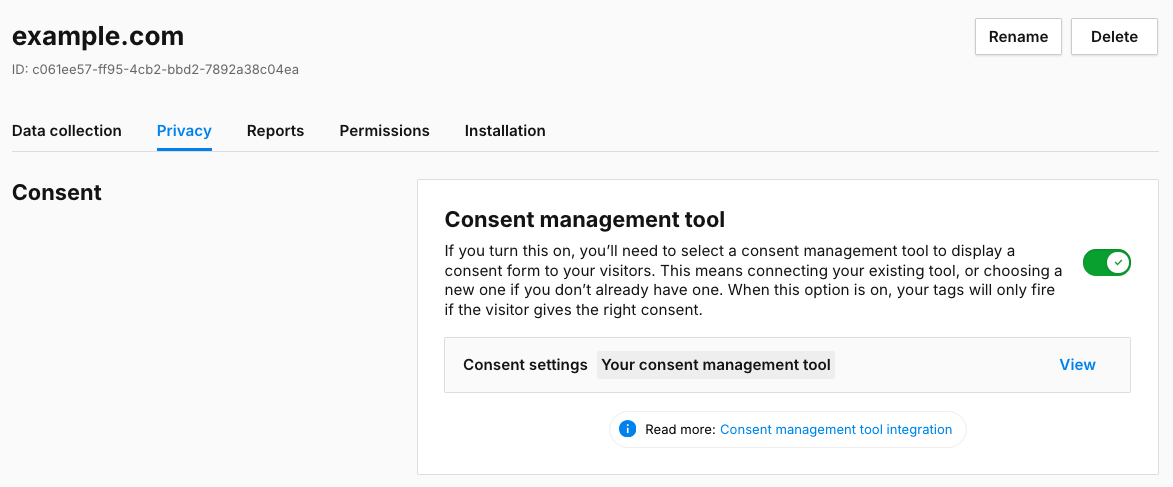
7. Choose Cookiebot or other CMP
8. Click Save.
9. Click View to customize the consent setting
Collect anonymous data from non-consenting visitors: You can collect anonymous data from visitors who haven’t given their consent. Their IP addresses will be completely masked. You will not recognize new and returning visitors. And you will only know their country. Both: Use session hash and Use visitors cookies help recognise events that belong to the same session. It’s up to you to decide whether to use a session hash and visitor cookies for these visitors or not.
- Use a session hash: If you use a session hash, it’ll be created for each session based on the visitor’s IP address, operating system, browser name, browser version, browser language, enabled browser plugins and site/app ID.
- Use visitor cookies: If you use visitor cookies (_pk_id and _pk_ses), they will expire 30 minutes after the last event.
Note: Some triggers in Tag Manager create cookies to function correctly. More about cookies
10. Click Save.
11. All done! Now Piwik PRO is ready for the integration with Cookiebot.
Add a tag with the JS code
Now you need to install the JS code that will translate consents from Cookiebot to the ones in Piwik PRO and add it to your site using a tag.
To add a tag with the JS code, follow these steps:
1. Log in to Piwik PRO.
2. Go to Menu > Tag Manager.
3. Navigate to Tags.
4. Click Add a tag.
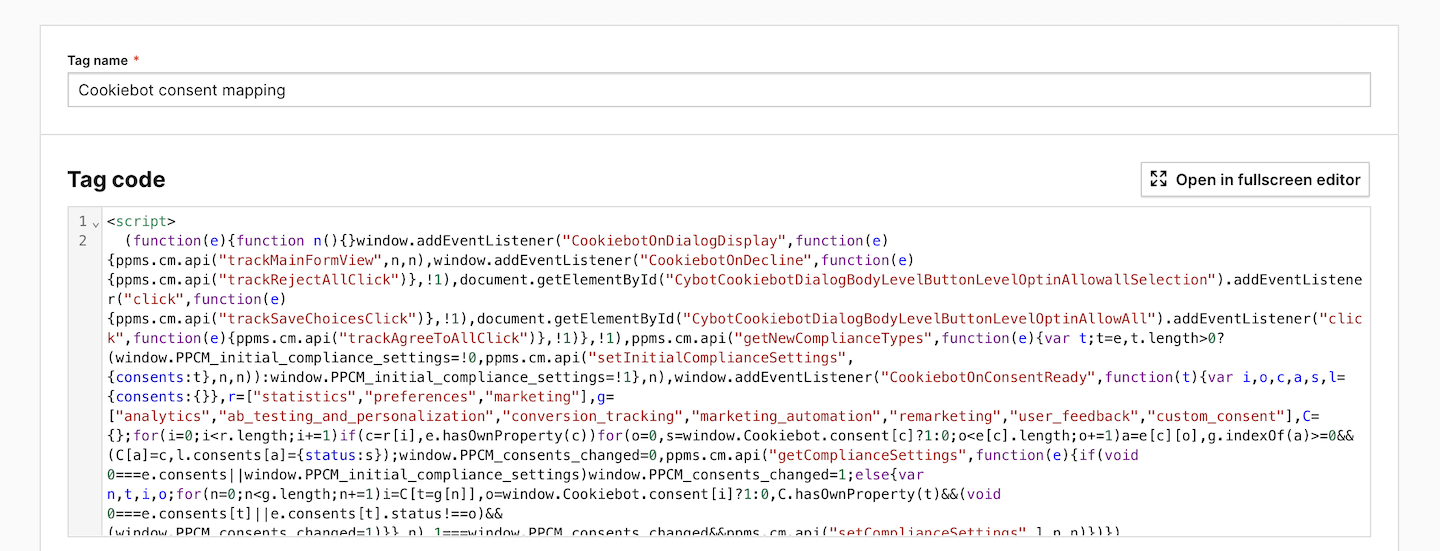
5. Name your tag. Example: Cookiebot consent mapping.
6. Pick the following tag type: Custom code (async).
7. Click Next.
8. Copy the code below
Click here to see the code
<script>
var f=Object.defineProperty;var d=(c,e,o)=>e in c?f(c,e,{enumerable:!0,configurable:!0,writable:!0,value:o}):c[e]=o;var s=(c,e,o)=>d(c,typeof e!="symbol"?e+"":e,o);(function(){const e=document.createElement("link").relList;if(e&&e.supports&&e.supports("modulepreload"))return;for(const t of document.querySelectorAll('link[rel="modulepreload"]'))i(t);new MutationObserver(t=>{for(const n of t)if(n.type==="childList")for(const g of n.addedNodes)g.tagName==="LINK"&&g.rel==="modulepreload"&&i(g)}).observe(document,{childList:!0,subtree:!0});function o(t){const n={};return t.integrity&&(n.integrity=t.integrity),t.referrerPolicy&&(n.referrerPolicy=t.referrerPolicy),t.crossOrigin==="use-credentials"?n.credentials="include":t.crossOrigin==="anonymous"?n.credentials="omit":n.credentials="same-origin",n}function i(t){if(t.ep)return;t.ep=!0;const n=o(t);fetch(t.href,n)}})();class b{constructor(e){s(this,"consentTypes",["analytics","ab_testing_and_personalization","custom_consent","user_feedback","marketing_automation","remarketing","conversion_tracking"]);s(this,"defaultSettingConsents",{consents:{analytics:{status:-1},ab_testing_and_personalization:{status:-1},custom_consent:{status:-1},user_feedback:{status:-1},marketing_automation:{status:-1},remarketing:{status:-1},conversion_tracking:{status:-1}}});s(this,"hasConsentType",e=>this.consentTypes.includes(e));s(this,"getDefaultConsentTypes",()=>this.consentTypes);s(this,"getDefaultSettingConsents",()=>this.defaultSettingConsents);this.logger=e,this.logger=e}trackMainFormView(){ppms.cm.api("trackMainFormView",()=>{this.logger.info("trackMainFormView request successful")},()=>{this.logger.error("trackMainFormView request failed")})}trackAgreeToAllClick(){ppms.cm.api("trackAgreeToAllClick",()=>{this.logger.info("trackAgreeToAllClick request successful")},()=>{this.logger.error("trackAgreeToAllClick request failed")})}trackRejectAllClick(){ppms.cm.api("trackRejectAllClick",()=>{this.logger.info("trackRejectAllClick request successful")},()=>{this.logger.error("trackRejectAllClick request failed")})}trackSaveChoicesClick(){ppms.cm.api("trackSaveChoicesClick",()=>{this.logger.info("trackSaveChoicesClick request successful")},()=>{this.logger.error("trackSaveChoicesClick request failed")})}trackReminderWidgetView(){ppms.cm.api("trackReminderWidgetView",()=>{this.logger.info("trackReminderWidgetView request successful")},()=>{this.logger.error("trackReminderWidgetView request failed")})}trackCloseButtonClick(){ppms.cm.api("trackCloseButtonClick",()=>{this.logger.info("trackCloseButtonClick request successful")},()=>{this.logger.error("trackCloseButtonClick request failed")})}setInitialComplianceSettings(e){ppms.cm.api("setInitialComplianceSettings",e,()=>{this.logger.info("setInitialComplianceSettings request successful")},()=>{this.logger.error("setInitialComplianceSettings request failed")})}getComplianceTypes(){return new Promise((e,o)=>{ppms.cm.api("getComplianceTypes",i=>{this.logger.info("getComplianceTypes request successful"),e(i)},()=>{this.logger.error("getComplianceTypes request failed"),o("getComplianceTypes request failed")})})}getComplianceSettings(){return new Promise((e,o)=>{ppms.cm.api("getComplianceSettings",i=>{this.logger.info("getComplianceSettings request successful"),e(i)},()=>{this.logger.error("getComplianceSettings request failed"),o("getComplianceSettings request failed")})})}setComplianceSettings(e){ppms.cm.api("setComplianceSettings",e,()=>{this.logger.info("setComplianceSettings request successful")},o=>{console.log(o),this.logger.error("setComplianceSettings request failed")})}}class y{constructor(e=1,o="Piwik PRO integration"){this.logLevel=e,this.name=o}isInfoLevel(){return this.logLevel>1}isErrorLevel(){return this.logLevel>0}error(e){this.logLevel>0&&console.error(`${this.name}: ${e}`)}info(e){this.logLevel>1&&console.info(`${this.name}: ${e}`)}}const k=()=>{_paq.push(["setUserIsAnonymous",!0])},S=()=>{_paq.push(["setUserIsAnonymous",!1])};class w{constructor(e){s(this,"cookiebotConsentTypes",["statistics","preferences","marketing"]);s(this,"getConsentTypes",()=>this.cookiebotConsentTypes);s(this,"getConsents",()=>this.getCookiebot().consent);s(this,"cookiebotExists",()=>(this.getCookiebot(),window.Cookiebot!==void 0));s(this,"getHasResponse",()=>{const e=this.getCookiebot();return this.logger.info(`Cookiebot has response: ${e.hasResponse}`),e.hasResponse});s(this,"getConsentNessessary",()=>this.getCookiebot().consent.necessary);s(this,"getConsentPreferences",()=>this.getCookiebot().consent.preferences);s(this,"getConsentStatistics",()=>this.getCookiebot().consent.statistics);s(this,"getConsentMarketing",()=>this.getCookiebot().consent.marketing);s(this,"getConsentMethod",()=>this.getCookiebot().consent.method);s(this,"getConsented",()=>this.getCookiebot().consented);s(this,"getDeclined",()=>this.getCookiebot().declined);s(this,"getDoNotTrack",()=>this.getCookiebot().doNotTrack);s(this,"getGdprApplies",()=>this.getCookiebot().regulations.gdprApplies);s(this,"getCcpaApplies",()=>this.getCookiebot().regulations.ccpaApplies);s(this,"getLgpdApplies",()=>this.getCookiebot().regulations.lgpdApplies);this.logger=e,this.logger=e}getCookiebot(){if(typeof window.Cookiebot>"u"||window.Cookiebot===null||Object.keys(window.Cookiebot).length===0)throw new Error("Cookiebot does not exist. Check that the script has been installed correctly.");return window.Cookiebot}}class v{constructor(e,o,i,t){s(this,"consentsChanged",!1);s(this,"complianceSettings");s(this,"consentMapService");s(this,"cookiebotService");s(this,"consentManagerApi");s(this,"logger");s(this,"prepareComplianceSettings",async()=>{const e=this.cookiebotService.getConsentTypes(),o=this.cookiebotService.getConsents(),i={};return e.forEach(t=>{if(this.consentMapService.hasMapping(t)){const n=o[t]?1:0;this.consentMapService.getMappedConsentTypes(t).forEach(l=>{this.consentManagerApi.hasConsentType(l)&&(i[l]={status:n})})}}),this.setComplianceSetting(i),this.getNewConsents()});s(this,"setComplianceSetting",e=>{this.complianceSettings=e});s(this,"getComplianceSettings",()=>this.complianceSettings);s(this,"setConsentsChanged",e=>{this.consentsChanged=e});s(this,"hasConsentsChanged",()=>this.consentsChanged);s(this,"getNewConsents",async()=>{const e=(await this.consentManagerApi.getComplianceSettings()).consents,o={};if(Object.keys(e).length===0)for(const i in this.complianceSettings){const t=i;this.complianceSettings.hasOwnProperty(t)&&this.complianceSettings[t]&&this.complianceSettings[t].hasOwnProperty("status")&&(this.complianceSettings[t].status>-1?o[t]=this.complianceSettings[t]:o[t]={status:0})}else for(const i in this.complianceSettings){const t=i;this.complianceSettings.hasOwnProperty(t)&&this.complianceSettings[t]&&this.complianceSettings[t].hasOwnProperty("status")&&e[t]&&e[t].hasOwnProperty("status")&&this.complianceSettings[t].status!==e[t].status&&(this.complianceSettings[t].status>-1?o[t]=this.complianceSettings[t]:o[t]={status:0})}return this.complianceSettings,Object.keys(o).length>0?{...this.complianceSettings,...o}:o});this.consentMapService=e,this.cookiebotService=o,this.consentManagerApi=i,this.complianceSettings=i.getDefaultSettingConsents().consents||{},this.logger=t}}class A{constructor(e){s(this,"mapping");s(this,"getMappedConsentTypes",e=>Object.values(this.mapping[e]));s(this,"hasMapping",e=>e in this.mapping);this.mapping=e}}class O{constructor(e){s(this,"createEvent",(e,o)=>{if(!window){this.logger.error("Window is not available");return}window.addEventListener(e,o,!1)});this.logger=e}}window._paq||(window._paq=[]);const T=async(c,e)=>{const o=new y(e),i=new A(c),t=new b(o),n=new w(o),g=new v(i,n,t,o),l=new O(o),p=async()=>{o.info("Start processing consents");const a=n.getHasResponse();if(n.getConsentStatistics()?S():k(),!a){const m=await t.getComplianceTypes();t.setInitialComplianceSettings(m);return}const r=await g.prepareComplianceSettings();Object.keys(r).length>0&&t.setComplianceSettings({consents:r})},u=(a,r)=>a?a.closest?a.closest(r):(a.tagName||"").toLowerCase()===r.toLowerCase()?a:u(a.parentNode,r):null,C=()=>{l.createEvent("click",function(a){o.info("Click event fired");const r=u(a.target,"button");if(r)switch(r.getAttribute("id")){case"CookiebotWidget-btn-withdraw":case"CybotCookiebotDialogBodyButtonDecline":t.trackRejectAllClick(),k();return;case"CybotCookiebotDialogBodyLevelButtonLevelOptinAllowallSelection":t.trackSaveChoicesClick();return;case"CybotCookiebotDialogBodyLevelButtonLevelOptinAllowAll":t.trackAgreeToAllClick();return;default:r.className&&(r.className.indexOf("CookiebotWidget-logo")>-1&&t.trackReminderWidgetView(),r.className.indexOf("CookiebotWidget-close")>-1&&t.trackCloseButtonClick())}}),l.createEvent("CookiebotOnConsentReady",async()=>{o.info("CookiebotOnConsentReady event fired"),await p()}),l.createEvent("CookiebotOnDialogDisplay",()=>{o.info("CookiebotOnDialogDisplay event fired"),t.trackMainFormView()}),l.createEvent("CookiebotOnTagsExecuted",async()=>{o.info("CookiebotOnTagsExecuted event fired"),await p()})},h=async()=>{await p()};C(),setTimeout(async()=>{try{await h()}catch{o.error("Cookiebot not ready")}},500)};
T(
  {
    statistics: ["analytics"],
    preferences: ["ab_testing_and_personalization"],
    marketing: ["marketing_automation", "remarketing", "conversion_tracking"],
  },
  2,
);
</script>
9. In Tag code, paste the code from step 8.
Note: If you want to fire custom tags in Tag Manager that should run without consent, you need to add the following attributes to the tag’s code:
<script type="text/javascript" data-cookieconsent="ignore"></script>For more details, see the Cookiebot documentation.
10. In Consent type, set the following type: No consent is required.
11. Click Choose existing trigger.
12. Pick the following trigger: All page views.
13. Click Add a tag.
14. Test your tag in debug mode.
15. When you’re happy with how the tag works, click Publish.
16. All done! Now tags in Piwik PRO will fire when the consent assigned to them is given on your Cookiebot consent form. If we look at our default code, the integration will work like this:
| A visitor consents on your Cookiebot form | Piwik PRO fires tags with this consent type |
|---|---|
| Statistics | Analytics |
| Preferences | A/B testing and personalization |
| Marketing | Conversion tracking
Marketing automation
Remarketing |
Optional: Customize your consent mapping
You may need to adjust the consent mapping to your needs. Here’s what you need to know about mapping. But before you do this, it’s important to understand the differences in consent types between the two products.
Consent types in Piwik PRO
In Piwik PRO, consent types are used to determine whether a specific tag (such as a tracking or marketing tag) should be fired for a visitor. If a tag requires the Analytics consent, it will only be activated for visitors who have given their consent for Analytics. This allows you to control which tags are activated for which visitors, based on their consent preferences.
Here’s a list of consent types in Piwik PRO.
| Name | API | Description in UI |
|---|---|---|
| Analytics | “analytics” | We’ll collect information about your visit to our site. It helps us understand how the site is used –– what’s working, what might be broken and what we should improve. |
| A/B testing and personalization | “ab_testing_and_personalization” | We’ll use your data to customize our site to your needs. We’ll show you more relevant content and carry out A/B tests. |
| Conversion tracking | “conversion_tracking” | We’ll use your data to measure how effective our ads and on-site campaigns are. |
| Marketing automation | “marketing_automation” | We’ll use your data to send you more relevant email or text message campaigns. We’ll also use it to exclude you from campaigns that you might not like. |
| Remarketing | “remarketing” | We’ll use your data to show you more relevant ads on other sites and social media. We’ll use it to measure how effective our ads are. We’ll also use it to exclude you from campaigns that you might not like. |
| User feedback | “user_feedback” | We’ll use your data to learn how our user interface is working. It’ll help us to improve our site for all users. |
| Custom consent | “custom_consent” |
You can set an additional consent type here. In Tag Manager, it’ll be still called: Custom consent. |
| No consent is required | – | – Note: It’s the type you can use for tags that don’t collect data. For example, tags that add a popup or content, or tags that change the look of your site. |
Consent types in Cookiebot
Here’s a list of consent types in Cookiebot.
| Name | API |
|---|---|
| Statistics | “statistics” |
| Preferences | “preferences” |
| Marketing | “marketing” |
Once you know what the consent types in each product are, you can decide to map them. Below you can find the list of parameters the integration supports along with the consent map variable.
consentMap (object, required)
An object that accepts consent IDs from Cookiebot as keys and a list of consent IDs from Piwik PRO as values. For the values, you need to use the API names for the consent types, not the names from the UI. Example: 'analytics'.
options (object, optional)
An object containing the options used by the integration. List of options:
- logLevel (integer, optional)
The integration will display the required level of information and error messages in the browser console. Possible values: 0 (displays nothing), 1 (displays errors), 2 (displays errors and successful requests). Default value: 1. - consentDetectionType (string, optional)
This option lets you choose whether to detect consent changes using an API or a cookie. The cookie is more reliable, but adds performance overhead to the website. Possible values:'api','cookie'. Default value:'api'.
An example of mapped consent types
<script>
  	(function(consentMap, options) {...})
        ({
	   statistics:["analytics"],
	   preferences:["ab_testing_and_personalization"],
	   marketing:["marketing_automation","remarketing","conversion_tracking"]
          },2)
</script>