The Piwik PRO Model Context Protocol (MCP) server lets you connect Claude Desktop to your Piwik PRO account. You can ask Claude Desktop to work with your Piwik PRO data using natural language. For example, you can query analytics data, manage tags, work with goals, and set up data collection.
In this article, we’ll show you how to install Piwik PRO MCP server in Claude desktop on macOS, Windows, and Linux.
Note: The Piwik PRO MCP server is currently available as a beta version.
Before you start
Here are some things to know before you start:
- You need a Piwik PRO account.
- You need API credentials:
- Client ID
- Client secret
- You need Claude Desktop installed on your computer.
- Choose one installation method:
- uv: Recommended. Use it to install and run the Piwik PRO MCP server.
- Docker: Use it to run the Piwik PRO MCP server in a container.
- Claude desktop stores MCP server settings in a JSON configuration file. You’ll need to edit this file to connect Claude Desktop with the Piwik PRO MCP server.
Note: For setup options, configuration details, and source code, see:
Generate API credentials in Piwik PRO
To connect Claude Desktop with your Piwik PRO account, generate API credentials by following these steps:
1. Log in to Piwik PRO.
2. Go to Menu > Your email address.
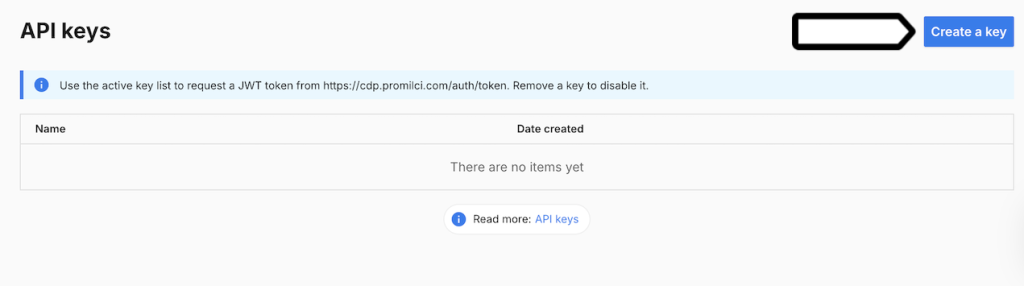
3. On the left, click API keys.
4. Click Create a key.
Note: Credentials are valid until you delete them in your profile.
5. Name your key and click OK.
6. Copy Client ID and Client secret. They won’t be available after you close this window.
Note:
- You’ll use these values later in the Claude Desktop configuration file.
- You’ll also need your Piwik PRO account address, for instance,
example.piwik.pro
Install uv on macOS or Linux
To install uv on macOS or Linux, follow these steps:
1. Open Terminal.
2. Run this command: curl -LsSf https://astral.sh/uv/install.sh | sh
3. Wait until the installation is finished.
Install uv on Windows
To install uv on Windows, follow these steps:
1. Open PowerShell.
2. Run this command:
powershell -ExecutionPolicy ByPass -c "irm https://astral.sh/uv/install.ps1 | iex"3. Wait until the installation is finished.
4. Check if uv is installed by running this command: uv --version
When the command returns a version number, it means uv is installed.
Tip: If your system doesn’t recognize the command, restart your terminal or computer and try again.
Open Claude Desktop configuration file
To open the configuration file from Claude Desktop, follow these steps:
1. Open Claude Desktop.
2. Go to Settings.
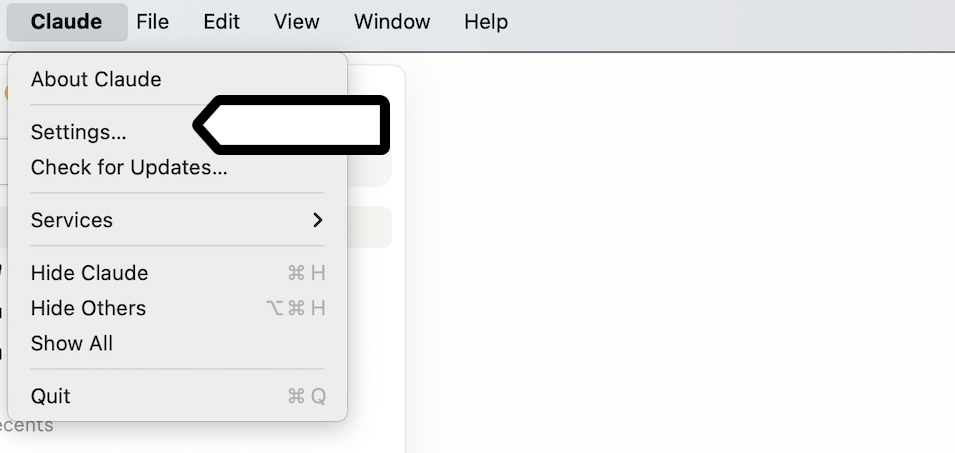
3. Open Developer.
4. Click Edit Config.

The Claude desktop will open the folder with the configuration file.
You can also open the file manually.
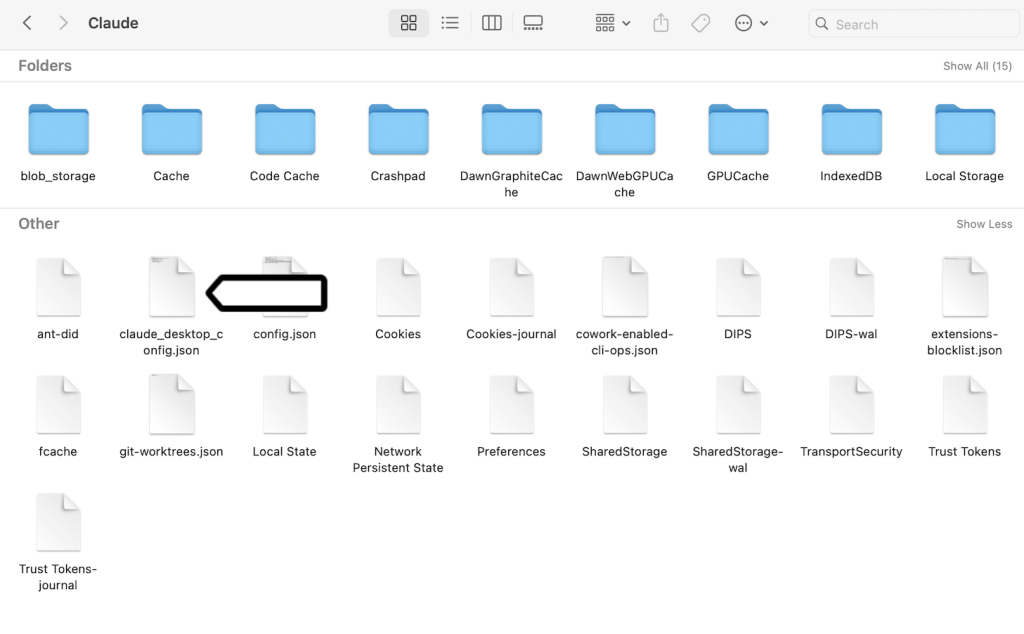
Configuration file locations
macOS:
~/Library/Application Support/Claude/claude_desktop_config.jsonWindows:
%APPDATA%\Claude\claude_desktop_config.jsonLinux:
~/.config/Claude/claude_desktop_config.jsonAdd the Piwik PRO MCP server configuration
To add the Piwik PRO MCP server to Claude Desktop, follow these steps:
1. Open claude_desktop_config.json.
2. Add the following configuration:
{
  "mcpServers": {
    "piwik-pro-analytics": {
      "command": "uvx",
      "args": ["piwik-pro-mcp"],
      "env": {
        "PIWIK_PRO_HOST": "ACCOUNT.piwik.pro",
        "PIWIK_PRO_CLIENT_ID": "YOUR_CLIENT_ID",
        "PIWIK_PRO_CLIENT_SECRET": "YOUR_CLIENT_SECRET"
      }
    }
  }
}
3. Replace:
ACCOUNT.piwik.prowith your Piwik PRO account address.YOUR_CLIENT_IDwith your Client ID.YOUR_CLIENT_SECRETwith your Client secret.
Restart Claude Desktop
To apply the changes, follow these steps:
1. Fully close Claude Desktop.
2. Open Claude Desktop again.
Note: Closing only the app window may not fully close Claude Desktop. Make sure the app is fully closed before you open it again.
Test the setup
To check if Claude Desktop can connect to the Piwik PRO MCP server, follow these steps:
1. Open a new chat in Claude Desktop.
2. Ask a question related to your Piwik PRO account, for example: “Show my websites in Piwik PRO” or “List available analytics tools.”
If the setup works, Claude Desktop shows the tools provided by the Piwik PRO MCP server.
Optional: Store credentials in a separate file
You can store your credentials in a separate .env file instead of adding them directly to claude_desktop_config.json.
This helps keep sensitive values separate from the main Claude Desktop configuration file and makes them easier to update later.
Create the environment file
To create the environment file, follow these steps:
1. Create a file named: .piwik-pro-mcp.env
2. Add these environment variables:
PIWIK_PRO_HOST=ACCOUNT.piwik.pro
PIWIK_PRO_CLIENT_ID=YOUR_CLIENT_ID
PIWIK_PRO_CLIENT_SECRET=YOUR_CLIENT_SECRET
3. Replace:
ACCOUNT.piwik.prowith your Piwik PRO account address.YOUR_CLIENT_IDwith your Client ID.YOUR_CLIENT_SECRETwith your Client secret.
4. Save the file in a secure location.
Update Claude Desktop configuration
To use the .env file, follow these steps:
1. Replace the previous configuration with this one:
{
  "mcpServers": {
    "piwik-pro-analytics": {
      "command": "uvx",
      "args": [
        "piwik-pro-mcp",
        "--env-file",
        "/absolute/path/to/.piwik-pro-mcp.env"
      ]
    }
  }
}
2. Replace: /absolute/path/to/.piwik-pro-mcp.env with the full path to your .env file.
3. Save the file.
4. Restart Claude Desktop.
Security best practices
Connecting Claude Desktop to Piwik PRO gives the AI assistant access to your Piwik PRO environment through MCP tools. Depending on your setup and permissions, Claude Desktop may be able to view analytics data, manage tags, change settings, or perform other actions in your account.
AI assistants work with natural language prompts, so they can sometimes perform actions you didn’t intend. For example, they could:
- Run an action for the wrong site.
- Change tags or settings by mistake.
- Publish unfinished changes.
- Access data that should stay restricted.
To reduce these risks, use safe configuration options and limit access to only what’s needed.
Keep safe mode enabled
By default, the Piwik PRO MCP server runs in safe mode.
In safe mode, tools that can change your setup are blocked. This includes actions like:
- Editing resources
- Deleting resources
- Publishing tags and changes
If you turn off safe mode, all MCP tools become available, including tools that can change your Piwik PRO setup.
The safe mode can be disabled by adding PIWIK_PRO_SAFE_MODE=0 to the configuration. Here is a complete example:
{
  "mcpServers": {
    "piwik-pro-analytics": {
      "command": "uvx",
      "args": ["piwik-pro-mcp"],
      "env": {
        "PIWIK_PRO_HOST": "ACCOUNT.piwik.pro",
        "PIWIK_PRO_CLIENT_ID": "YOUR_CLIENT_ID",
        "PIWIK_PRO_CLIENT_SECRET": "YOUR_CLIENT_SECRET",
	 "PIWIK_PRO_SAFE_MODE": 0
      }
    }
  }
}
Recommendation: Keep safe mode enabled unless you need advanced management options.
Control tool permissions in Claude Desktop
Most MCP clients, including Claude desktop and Cursor, let you decide how tools can be used.
You can usually set tools to:
- Run automatically
- Ask for approval before each use
- Stay blocked

This gives you another layer of control outside the MCP server.
For example, you can:
- Let read-only analytics tools run automatically.
- Require approval for configuration changes.
- Block tools that publish or edit changes.
Recommendation: Require approval for all tools that can change your setup or publish updates.
Use a dedicated Piwik PRO user for MCP access
We recommend creating a separate Piwik PRO user account only for MCP access. This helps limit the impact of accidental or unwanted actions.
To set up a dedicated user, follow these steps:
1. Create a dedicated Piwik PRO user account.
2. Generate API credentials for that account.
3. Assign only the permissions needed for your use case.
For example, you can:
- Create a read-only account for analytics queries.
- Give access only to Tag Manager.
- Restrict access to selected sites or apps.
- Use a test environment instead of a production site.
Recommendation: Grant only the minimum permissions needed.
Install with Docker instead of uv
You can also run the Piwik PRO MCP Server with Docker.
Before you start
Install Docker Desktop: Docker Desktop download page.
Add the Docker configuration
To run the MCP server with Docker, follow these steps:
1. Open claude_desktop_config.json.
2. Add this configuration:
{
  "mcpServers": {
    "piwik-pro-analytics": {
      "command": "docker",
      "args": [
        "run",
        "-i",
        "--rm",
        "ghcr.io/piwikpro/mcp:latest"
      ],
      "env": {
        "PIWIK_PRO_HOST": "ACCOUNT.piwik.pro",
        "PIWIK_PRO_CLIENT_ID": "YOUR_CLIENT_ID",
        "PIWIK_PRO_CLIENT_SECRET": "YOUR_CLIENT_SECRET"
      }
    }
  }
}
3. Replace:
ACCOUNT.piwik.prowith your Piwik PRO account address.YOUR_CLIENT_IDwith your Client ID.YOUR_CLIENT_SECRETwith your Client secret.
4. Save the file.
5. Restart Claude Desktop.
Troubleshooting
If the Piwik PRO MCP server doesn’t work as expected, check the common issues below. Most problems are caused by an invalid configuration file, missing credentials, or Claude Desktop not fully restarting.
The Claude desktop doesn’t show MCP tools
If Claude Desktop doesn’t show MCP tools, check the following:
- Claude desktop was fully restarted
- The JSON configuration is valid
- Your Client ID and Client secret are correct
- Your internet connection is active
You can also check Claude Desktop logs. To open them, go to Settings > Developer > Logs.
You see a ‘Command not found’ error
The Claude Desktop may not find uvx automatically. To fix this, use the full path to the executable.
macOS and Linux
To find the path, run this command: which uvx
Example result: /usr/local/bin/uvx
Use this path in the configuration: "command": "/usr/local/bin/uvx"
Windows
To find the path, run this command in PowerShell: where uvx
Example result: C:\Users\YourName\.local\bin\uvx.exe
Use this path in the configuration.
You see an invalid JSON error
The configuration file must contain valid JSON.
Common problems include:
- Missing commas
- Extra commas
- Missing quotation marks
- Incorrect brackets
Tip: You can use a JSON validator to check the file.