Setting up a custom domain allows you to host Piwik PRO on a URL that matches your company’s branding, such as example.yourdomain.com. A custom domain enhances trust and helps you maintain your brand identity.
This guide explains how to add and set up a custom domain in Piwik PRO.
Before you start
Here are some important things to keep in mind before you start:
- You need owner permission to add and use a custom domain in Menu > Administration > Account > Domains > Default setup.
- To add a new custom domain, you have to set your DNS record properly. Your domain must point to a CNAME record
{organization}.piwik.pro. Remember that DNS propagation may take up to 24 hours. Here are some examples on how to do it: on Azure, or on AWS. - You need edit & publish permission to a site or app to set up a custom domain per site or app.
- Ensure your domain certificate is up to date and will not expire anytime soon. Remember to check the expiration date and update the certificate before it expires to avoid any impact on data collection. Read more
- Decide what purpose your custom domain will serve. For example: hosting the tool, tracking resources, or acting as the URL for your Piwik PRO account and API endpoints.
Add a custom domain
Note: You need owner permission to add and use a custom domain in the default setup.
To add a new custom domain, follow these steps:
1. Log in to Piwik PRO.
2. Go to Menu > Administration.
3. Navigate to Account.
4. In Domains, find the Domains list.
5. Click +Add a domain.

6. In Add a domain window, fill out the fields. You have to enter the domain name and, optionally, define what you want to use it for. You also have to upload a certificate chain and a private key.
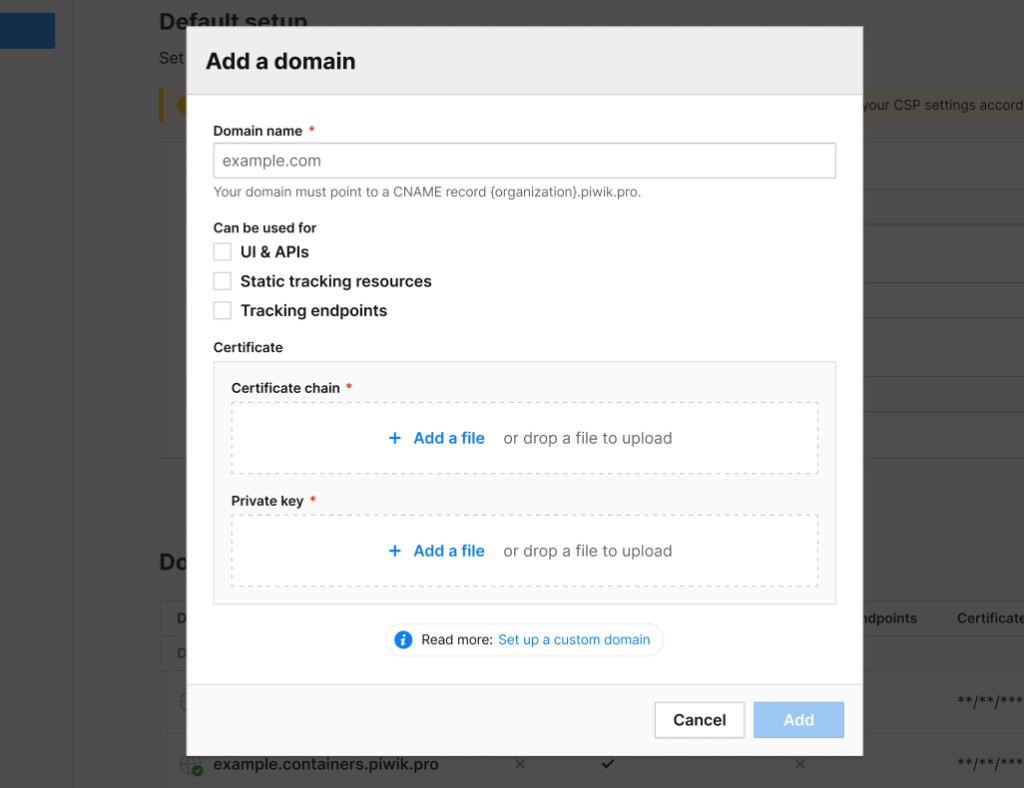
Note: Your domain name must point to a DNS CNAME record. Make sure the leaf certificate (your main certificate) is listed first in the file. The certificate chain must be in PEM format (with .pem, .crt, or .cer extensions). The private key must be in PEM format (with .pem or .key extensions), encoded using PKCS#8.
7. Click Add.
Note: Remember to check your certificate’s expiration date and update it before it expires to avoid any impact on data collection. Read more
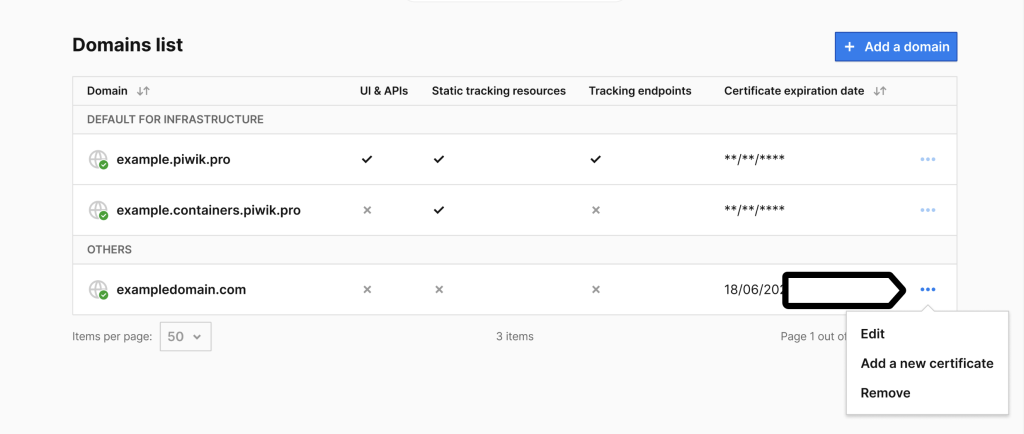
8. After successfully adding a new domain, you should see it on your Domains list.
9. If you want to edit it, add a new certificate or remove the domain, click the three-dot ⋯ icon.
Note: The processing of your newly added domain may take some time. Check back to confirm that the domain was added successfully.
You can add up to 10 new custom domains.
Use your custom domain in default setup
Note: This setup applies to all sites and apps unless you change these settings per site or app. You can read more about how to set it up per site or app in the next section of this article.
You need owner permission to add and use a custom domain in the default setup.
To use your custom domain in default setup, follow these steps:
1. Log in to Piwik PRO.
2. Go to Menu > Administration.
3. Navigate to Account.
4. In Domains, find the Default setup.
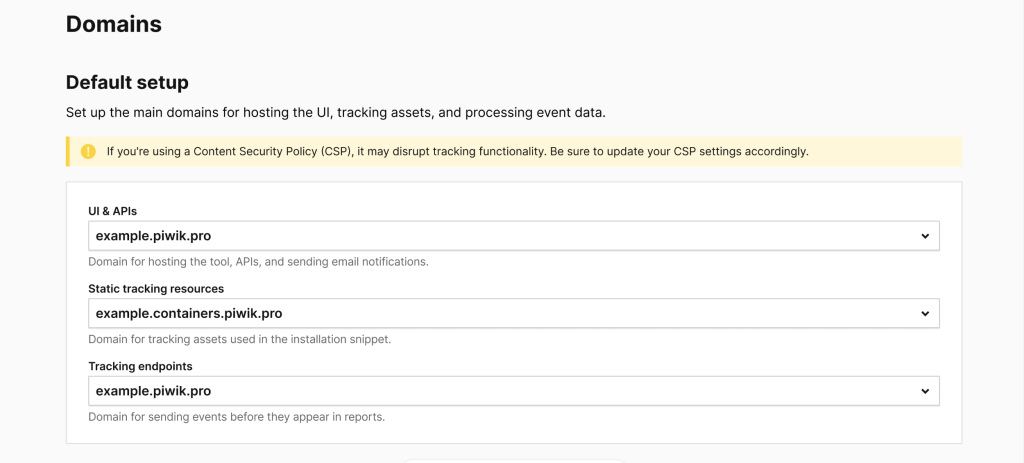
5. Here you can decide which custom domain to use in your default setup by choosing its name from the dropdown list.
You can choose to use your custom domain for:
- UI and APIs – it will be used for hosting the tool, APIs, and sending email notifications.
- Static tracking resources – it will be used for tracking assets used in the installation snippet. Just be careful, changing the default domain for static tracking resources requires updating the tracking snippets on all pages where they are installed.
- Tracking endpoints – it will be used for sending events to your Piwik PRO account.
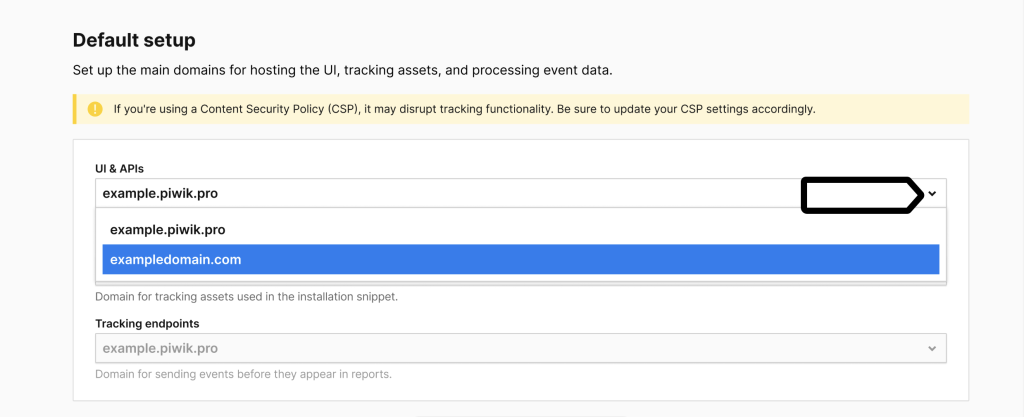
Note: If you can’t see your custom domain on the dropdown list, make sure you’ve marked that it can be used for this type of the setup and that it has a valid certificate. On the Domains list, the checkmarks show what each domain can be used for. Only domains marked for a specific purpose (e.g., UI & APIs) will appear in the dropdown menu in the Default setup.
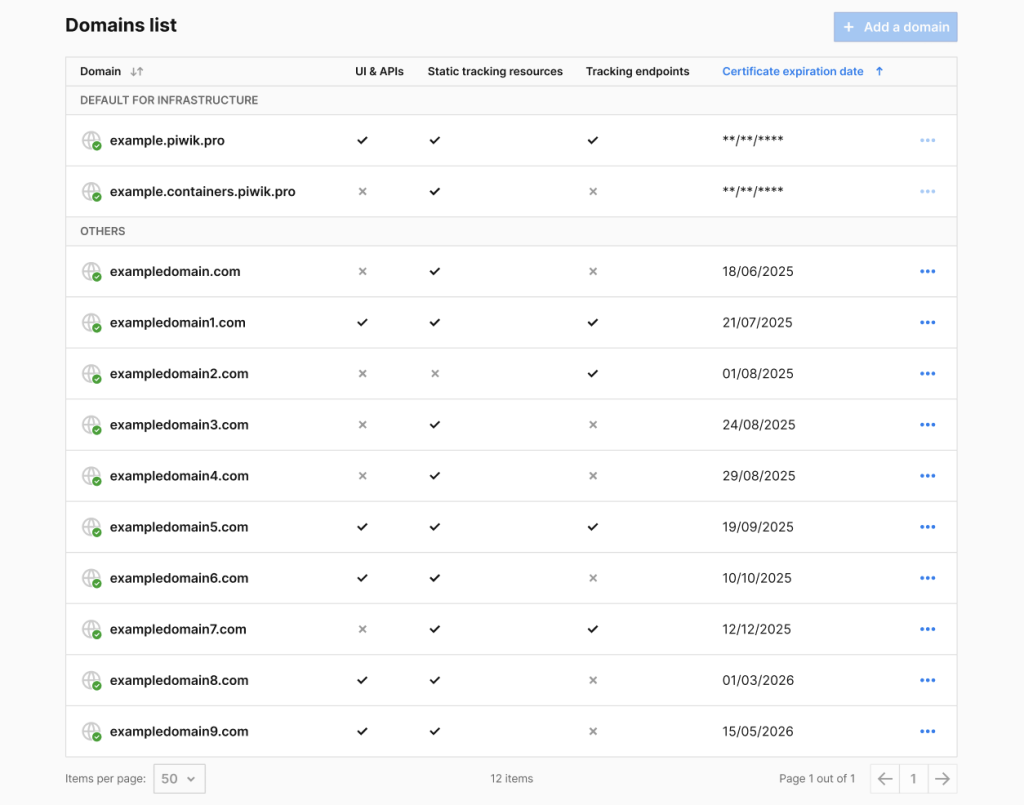
You can add a new certificate, edit, or remove your custom domain by clicking the three-dot ⋯ icon next to its name.
6. Done! You’ve successfully set up your custom domain in the default setup.
Note: Remember, you can always switch back to the default domains for your account.
Set up a custom domain per site or app
Note: You need at least edit & publish permission to a site or app to set up a custom domain per site or app.
To set up a custom domain per site or app, follow these steps:
1. Log in to Piwik PRO.
2. Go to Menu > Administration.
3. Navigate to Sites or apps.
4. Choose a site or app from the list.
5. In Data collection, navigate to Domains.
6. In Domains setup, click Edit.
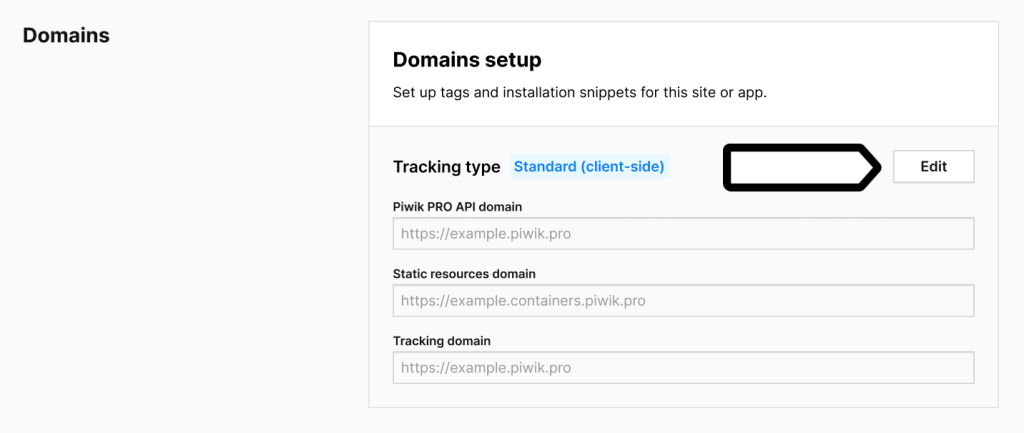
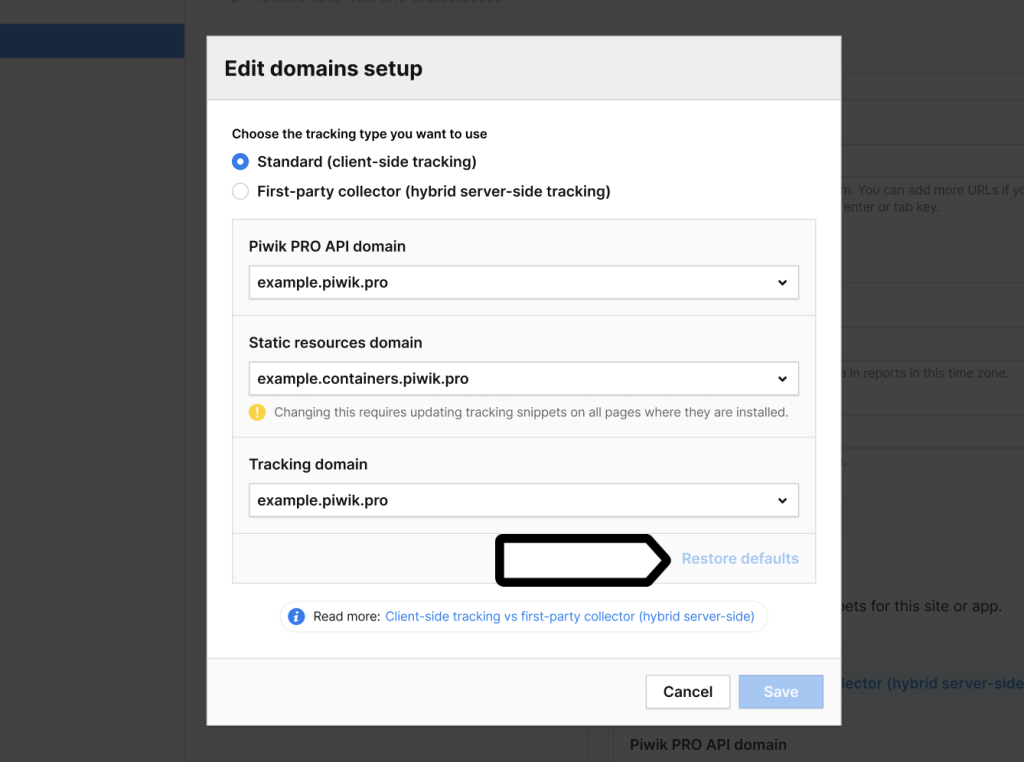
7. Choose the tracking type you want to use. You can choose from Standard (client-side tracking) and First-party collector (hybrid server-side tracking). Read more
8. If you choose a Standard (client-side tracking) tracking type, you have to decide which custom domains you want to use for this site or app and choose their names from the dropdown lists.
Note: If you can’t see your custom domain on the dropdown list, make sure you’ve marked that it can be used for this setup in Administration > Account > Domains.
You can choose to use your custom domain for:
- Piwik PRO API domain – it will be used for querying visitor audiences from your site or app.
- Static resources domain – it will be used for tracking assets used in the installation snippet. Just be careful, changing the default domain for static resources domain requires updating the tracking snippets on all pages where they are installed.
- Tracking domain– it will be used for sending events to your Piwik PRO account.
Remember, you can always switch back to the default domains set for your account in Administration > Account > Domains > Default setup by clicking Restore defaults in the Edit domains setup.
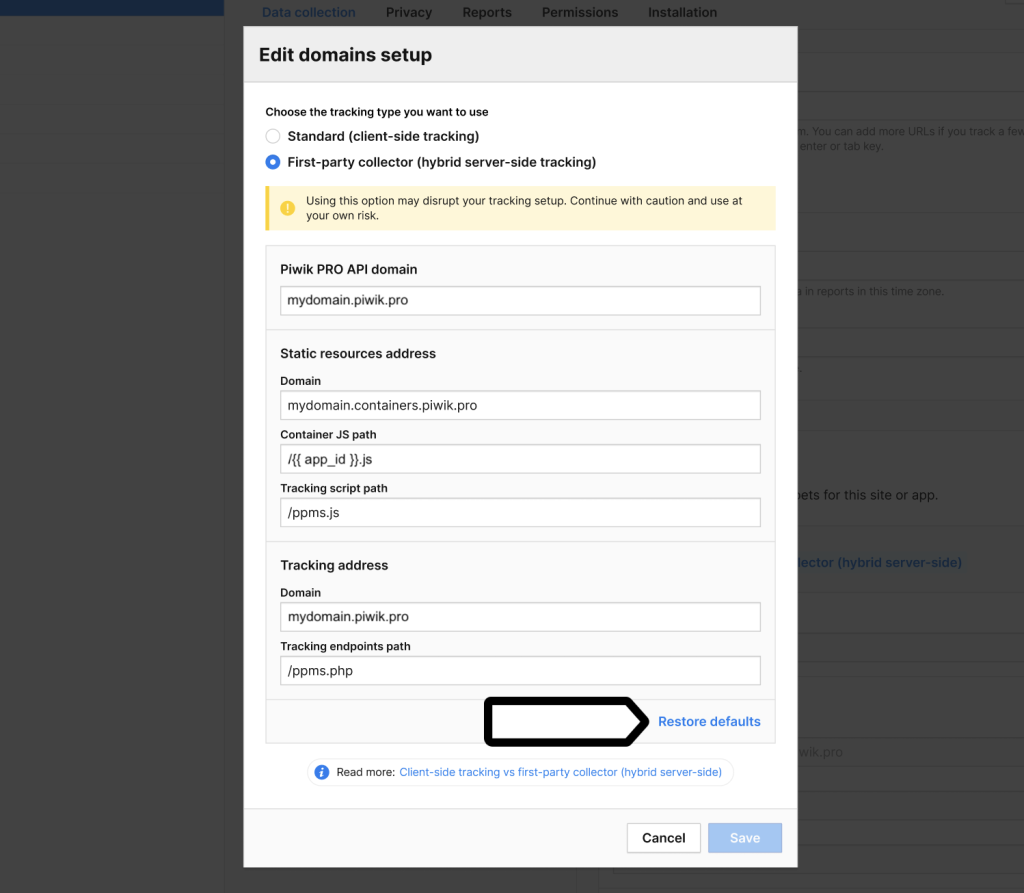
9. If you choose a First-party collector (hybrid server-side tracking) tracking type, you have to fill in the following fields: Piwik PRO API domain, Static resources address and Tracking address. Read more
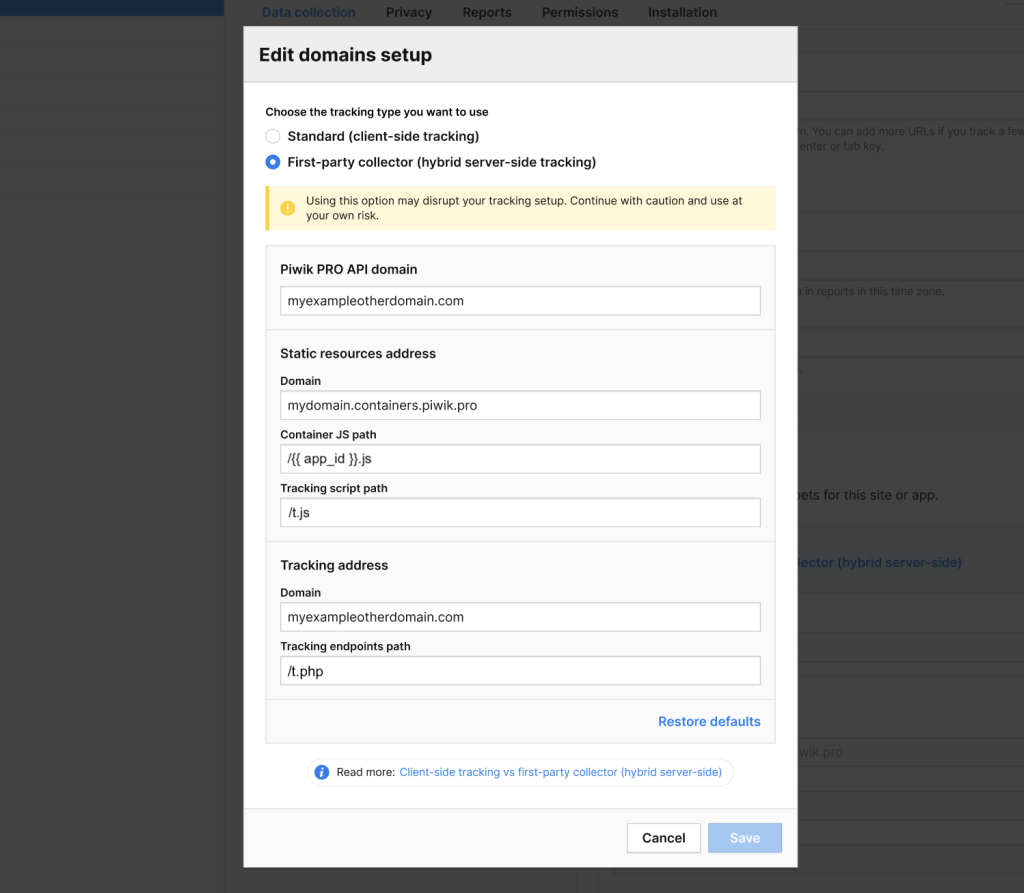
Note: Using this option may disrupt your tracking setup. Continue with caution and use at your own risk.
Remember, you can always switch back to the default domains set for your account in Administration > Account > Domains > Default setup by clicking Restore defaults in the Edit domains setup. Then, these paths will also be restored to the following settings:
- Container JS path:
/{{ app_id }}.js - Tracking script path:
/ppms.js - Tracking endpoints path:
/ppms.php
10. Click Save.
11. Done! You’ve successfully set up a custom domain per your site or app.