A first-party collector lets you collect data hybrid server-side. This method sends data from a visitor’s browser to your own server and then to your Piwik PRO account using a reverse proxy. With this approach, you are able to (1) have the same tracking domain as your website, (2) optionally use subdomains as tracking endpoints and (3) have the first-party tracking solution.
In this article, we’ll walk you through the process of adding a site or app in Piwik PRO and setting up the first-party collector.
Before you start
Here are some key things to know before you begin the process:
- If you use both Matomo and Piwik PRO, make sure that there’s no conflict between the tracking codes. Read more
- You’ll need to repeat the reverse proxy setup for each site you want to track with the first-party collector – even if you use the same tracking code for a few sites. The same reverse proxy setup can’t be used for multiple sites.
- You’ll need to update your Content Security Policy (CSP) configuration if you use CSP. After setting up the first-party collector, you may be able to remove some Piwik PRO domains from the CSP allowlist.
- Installing the first-party collector will cause the following paths on your website to be forwarded to Piwik PRO:
/t.js,/t.php,/containers/,/consent/and/api/cdp/. Make sure your website is not using them before installation. If it does, it may lead to issues on the site. You can modify the paths according to your needs. If you have any doubts about how to do this, contact us. - Learn more about the differences between client-side and hybrid server-side tracking. Read more
- The first-party collector is only available in Enterprise plans and versions +16.0.0.
Add a site or app in Piwik PRO
If you haven’t yet created a site or app in Piwik PRO, this is the step you need to take before installing the first-party collector.
To add a site or app in Piwik PRO, follow these steps:
1. Go to Menu > Administration.
2. Navigate to Sites & apps.
3. Click Add a site or app.
4. Type the site or app name and address and click Save.
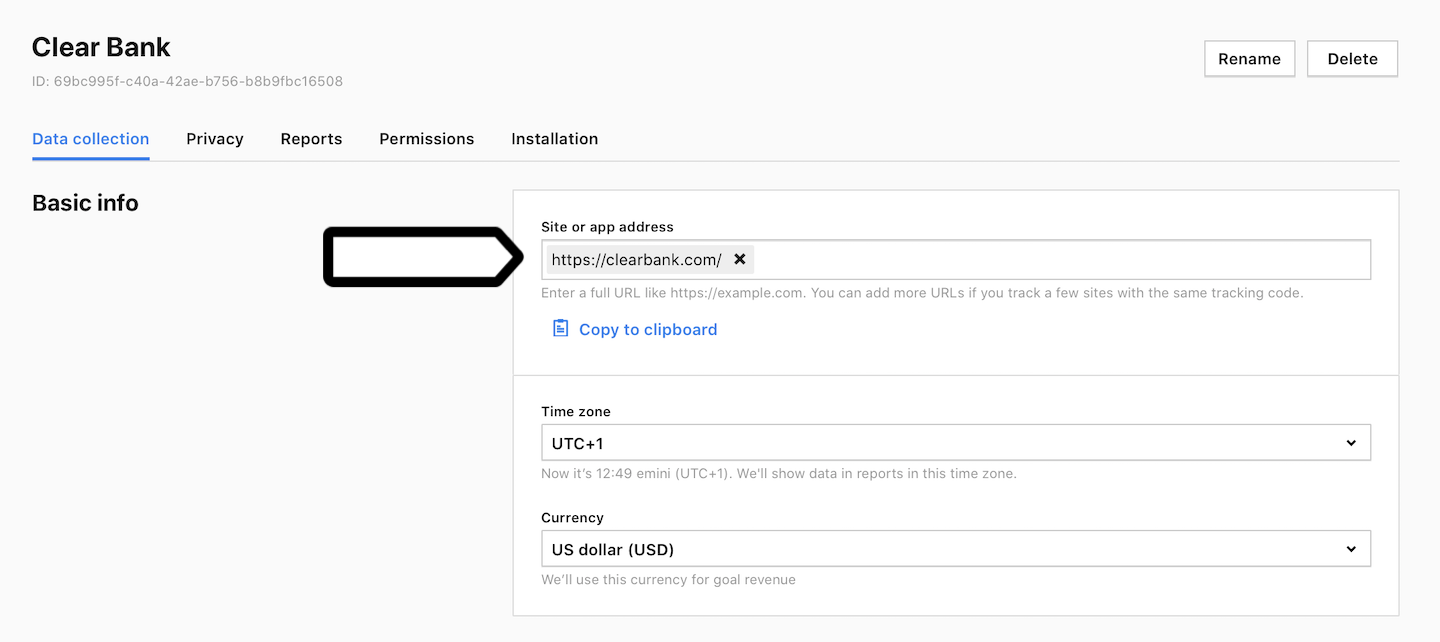
Note: If you want to track a few domains with the same tracking code, add their addresses. Just keep in mind that you’ll need to add these domains to your custom tracking code and set up a reverse proxy for each domain separately.
5. Set the time zone and currency.
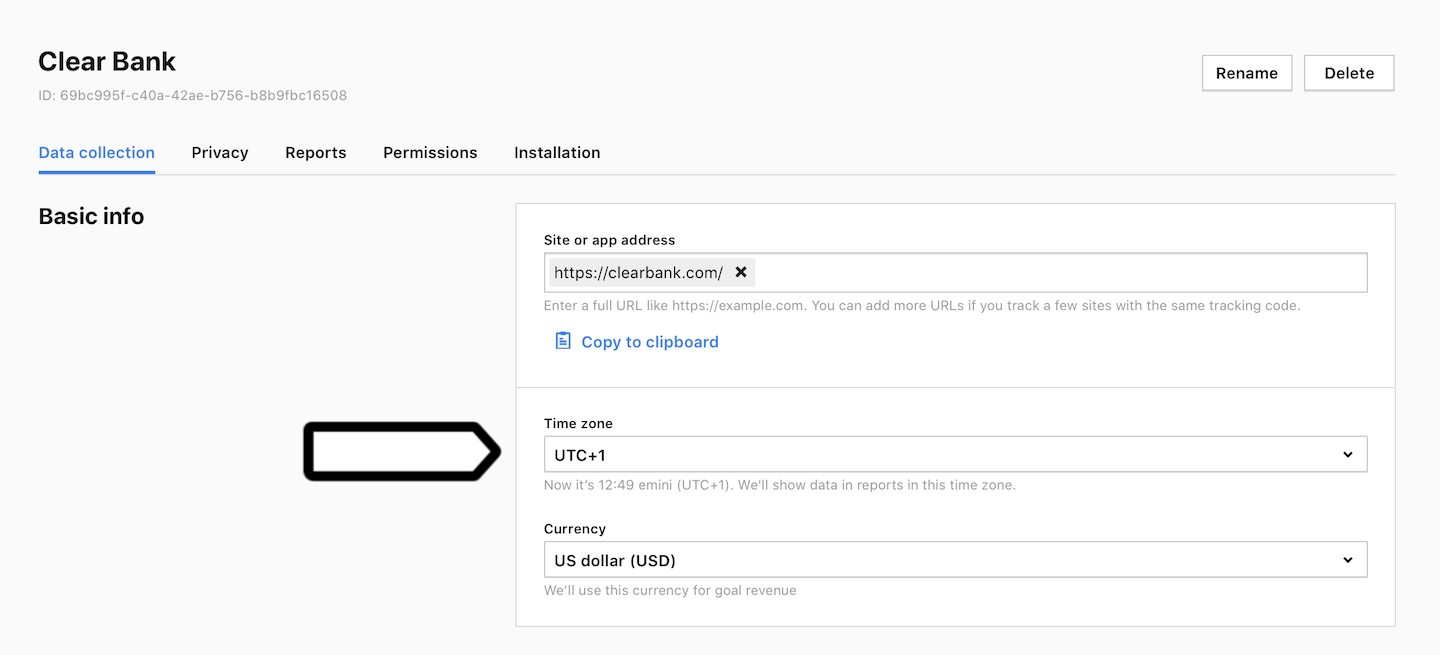
Note: We’ll show data in reports in this time zone. We’ll use this currency for goal revenue.
6. That’s done! Now let’s move on to adding a domain using first party collector tracking type.
Add a domain using first-party collector (hybrid server-side) tracking type
To add a domain in Piwik PRO using first-party collector tracking type, follow these steps:
1. Log in to Piwik PRO.
2. Go to Menu > Administration.
3. Navigate to Sites or apps.
4. Choose a site or app from the list.
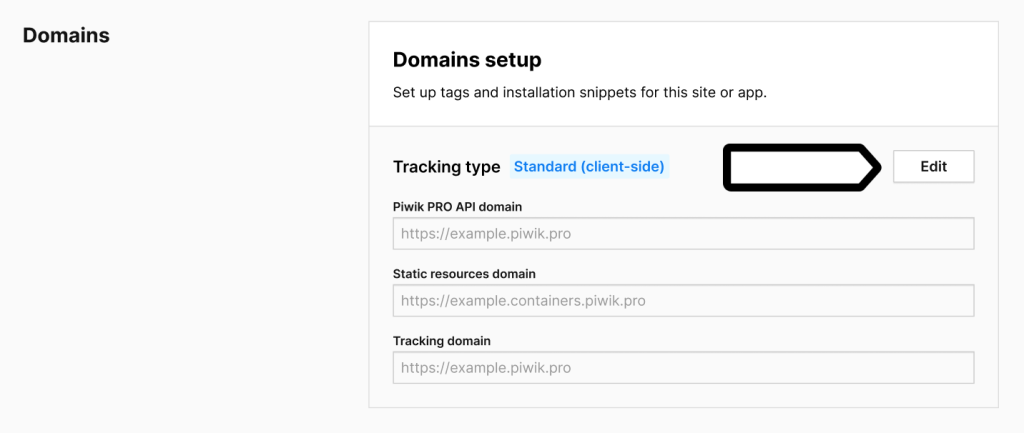
5. In Data collection, navigate to Domains.
6. In Domains setup, click Edit.
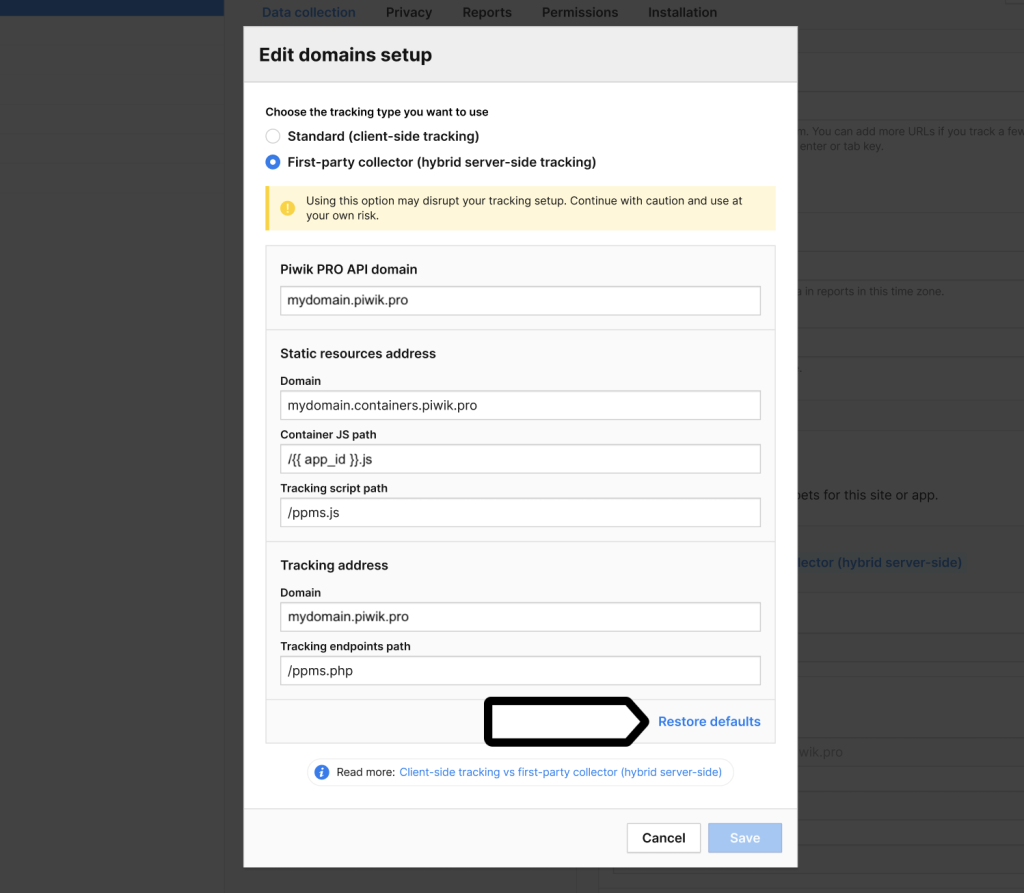
7. Choose the First-party collector (hybrid server-side tracking).
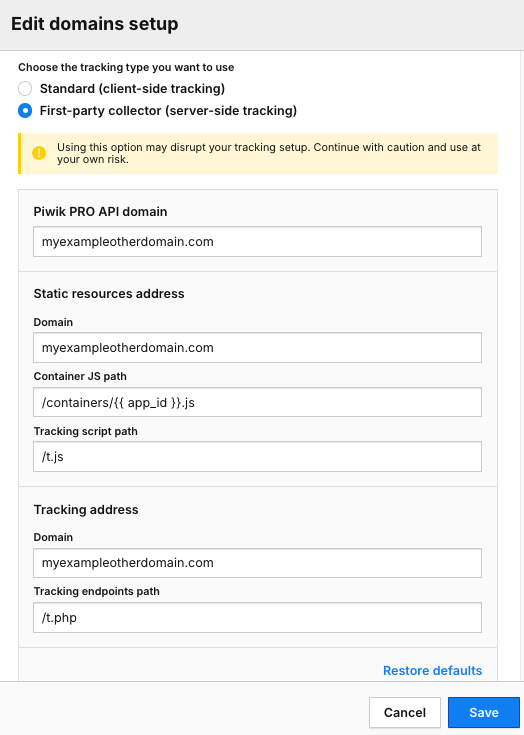
8. Fill in the following fields: Piwik PRO API domain, Static resources address and Tracking address:
- Piwik PRO API domain – it will be used for querying visitor audiences from your site or app.
- Static resources address – it will be used for tracking assets used in the installation snippet. Just be careful, changing the default domain for static resources domain requires updating the tracking snippets on all pages where they are installed.
- Tracking address – it will be used for sending events to your Piwik PRO account.
Note: Using this option may disrupt your tracking setup. Continue with caution and use at your own risk.
Remember, you can always switch back to the default domains set for your account in Administration > Account > Domains > Default setup by clicking Restore defaults in the Edit domains setup. Then, these paths will also be restored to the following settings:
- Container JS path:
/{{ app_id }}.js - Tracking script path:
/ppms.js - Tracking endpoints path:
/ppms.php
9. Note the Tracking script path and Tracking endpoints path, you will need them later, during setting up reverse proxy.
10. Click Save.
11. That’s done! Now, let’s move on to setting up your reverse proxy in Apache or Nginx.
Set up your reverse proxy
To set up your reverse proxy in Apache or Nginx, follow these instructions:
Apache reverse proxy (method 1)
First, enable the following modules: proxy, proxy_http, headers, ssl and set SSLProxyEngine on.
In the code below, replace accountname.piwik.pro with your account name, and add the code to your Apache main configuration file:
# Modules required by PiwikPRO reverse proxy
  <IfModule !proxy_module>
      LoadModule proxy_module modules/mod_proxy.so
  </IfModule>
  <IfModule !proxy_http_module>
      LoadModule proxy_http_module modules/mod_proxy_http.so
  </IfModule>
  <IfModule !headers_module>
      LoadModule headers_module modules/mod_headers.so
  </IfModule>
  <IfModule !ssl_module>
      LoadModule ssl_module modules/mod_ssl.so
  </IfModule>

  # PiwikPRO reverse proxy definitions
  <IfModule proxy_http_module>
      ProxyPass "/t.js" "https://accountname.piwik.pro/ppms.js"
      ProxyPassReverse "/t.js" "https://accountname.piwik.pro/ppms.js"

      ProxyPass "/t.php" "https://accountname.piwik.pro/ppms.php"
      ProxyPassReverse "/t.php" "https://accountname.piwik.pro/ppms.php"

      ProxyPass "/containers/" "https://accountname.piwik.pro/containers/"
      ProxyPassReverse "/containers/" "https://accountname.piwik.pro/containers/"

      ProxyPass "/consent/" "https://accountname.piwik.pro/consent/"
      ProxyPassReverse "/consent/" "https://accountname.piwik.pro/consent/"

      ProxyPass "/api/cdp/" "https://accountname.piwik.pro/api/cdp/"
      ProxyPassReverse "/api/cdp/" "https://accountname.piwik.pro/api/cdp/"

  </IfModule>
Apache reverse proxy (method 2)
First, enable the following modules: proxy, proxy_http, headers, ssl , rewrite and set SSLProxyEngine on.
In the code below, replace accountname.piwik.pro with your account name, and add the code to your .htaccess file:
<IfModule mod_rewrite.c>
      RewriteEngine On
      <IfModule  mod_proxy_http.c>
          <IfModule mod_ssl.c>
              RewriteBase /
              RewriteRule ^t\.js($|\?.*)$ https://accountname.piwik.pro/ppms.js$1 [P]
              RewriteRule ^t\.php($|\?.*)$ https://accountname.piwik.pro/ppms.php$1 [P]
              RewriteRule ^containers/(.*)$ https://accountname.piwik.pro/containers/$1 [P]
              RewriteRule ^consent/(.*)$ https://accountname.piwik.pro/consent/$1 [P]
              RewriteRule ^api/cdp/(.*)$ https://accountname.piwik.pro/api/cdp/$1 [P]
          </IfModule>
      </IfModule>
</IfModule>Note: The expressions ^t\.js($|\?.*)$ and ^t\.php in the code need to be adjusted based on your domain settings in Piwik PRO.
Use the paths that you noted earlier. To find your paths, go to Domain setup in Menu > Administration > Sites or apps > Data collection > Domains.
Use the values from:
- Tracking script path – replace
^t\.js($|\?.*)$ - Tracking endpoints path – replace
^t\.php
Make sure these values match your setup to ensure correct tracking.
Nginx reverse proxy
In the code below, replace accountname.piwik.pro with your account name, and add the code to your Nginx main configuration file:
http {
      [...]
      proxy_set_header X-Forwarded-For $proxy_add_x_forwarded_for;
      proxy_set_header X-Forwarded-Host $host;
      server {
        [...]
          location /t.js {
              proxy_pass https://accountname.piwik.pro/ppms.js;
          }

          location /t.php {
              proxy_pass https://accountname.piwik.pro/ppms.php;
          }

          location /containers/ {
              proxy_pass https://accountname.piwik.pro/containers/;
          }

          location /consent/ {
              proxy_pass https://accountname.piwik.pro/consent/;
          }

          location /api/cdp/ {
              proxy_pass https://accountname.piwik.pro/api/cdp/;
          }
      }
  }
Note: The expressions /t.js and /t.php in the code need to be adjusted based on your domain settings in Piwik PRO.
Use the paths that you noted earlier. To find your paths, go to Domain setup in Menu > Administration > Sites or apps > Data collection > Domains.
Use the values from:
- Tracking script path – replace /t.js
- Tracking endpoints path – replace /t.php
Make sure these values match your setup to ensure correct tracking.
3. (optional) Repeat the reverse proxy setup (steps 1–2) for each site you want to track with the first-party collector – even if you use the same tracking code for a few sites. The same reverse proxy setup can’t be used for multiple sites.
4. Test your setup by going to one of these endpoints:
https://<yourwebsitedomain>/containers/<site-app-ID>.jshttps://<yourwebsitedomain>/t.js
They should return JavaScript code.
5. That’s done. Data will appear in reports in about two hours. Data in the tracker debugger will appear instantly.
Tip: You can also check manually if the tracking works. Read more
6. Job done! Your site is now being tracked by our first-party collector. If you want to track other sites this way, repeat steps 1-5 for each site.