When you use Server-side Google Tag Manager, you can use our integration to send the collected data to Piwik PRO. The integration uses a dedicated client template and tag in Server-side Google Tag Manager. The tag sends tracked events from Google to Piwik PRO in real time.
To integrate, you’ll have to add a site or app in Piwik PRO, then set up our dedicated client template and tag in Server-side Google Tag Manager and finally set up custom tracking in Piwik PRO.
Before you start
Here are some things to know before you start:
- Needed permissions in Piwik PRO: owner.
- Needed permissions in Server-side Google Tag Manager: administrator.
- Our client template and tag template are also described in this blog post.
- If you want to contribute to the template development, here are the links to our GitHub repositories:
Enterprise plan
Note: If you choose to install Piwik PRO using a tag manager other than ours, we won’t be able to provide technical support for such a setup. We aim to deliver you the best possible service, but we can’t do that for third-party tools.
Add a site or app in Piwik PRO
To add a site or app in Piwik PRO, follow these steps:
1. Go to Menu > Administration.
2. Navigate to Sites & apps.
3. Click Add a site or app.
4. Type the site or app name and address and click Save.
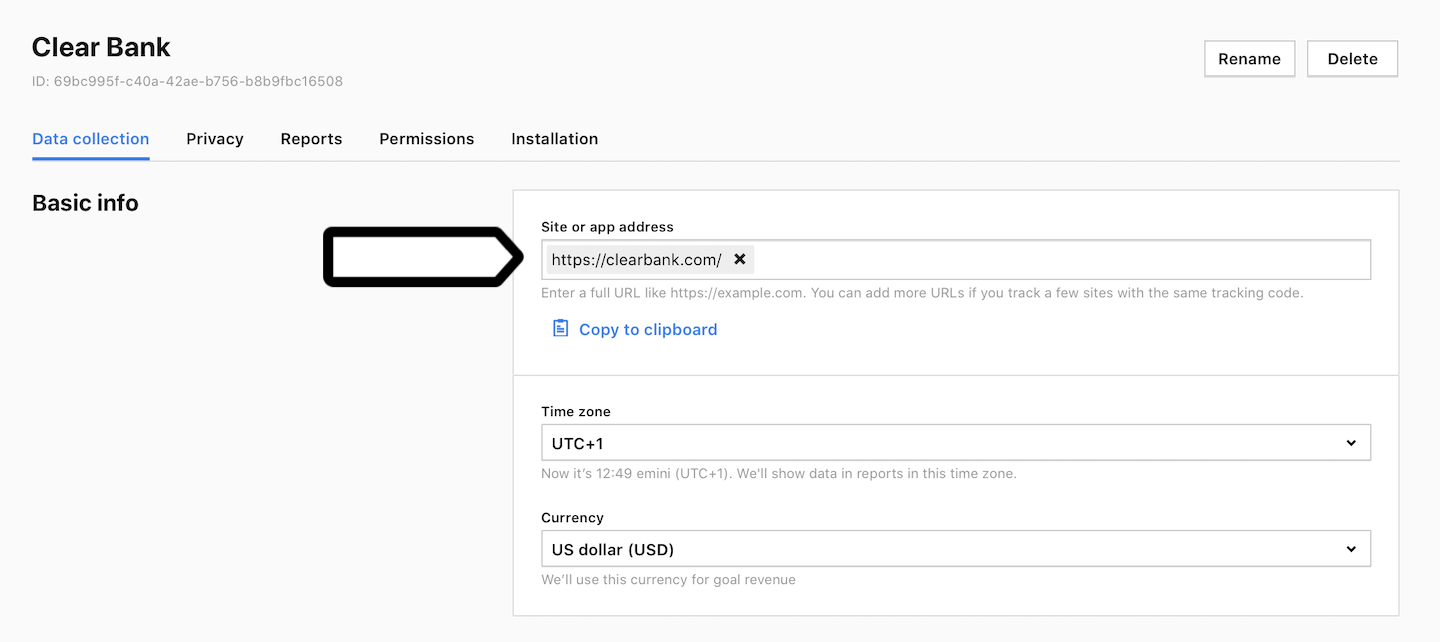
Note: If you want to track a few domains, add their addresses.
5. Set the time zone and currency.
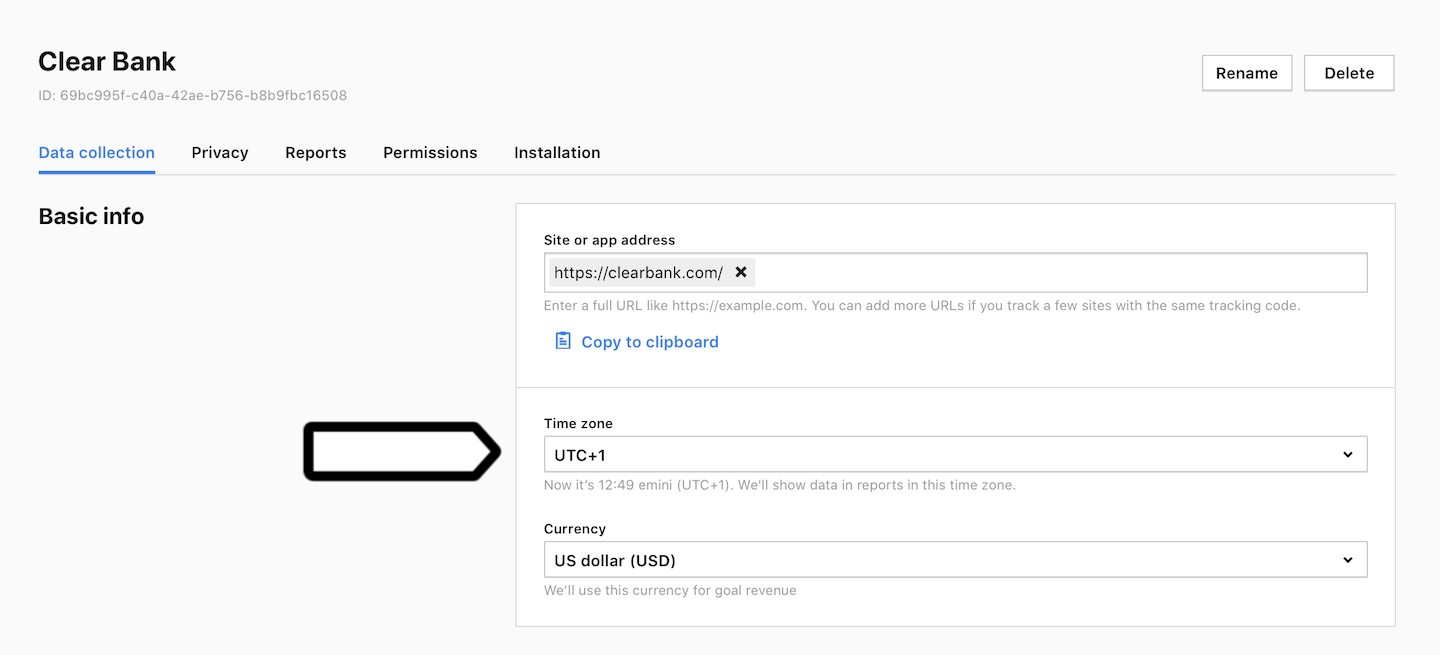
Note: We’ll show data in reports in this time zone. We’ll use this currency for goal revenue.
Install our client template
The Piwik PRO Client template is designed to capture requests from Piwik PRO’s client-side libraries.
To install our client template, follow these steps:
1. Download our client template.
2. Log in to Google Tag Manager.
3. Open your server-side container.
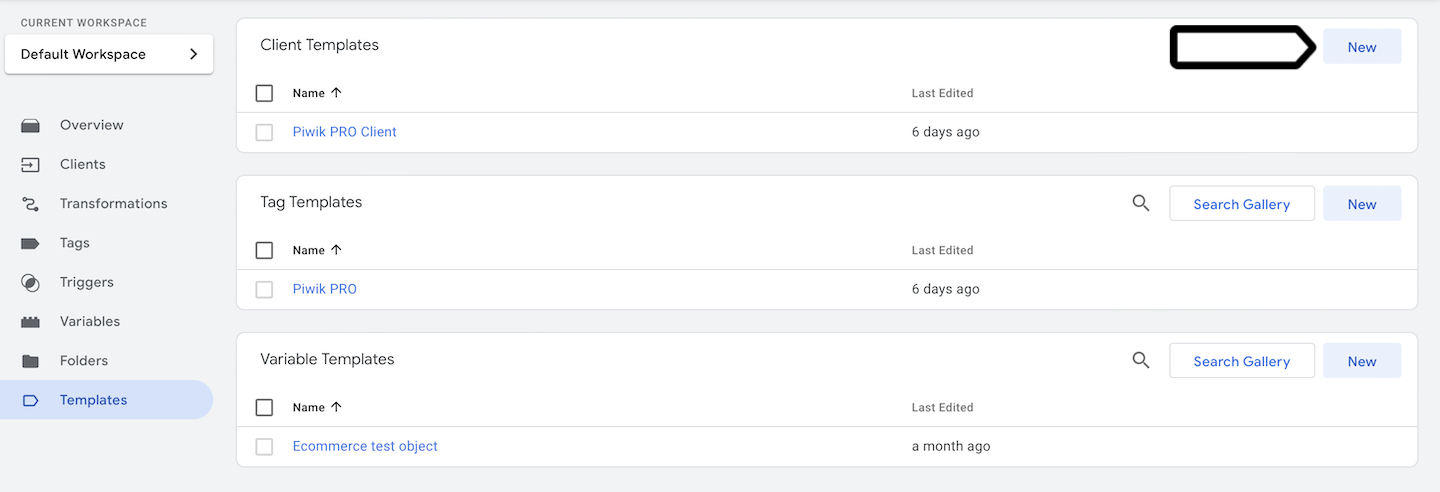
4. Go to Templates.
5. In Client Templates, click New.
6. Click the ⋯ three-dot icon in the upper right corner and select Import.
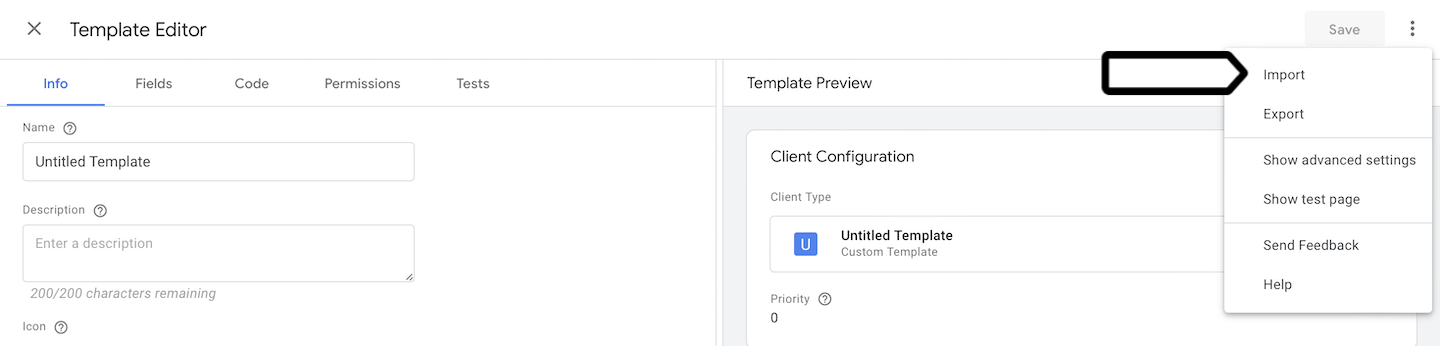
7. Upload the template you’ve downloaded in step 1.
8. Click Save.
9. Navigate to Clients.
10. Click New.
11. Select Piwik PRO Client from the list of available templates.
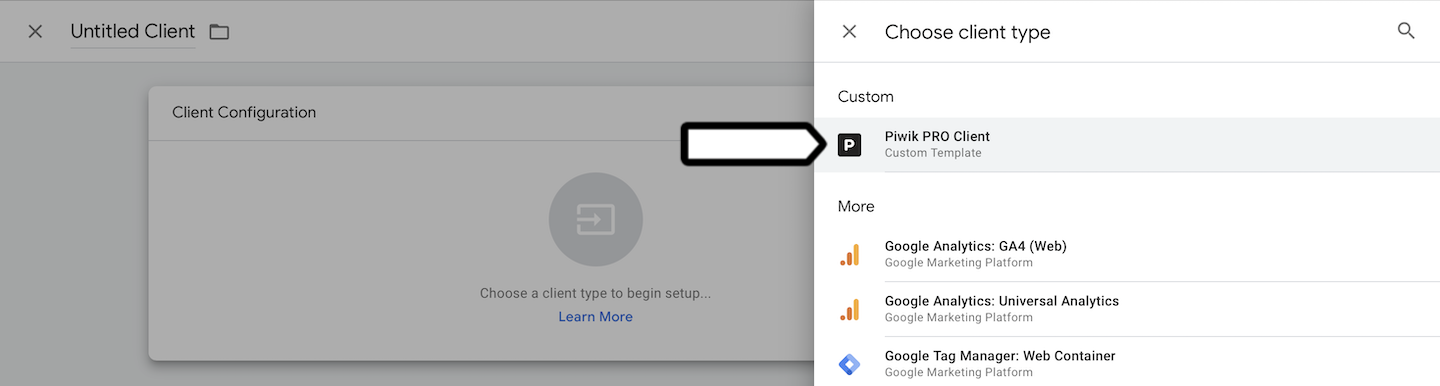
12. Click Submit.
13. Click Publish.
14. That’s done!
Install our tag template
The tag template’s purpose is to compose an HTTP request to your Piwik PRO account.
To install our tag template, follow these steps:
1. In Server-side Google Tag Manager, go to Tags.
2. Click New.
3. Name your tag. Example: Piwik PRO.
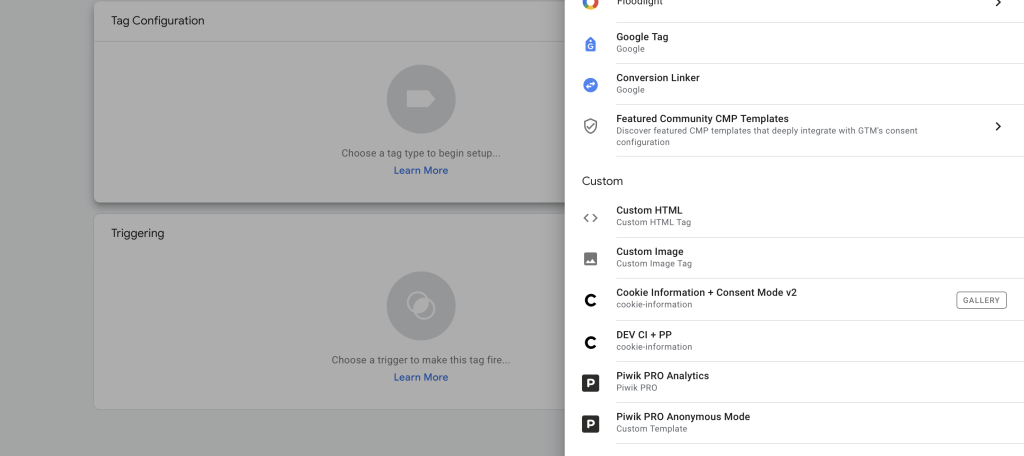
4. Click Choose a tag type to begin setup…
5. Click Discover more tags in the Community Template Gallery.
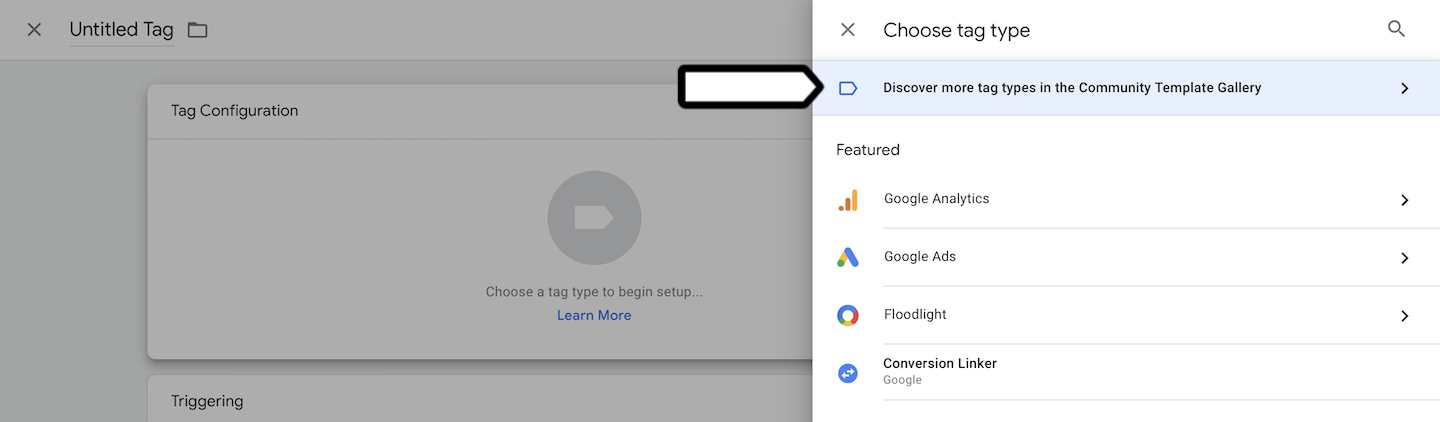
6. Click on the search icon and type in Piwik PRO. Our tag will appear in the search results. Make sure it is the original one, made by Piwik PRO.

7. Click Piwik PRO.
8. Click Add to workspace.
9. Click Add to confirm your choice.
10. In Triggering, click Choose a trigger to make this tag fire…
11. Add a new custom trigger with the following condition: Client Name equals Piwik PRO Client.
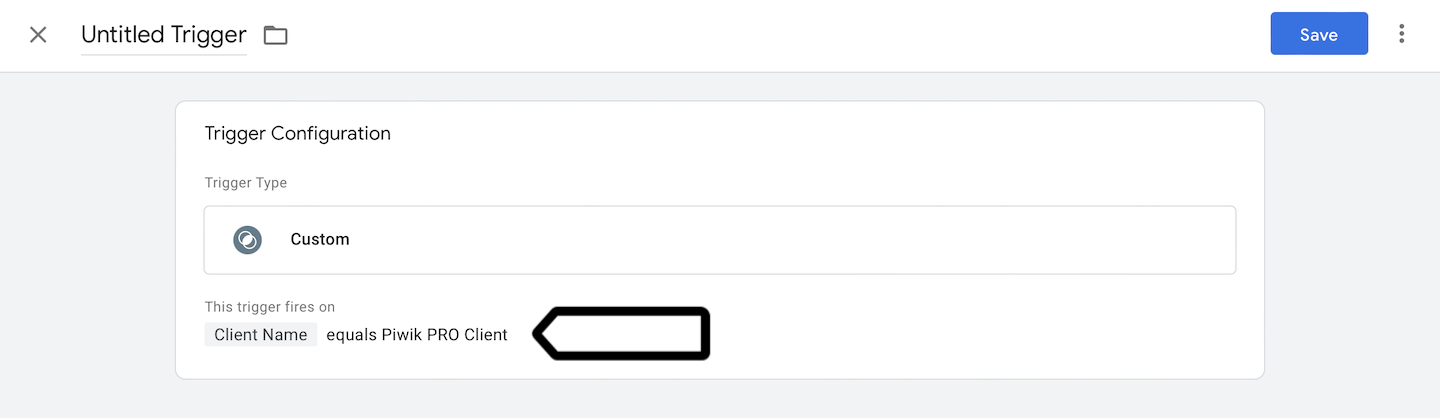
12. Click Submit.
13. Click Publish.
14. That’s also done!
Method 1: Set up tracking in Piwik PRO
Once the client template and tag template are added, you need to set up tracking. This method assumes you’re using Piwik PRO to collect data.
To set up tracking, follow these steps:
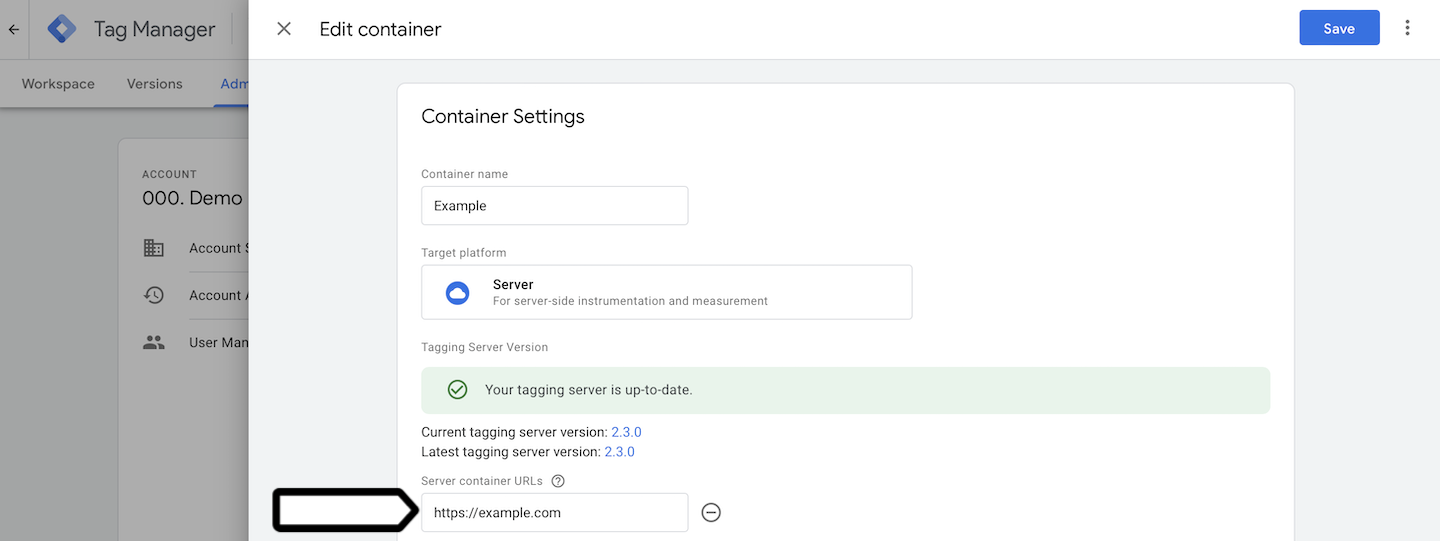
1. Log in to Server-side Google Tag Manager.
2. Go to Admin > Container settings.
3. Copy Server container URLs.
4. Log in to Piwik PRO.
5. Go to Menu > Tag Manager > Tags and turn off Piwik PRO tag (tracking code). In the next steps, you’ll set up custom tracking.
6. Set up your custom tracking depending on Consent Manager settings:
(Case 1) If Menu > Administration > Sites & apps > Privacy > Ask visitors for consent (on) and Collect anonymous data from non-consenting visitors (on) > Use visitor cookies (on)
Note: We’ll no longer offer Consent Manager for new Piwik PRO accounts.
In the tracking code below, replace:
<site-app-ID>with your site ID (Where to find it?),https://example.com/ppms.phpwith the copied server container URL from GTM and added/ppms.php,https://youraccountname.containers.piwik.pro/ppms.jswith your account address.
Then, add the code as:
Note: [Enterprise only] These fields are fully editable – no need to use custom code.
Tag type: Custom code
Consent type: No consent is required
Trigger: All page views
<script>
  var _paq = window._paq || [];

(function () {
      var trackAnonymously = {{ Piwik PRO Anonymization }}('analytics');
      if (trackAnonymously) {
          _paq.push(['setUserIsAnonymous', 1]);
          _paq.push(['setVisitorCookieTimeout', 1800]);
      }
  }());

  _paq.push(['setTrackingSource', 'jstc_tm']);
  _paq.push(['enableLinkTracking']);
  _paq.push(['setDomains', ['www.example.com', 'shop.example.com']]); // Add this line only if you use this tag on more than one domain
  _paq.push(['setCookieDomain', '.example.com']); // Add this line only if you have cross-subdomain tracking
  _paq.push(['setSecureCookie', 1]);
  _paq.push(['trackPageView']);
  _paq.push(['enableJSErrorTracking']);
  (function(p,i,w,ik) {
      var g=ik.createElement('script'),s=ik.getElementsByTagName('script')[0];
      _paq.push(['setTrackerUrl', p]);
      _paq.push(['setSiteId', w]);
      g.type='text/javascript';g.async=true;g.defer=true;g.src=i;s.parentNode.insertBefore(g,s);
  })('https://example.com/ppms.php','https://youraccountname.containers.piwik.pro/ppms.js','<site-app-ID>',document)
</script>
Add this deanonymization code as:
Tag type: Custom code
Consent type: Analytics
Trigger: All page views
<script>
  var _paq = window._paq || [];
  (function () {
      var consents = {{ Consents }};
      var consentType = 'analytics';

      if (typeof consents !== 'undefined' &&
          consents.hasOwnProperty('current_state') &&
          consents.current_state.hasOwnProperty(consentType) &&
          consents.current_state[consentType] === 1 &&
          consents.hasOwnProperty('previous_state') &&
          consents.previous_state.hasOwnProperty(consentType) &&
          consents.previous_state[consentType] !== 1
      ) {
		   _paq.push(['deanonymizeUser']);
  		   _paq.push(['setVisitorCookieTimeout', 33955200]);
      }
  }());
</script>
(Case 2) If Menu > Administration > Sites & apps > Privacy > Ask visitors for consent (on) and Collect anonymous data from non-consenting visitors (on) > Use a session hash (on)
Note: The IP address is the key part of the Session hash. Make sure you provide it correctly in tracking requests. Otherwise, you may merge distinct sessions into one. Avoid using the Session hash if most users don’t come from unique IPs. Read more
In the tracking code below, replace:
<site-app-ID>with your site ID (Where to find it?),https://example.com/ppms.phpwith the copied server container URL from GTM and added/ppms.php,https://youraccountname.containers.piwik.pro/ppms.jswith your account address.
Then, add the code as:
Tag type: Custom code
Consent type: No consent is required
Trigger: All page views
<script>
  var _paq = window._paq || [];

(function () {
      var trackAnonymously = {{ Piwik PRO Anonymization }}('analytics');
      if (trackAnonymously) {
          _paq.push(['setUserIsAnonymous', 1]);
          _paq.push(['disableCookies']);
      }
  }());

  _paq.push(['setTrackingSource', 'jstc_tm']);
  _paq.push(['enableLinkTracking']);
  _paq.push(['setDomains', ['www.example.com', 'shop.example.com']]); // Add this line only if you use this tag on more than one domain
  _paq.push(['setCookieDomain', '.example.com']); // Add this line only if you have cross-subdomain tracking
  _paq.push(['setSecureCookie', 1]);
  _paq.push(['enableHeartBeatTimer']);
  _paq.push(['trackPageView']);
  _paq.push(['enableJSErrorTracking']);
  (function(p,i,w,ik) {
      var g=ik.createElement('script'),s=ik.getElementsByTagName('script')[0];
      _paq.push(['setTrackerUrl', p]);
      _paq.push(['setSiteId', w]);
      g.type='text/javascript';g.async=true;g.defer=true;g.src=i;s.parentNode.insertBefore(g,s);
  })('https://example.com/ppms.php','https://youraccountname.containers.piwik.pro/ppms.js','<site-app-ID>',document)
</script>
Add this deanonymization code as:
Tag type: Custom code
Consent type: Analytics
Trigger: All page views
<script>
  var _paq = window._paq || [];
  (function () {
      var consents = {{ Consents }};
      var consentType = 'analytics';

      if (typeof consents !== 'undefined' &&
          consents.hasOwnProperty('current_state') &&
          consents.current_state.hasOwnProperty(consentType) &&
          consents.current_state[consentType] === 1 &&
          consents.hasOwnProperty('previous_state') &&
          consents.previous_state.hasOwnProperty(consentType) &&
          consents.previous_state[consentType] !== 1
      ) {
          		   _paq.push(['deanonymizeUser']);
		   _paq.push(['enableCookies']);
      }
  }());
</script>
(Case 3) If Menu > Administration > Sites & apps > Privacy > Ask visitors for consent (off)
In the tracking code below, replace:
<site-app-ID>with your site ID (Where to find it?),https://example.com/ppms.phpwith the copied server container URL from GTM and added/ppms.php,https://youraccountname.containers.piwik.pro/ppms.jswith your account address.
Then, add the code as:
Tag type: Custom code
Consent type: No consent is required
Trigger: All page views
<script>
  var _paq = window._paq || [];
  _paq.push(['setTrackingSource', 'jstc_tm']);
  _paq.push(['enableLinkTracking']);
  _paq.push(['setDomains', ['www.example.com', 'shop.example.com']]); // Add this line only if you use this tag on more than one domain
  _paq.push(['setCookieDomain', '.example.com']); // Add this line only if you have cross-subdomain tracking
  _paq.push(['setSecureCookie', 1]);
  _paq.push(['enableHeartBeatTimer']);
  _paq.push(['trackPageView']);
  _paq.push(['enableJSErrorTracking']);
  (function(p,i,w,ik) {
      var g=ik.createElement('script'),s=ik.getElementsByTagName('script')[0];
      _paq.push(['setTrackerUrl', p]);
      _paq.push(['setSiteId', w]);
      g.type='text/javascript';g.async=true;g.defer=true;g.src=i;s.parentNode.insertBefore(g,s);
  })('https://example.com/ppms.php','https://youraccountname.containers.piwik.pro/ppms.js','<site-app-ID>',document)
</script>
7. Check to see if your tracking works correctly in the tracker debugger. Read more
8. All done!
Method 2: Set up tracking in Google Tag Manager
Once the client template and tag template are added, you need to set up tracking. This method assumes you’re using Piwik PRO Analytics tag in Google Tag Manager to collect data.
To set up tracking, follow these steps:
1. Log in to Server-side Google Tag Manager.
2. Go to Admin > Container settings.
3. Copy Server container URLs.

4. Go to Google Tag Manager.
5. Open your regular container.
6. Navigate to Tags > Piwik PRO Analytics.
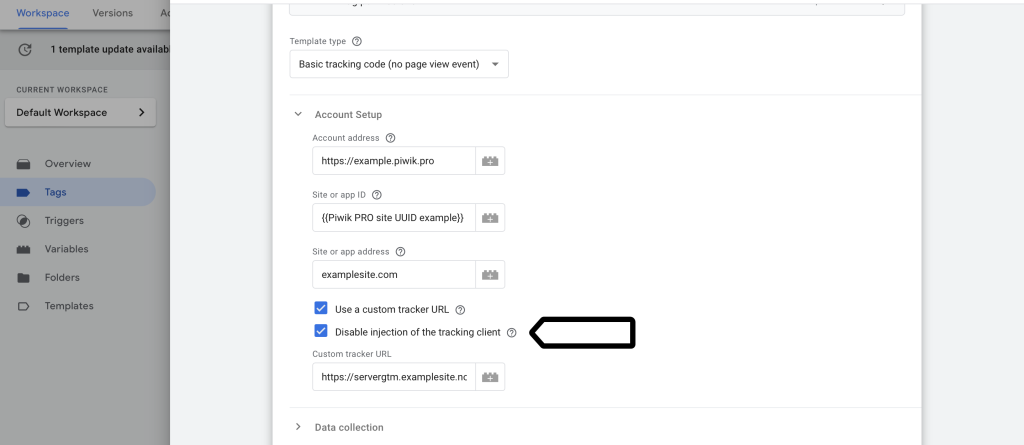
7. In Account setup, select Use a custom tracker URL.
8. Enter the copied server container URL from GTM and add /ppms.php, for example: https://example.com/ppms.php.
9. Click Save.
10. Click Publish.
11. Check to see if your tracking works correctly in the tracker debugger. Read more
12. All done!
Use server-side Google Tag Manager to serve the Piwik PRO JavaScript Tracking Client
If you want to serve the Piwik PRO JavaScript Tracking Client (ppms.js and ppas.js) using server-side Google Tag Manager, follow the steps below based on your tag management system.
If you’re using Google Tag Manager
1. Log in to Google Tag Manager.
2. Go to Tags.
3. Navigate to the Piwik PRO Analytics tag template.
4. In the Piwik PRO Analytics template, enable the Disable injection of the tracking client option.
5. Click New to add a new tag.
6. In Tag configuration, choose a Custom HTML tag type from the list.
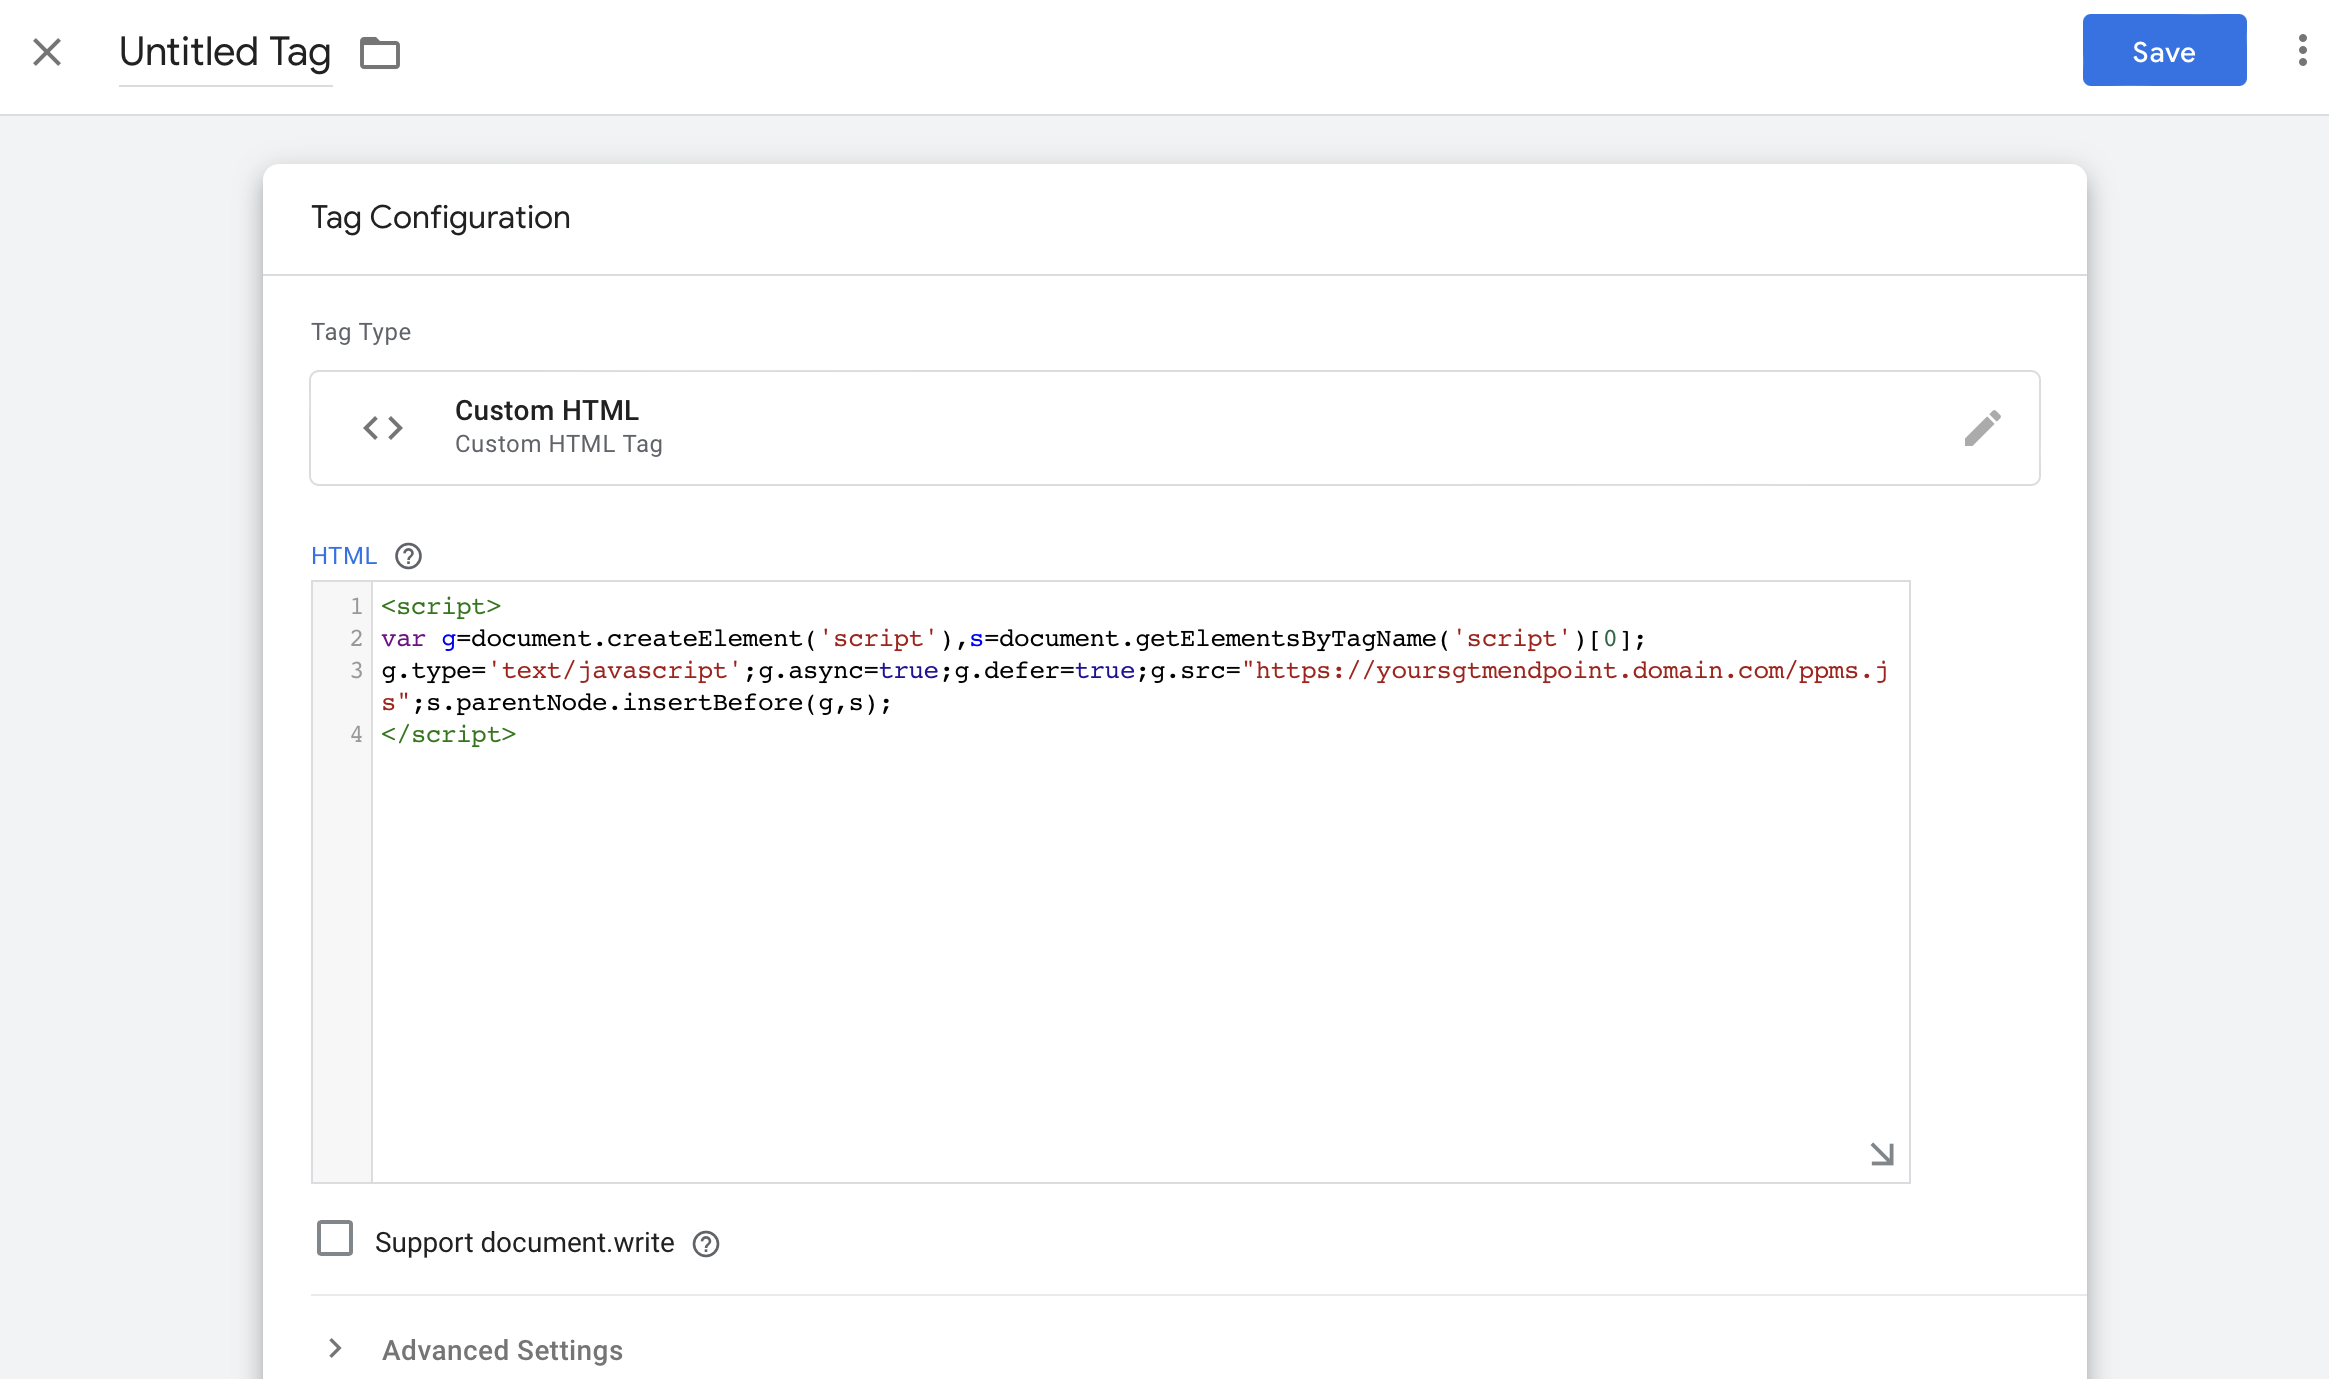
7. Add the following piece of code to the tag, making sure to replace yoursgtmendpoint.domain.com with your server-side GTM endpoint address.
You can find it in step 3 of Method 1: Set up tracking in Piwik PRO and Method 2: Set up tracking in Google Tag Manager sections of this article.
<script>
var g=document.createElement('script'),s=document.getElementsByTagName('script')[0];
g.type='text/javascript';g.async=true;g.defer=true;
g.src="https://yoursgtmendpoint.domain.com/ppms.js";
s.parentNode.insertBefore(g,s);
</script>
8. In Triggering, set up the same trigger as the one used for the Basic tracking code tag.
9. Make sure the new tag is set up to fire before the basic tracking code tag.
10. Click Save.
11. Test it in Preview Mode.
12. If everything works correctly, publish the tag.
If you’re using Piwik PRO Tag Manager
1. Log in to Server-side Google Tag Manager.
2. Find the code you have added in the Method 1: Set up tracking in Piwik PRO section and click Edit.
Note: [Enterprise only] These fields are fully editable – no need to use custom code.
3. Replace https://youraccountname.containers.piwik.pro/ppms.js with your server-side GTM endpoint address (for example, https://yoursgtmendpoint.domain.com/ppms.js).
4. Click Save.
5. Test it in the debug mode. Read more.
6. If everything works correctly, publish the tag.
7. Done!
Map Piwik PRO to GA4 data stream
If you’re using Server-side GTM to collect GA4 data, you can map it to Piwik PRO by following the guidelines in this blog post. We plan to implement an easier mapping method in the future.