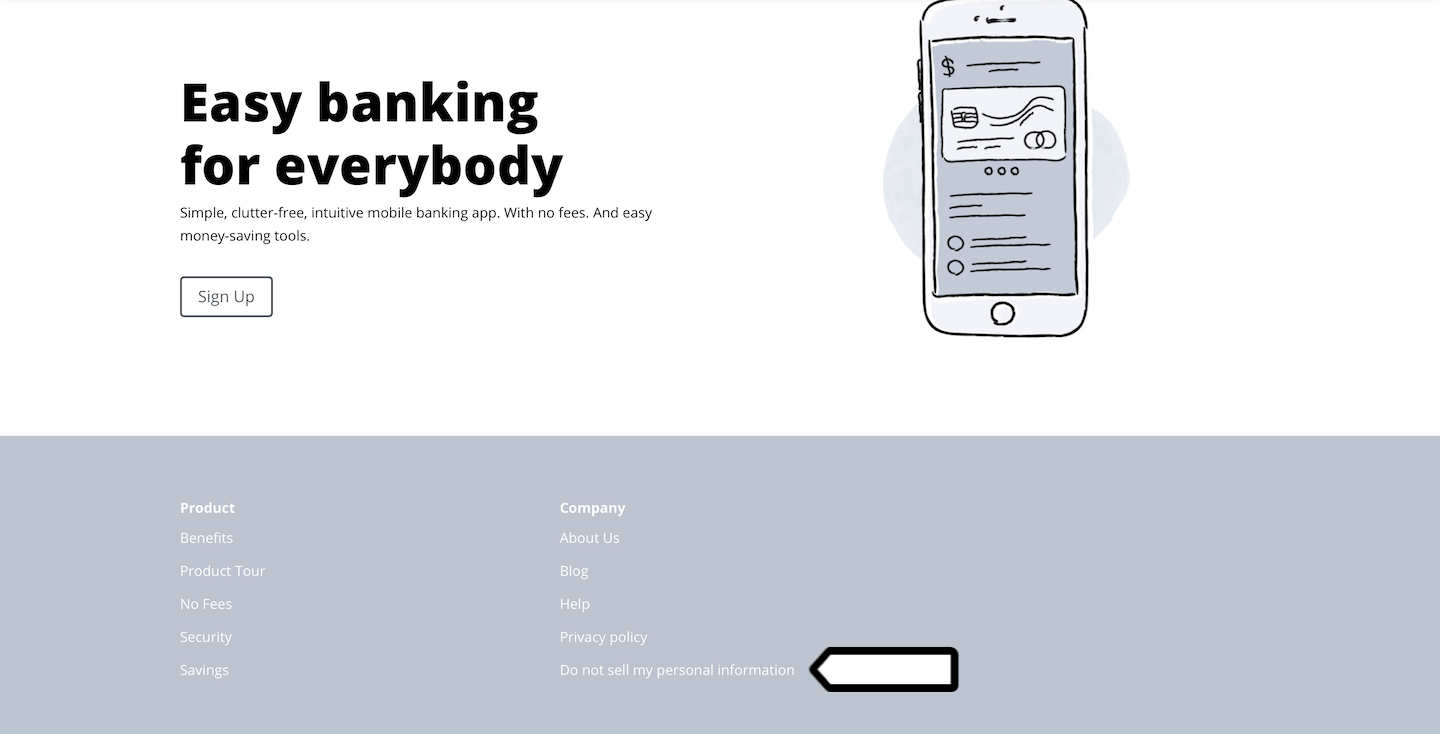
If you run an online business in California and share collected visitor data with third parties in exchange for something of value, you need to add a “Do not sell my personal information” link to your site. This link should direct visitors to a page where they can easily opt out of data sharing.
This rule is part of the California Consumer Privacy Act (also known as CCPA) guidelines. Before using it, your legal team should assess whether you are “selling” the data you collect. If so, you can use the method below to add a bottom bar with a link and an opt-out mechanism to your website.
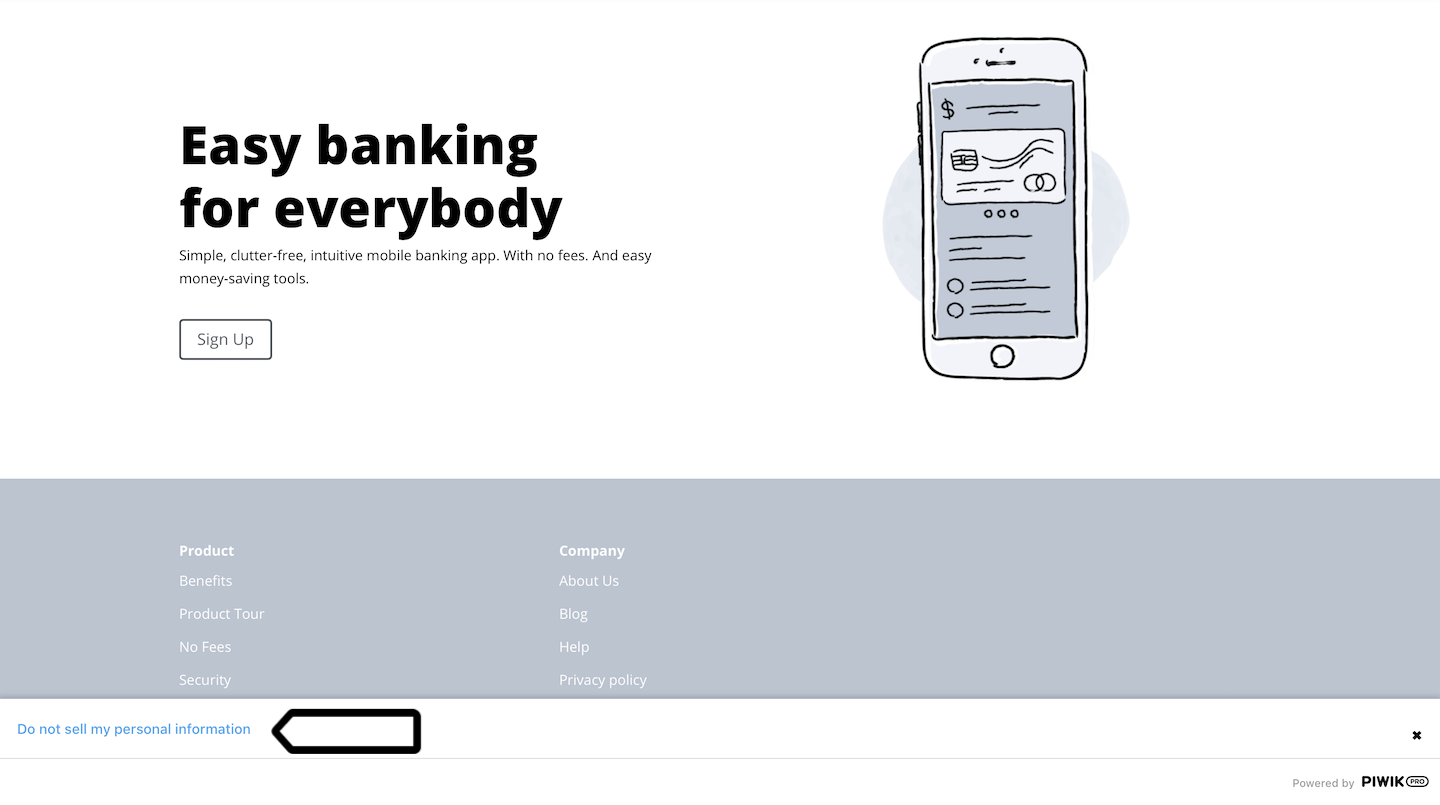
Here’s an example of the bottom bar that visitors will see when they enter your site.
And here’s an example of the opt-out form where visitors can choose to opt out of tracking or sharing their data.

Before you start
Here are some things to know before you start:
- You’ll use our opt-out form so that visitors can opt out of tracking and as a result not share their data.
- You’ll use custom code that will display a bottom bar on your site with a “Do not sell my personal information” link. Alternatively, you can simply add a link to the footer menu.
- When using an opt-out form, make sure that Respect opt-out and DNT is on for each tag. This setting prevents tags from activating for visitors who have opted out. It’s usually turned off by default, so make sure to turn it on.
Add an opt-out form to your page
We’ll start by adding an opt-out form to the privacy policy page. This form will let visitors opt out of tracking and as a result opt out of data sharing.
To add an opt-out form to your site, follow these steps:Available from version 16.0.0. For versions below 16.0.0, go to Menu > Administration > Platform > Opt-out generator.
1. Go to Menu > Administration.
2. Navigate to Settings.
3. On the left, click Opt-out form.
4. Type the message you want to show to your visitors.
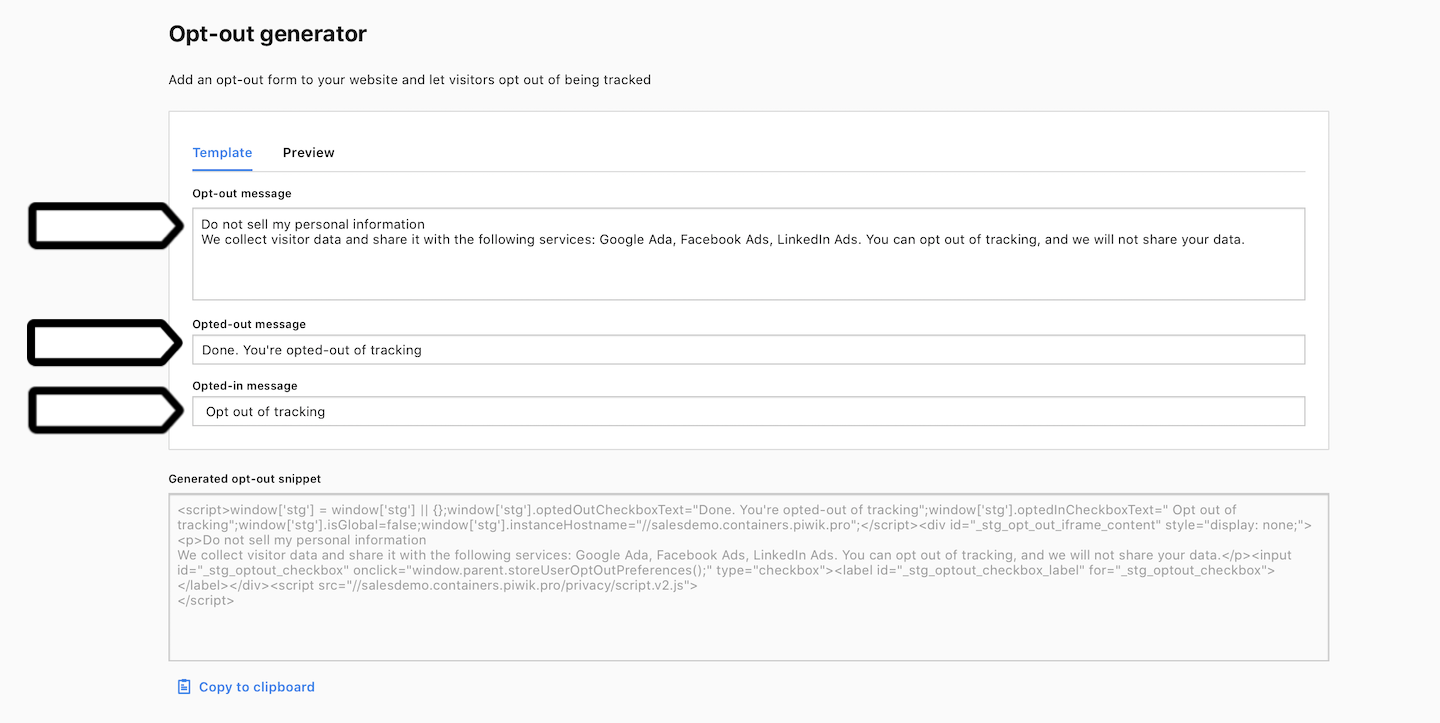
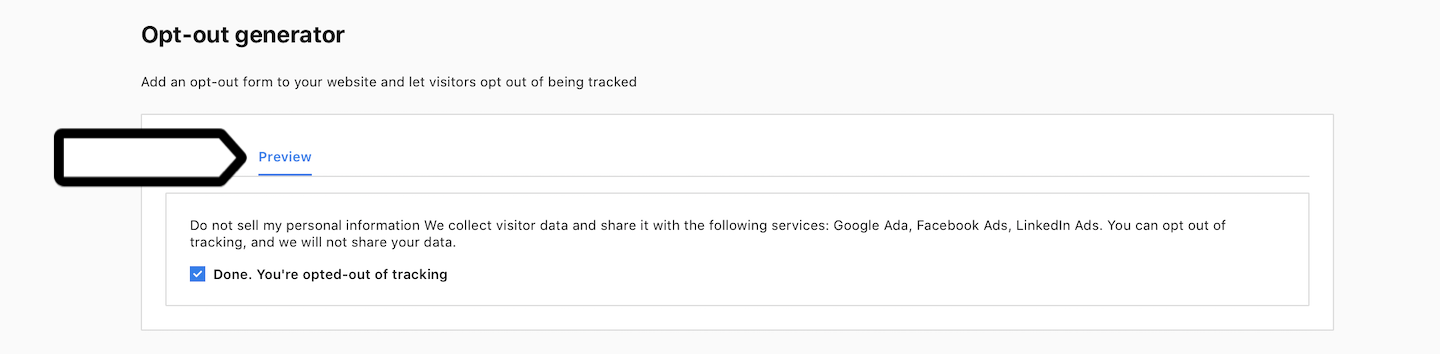
5. Click Preview to see how the message will appear on your website after installation. The message will adopt your website’s CSS styles, so it will look different from this preview.
6. When you’re happy with how the form looks, copy the code and paste it into your website.
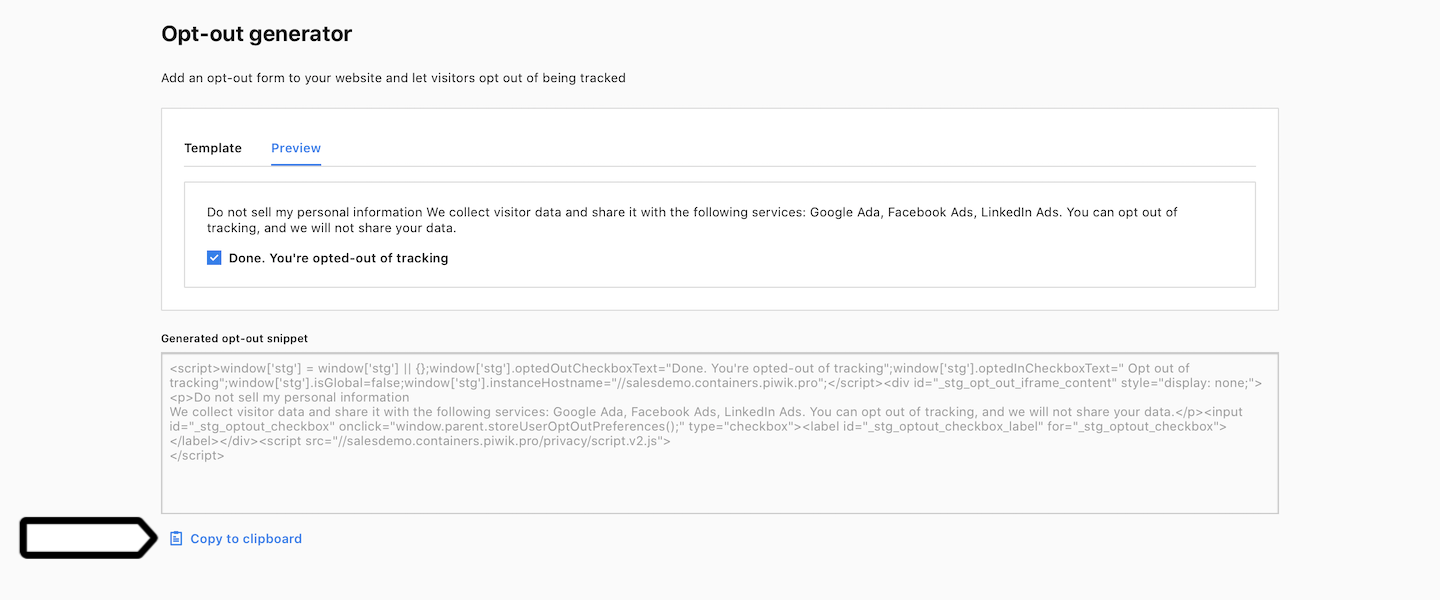
7. The opt-out form is now on your page. Select Opt out of tracking and check in debug mode that you works correctly.

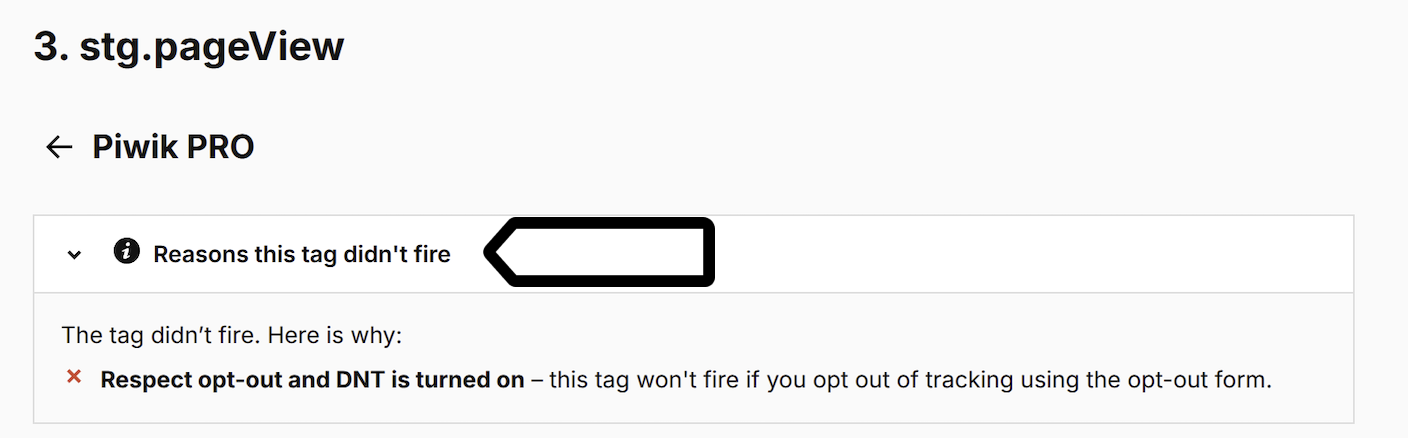
Note: If you selected Opt out of tracking, you should see later in debug mode that the Piwik PRO tag didn’t fire. In the tag details, you’ll find the reason listed as “Respect opt-out and DNT is turned” on and that it is due to opt-out.
8. Go to Menu > Tag Manager.
9. Navigate to Tags.
10. On the left, click Piwik PRO.
11. In Privacy, turn on Respect opt-out and DNT.
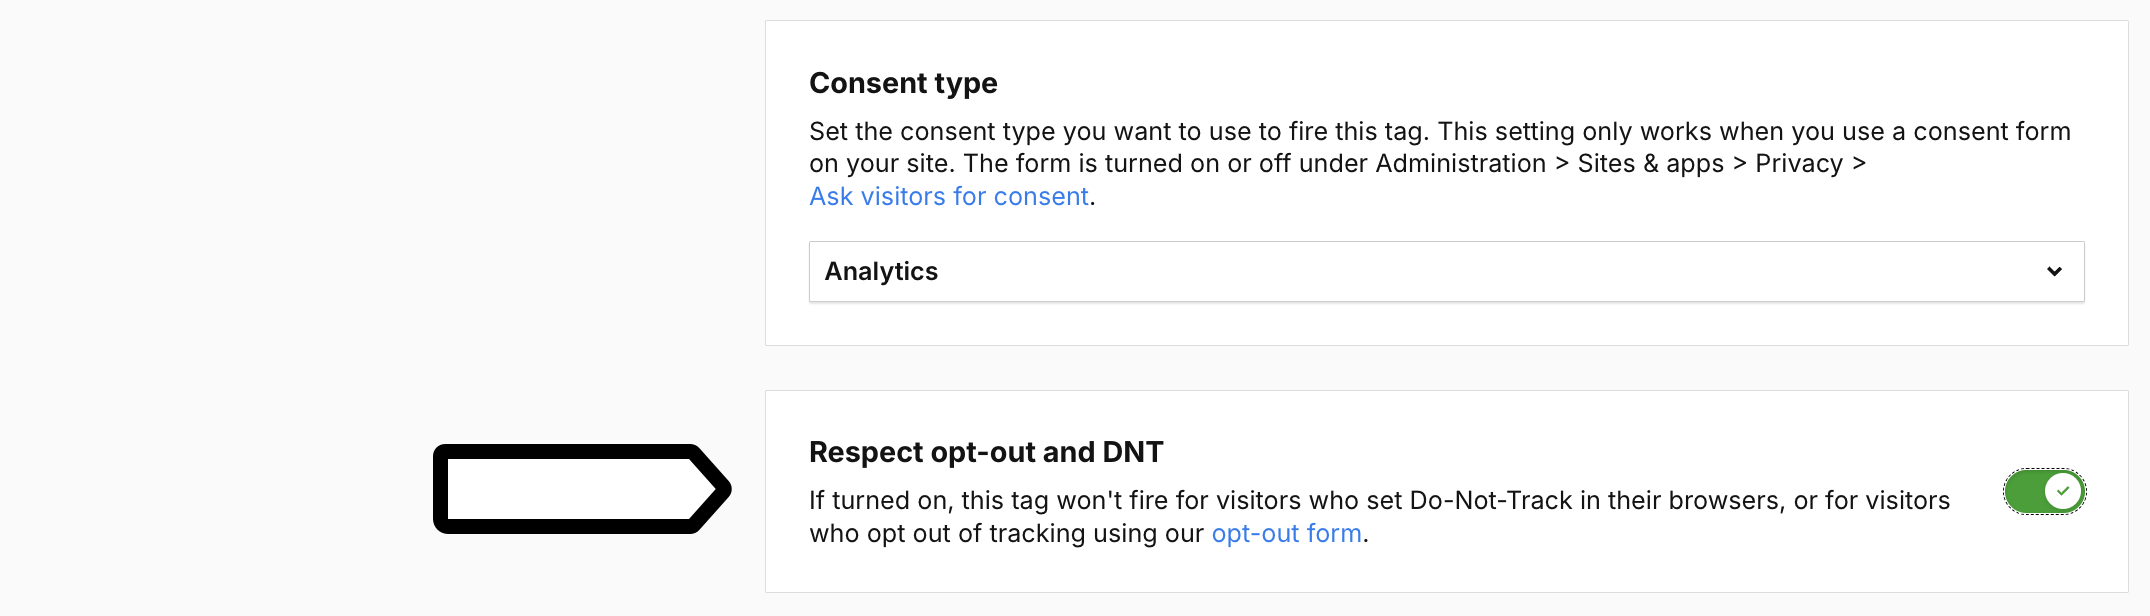
Note: If turned on, this tag won’t fire for visitors who opt out of tracking. Make sure it’s turned on for all tags that you use to collect and share data.
12. Click Save.
13. Check the other tags.
Note: Turn on Respect opt-out and DNT for third-party tools like Google Ads, Facebook Ads and others that use user data. Also, remember that some free tools on your website, like social share buttons, can collect data from the sites they’re on.
14. You can also use debug mode to see how tags behave for opted-out visitors. Go to Debug mode.

15. Choose the site or app you want to work with. Use the site/app picker in the upper right corner.
16. In Your site address, type in or select your site or app address.
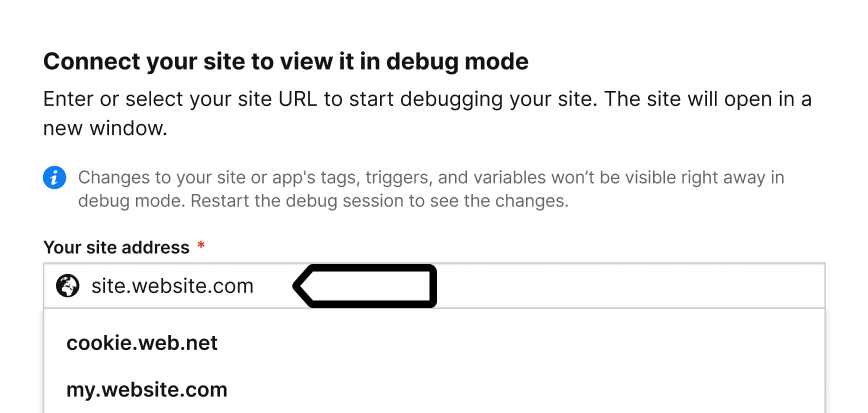
17. Click Connect.
Note: If you have any trouble connecting, check that:
- Your browser allows popups. Some browsers, e.g. Safari, block them by default.
- The necessary code is installed on your site.
- You entered the correct site address.
- Ad blockers are turned off.
18. (Optional) Turn on Prevent page reload. This will stop the page from refreshing when you click elements that would normally trigger a reload.
Tip: This option is useful for testing form submissions and link clicks.
19. Once your site is connected, it will open in a new tab.
20. If the Piwik PRO tag has Respect opt-out and DNT on and you opted out from tracking using the opt-out form, the tag won’t fire.
21. To check if Piwik PRO wasn’t fired, go to Tags.
Note: Piwik PRO tag is a default tag necessary for basic tracking.
22. Click Piwik PRO.

23. See what trigger is set for the tag.

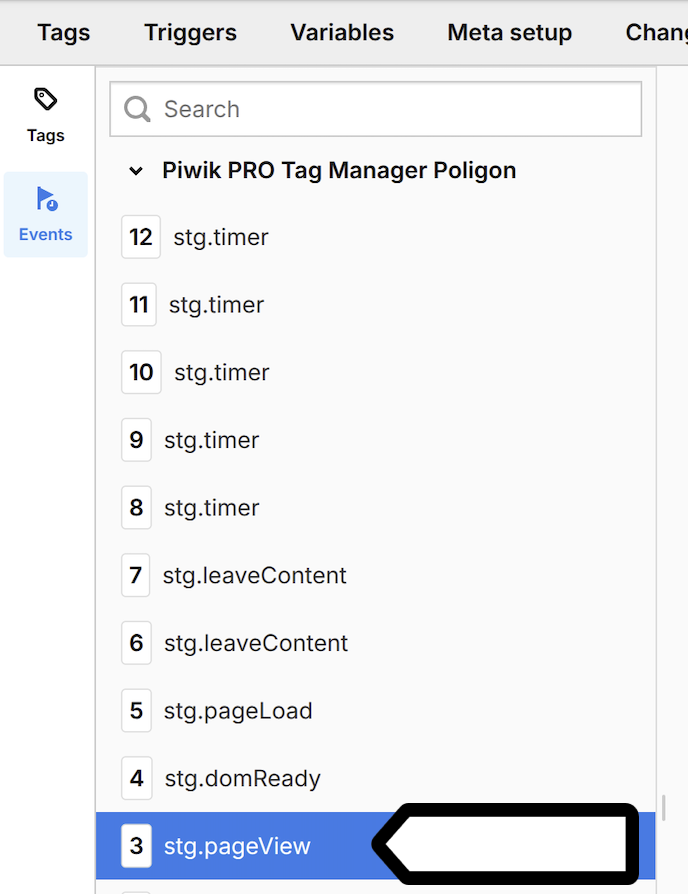
24. In Events, find the stg.pageView event.
25. In Tags, find the Piwik PRO tag for this event.
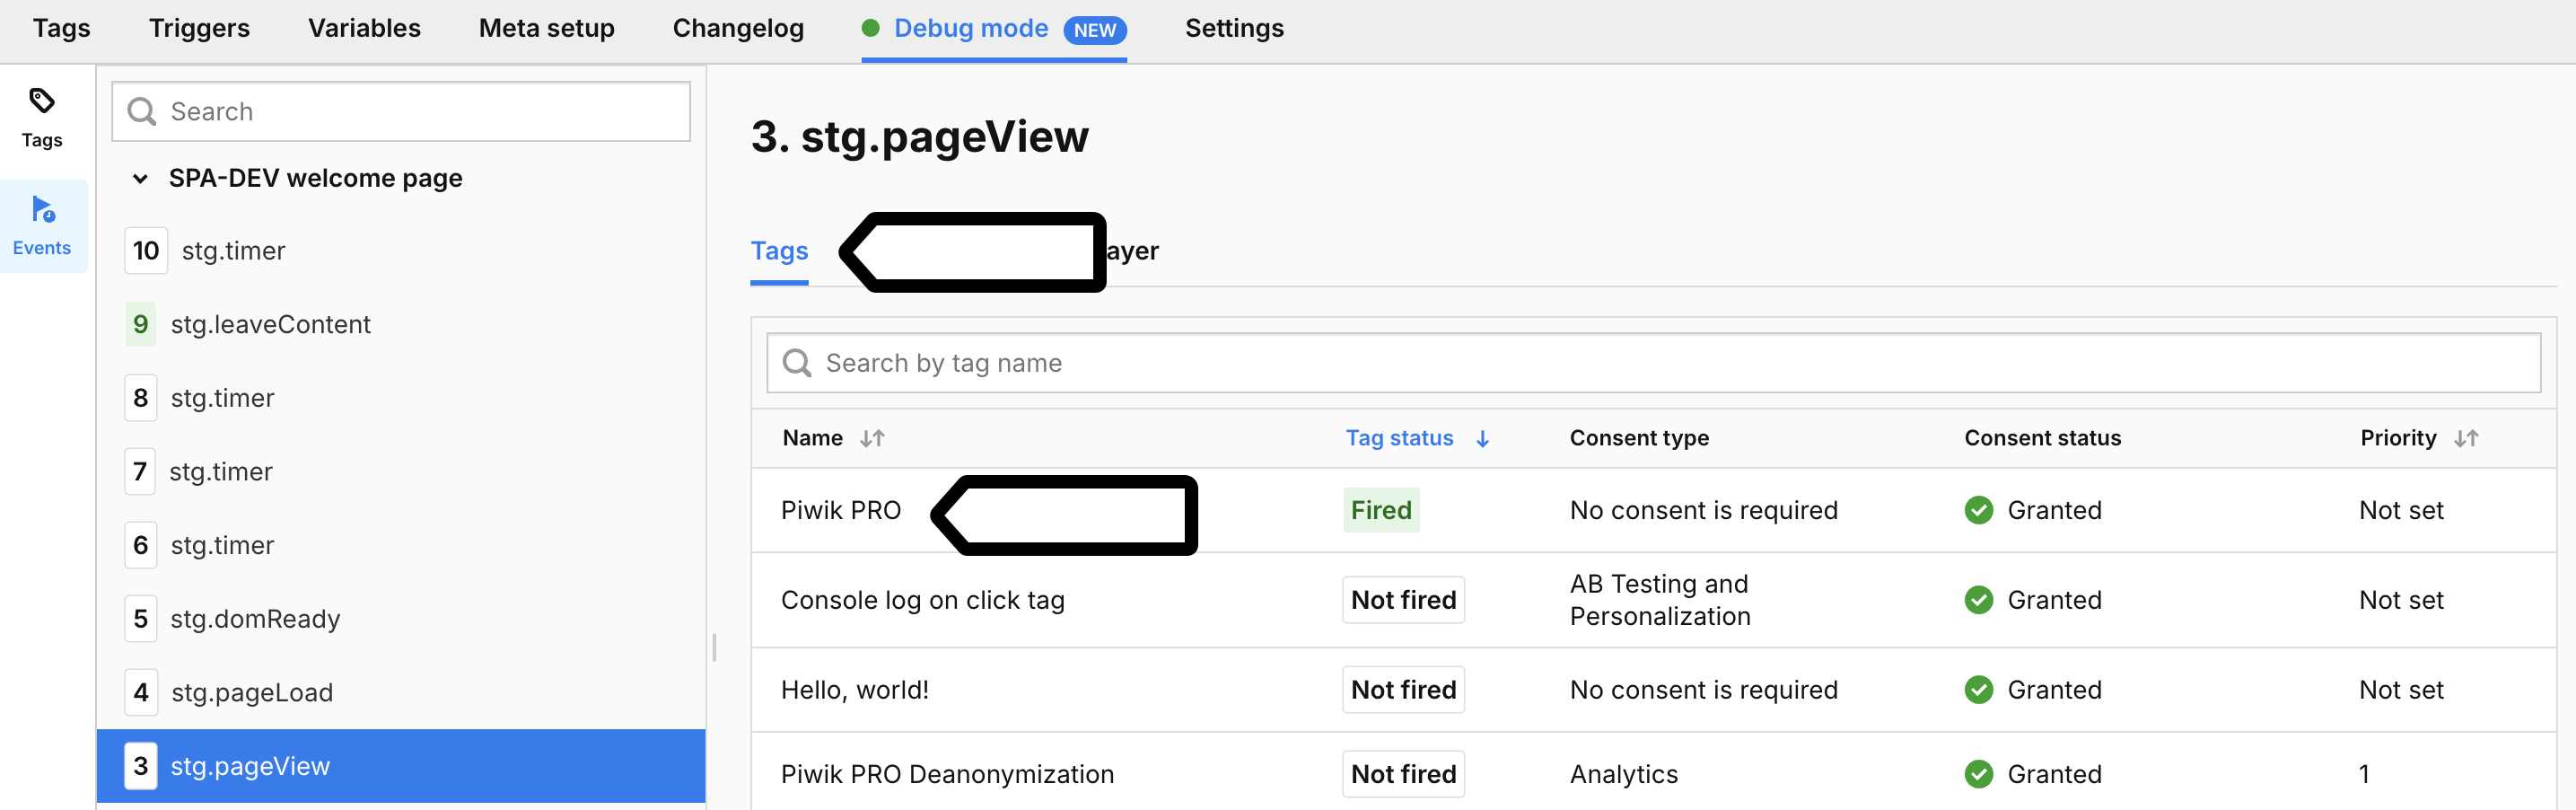
26. Click Piwik PRO tag.
27. In Reasons this tag didn’t fire, you can find that Respect opt-out and DNT is turned on for this tag.
28. When you’re happy with how the tags work, click Publish.

29. All done!
Note: Another approach is to collect data but not activate tags that share it with third parties. In this case, let visitors know that they can opt out of data sharing while tracking still takes place.
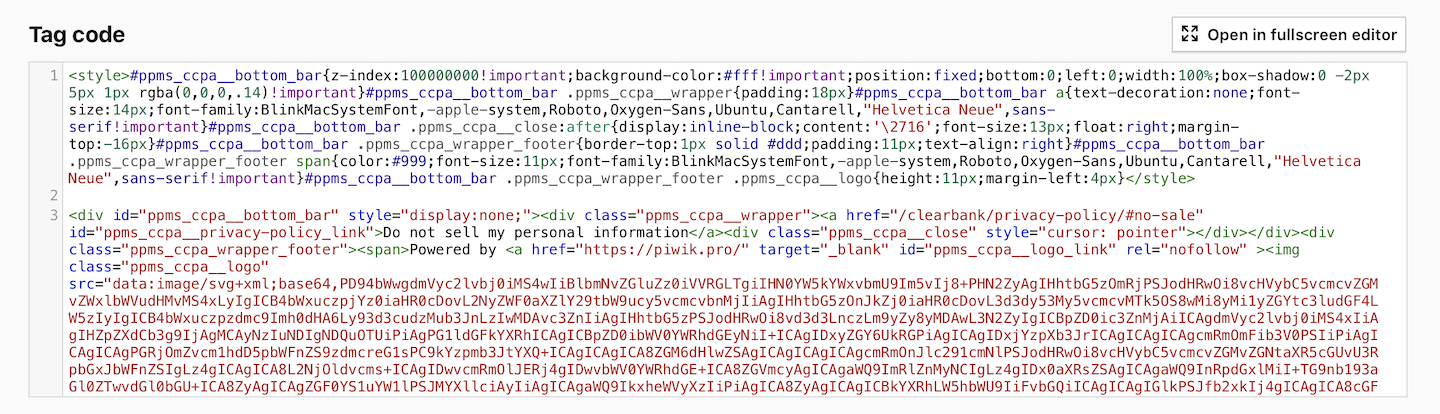
Option #1: Create a tag with a custom code
Next, we’ll create a tag that’ll display a bottom bar. This bar will feature a link that says “Do not sell my personal information,” leading to the privacy policy page, ideally to the opt-out form section.
Here’s the code that you’ll use:
<style>
#ppms_ccpa__bottom_bar {
z-index: 100000000 !important;
background-color: #fff !important;
position: fixed;
bottom: 0;
left: 0;
width: 100%;
box-shadow: 0 -2px 5px 1px rgba(0, 0, 0, .14) !important
}
#ppms_ccpa__bottom_bar .ppms_ccpa__wrapper {
padding: 18px
}
#ppms_ccpa__bottom_bar a {
text-decoration: none;
font-size: 14px;
font-family: BlinkMacSystemFont, -apple-system, Roboto, Oxygen-Sans, Ubuntu, Cantarell, "Helvetica Neue", sans-serif !important
}
#ppms_ccpa__bottom_bar .ppms_ccpa__close:after {
display: inline-block;
content: '\2716';
font-size: 13px;
float: right;
margin-top: -16px
}
#ppms_ccpa__bottom_bar .ppms_ccpa_wrapper_footer {
border-top: 1px solid #ddd;
padding: 11px;
text-align: right
}
#ppms_ccpa__bottom_bar .ppms_ccpa_wrapper_footer span {
color: #999;
font-size: 11px;
font-family: BlinkMacSystemFont, -apple-system, Roboto, Oxygen-Sans, Ubuntu, Cantarell, "Helvetica Neue", sans-serif !important
}
#ppms_ccpa__bottom_bar .ppms_ccpa_wrapper_footer .ppms_ccpa__logo {
height: 11px;
margin-left: 4px
}
</style>
<div id="ppms_ccpa__bottom_bar" style="display:none;">
<div class="ppms_ccpa__wrapper"><a href="/privacy-policy" id="ppms_ccpa__privacy-policy_link">Do not sell my personal information</a>
<div class="ppms_ccpa__close" style="cursor: pointer"></div>
</div>
<div class="ppms_ccpa_wrapper_footer"><span>Powered by <a href="https://piwik.pro/" target="_blank" id="ppms_ccpa__logo_link" rel="nofollow"><img class="ppms_ccpa__logo" src="data:image/svg+xml;base64,PD94bWwgdmVyc2lvbj0iMS4wIiBlbmNvZGluZz0iVVRGLTgiIHN0YW5kYWxvbmU9Im5vIj8+PHN2ZyAgIHhtbG5zOmRjPSJodHRwOi8vcHVybC5vcmcvZGMvZWxlbWVudHMvMS4xLyIgICB4bWxuczpjYz0iaHR0cDovL2NyZWF0aXZlY29tbW9ucy5vcmcvbnMjIiAgIHhtbG5zOnJkZj0iaHR0cDovL3d3dy53My5vcmcvMTk5OS8wMi8yMi1yZGYtc3ludGF4LW5zIyIgICB4bWxuczpzdmc9Imh0dHA6Ly93d3cudzMub3JnLzIwMDAvc3ZnIiAgIHhtbG5zPSJodHRwOi8vd3d3LnczLm9yZy8yMDAwL3N2ZyIgICBpZD0ic3ZnMjAiICAgdmVyc2lvbj0iMS4xIiAgIHZpZXdCb3g9IjAgMCAyNzIuNDIgNDQuOTUiPiAgPG1ldGFkYXRhICAgICBpZD0ibWV0YWRhdGEyNiI+ICAgIDxyZGY6UkRGPiAgICAgIDxjYzpXb3JrICAgICAgICAgcmRmOmFib3V0PSIiPiAgICAgICAgPGRjOmZvcm1hdD5pbWFnZS9zdmcreG1sPC9kYzpmb3JtYXQ+ICAgICAgICA8ZGM6dHlwZSAgICAgICAgICAgcmRmOnJlc291cmNlPSJodHRwOi8vcHVybC5vcmcvZGMvZGNtaXR5cGUvU3RpbGxJbWFnZSIgLz4gICAgICA8L2NjOldvcms+ICAgIDwvcmRmOlJERj4gIDwvbWV0YWRhdGE+ICA8ZGVmcyAgICAgaWQ9ImRlZnMyNCIgLz4gIDx0aXRsZSAgICAgaWQ9InRpdGxlMiI+TG9nb193aGl0ZTwvdGl0bGU+ICA8ZyAgICAgZGF0YS1uYW1lPSJMYXllciAyIiAgICAgaWQ9IkxheWVyXzIiPiAgICA8ZyAgICAgICBkYXRhLW5hbWU9IiFvbGQiICAgICAgIGlkPSJfb2xkIj4gICAgICA8cGF0aCAgICAgICAgIGlkPSJwYXRoNCIgICAgICAgICBzdHlsZT0iZmlsbDojMTMxMzEzIiAgICAgICAgIGQ9Ik0xNTUuNDEsMjIuMzMsMTY5LjE5LDguNTVhNSw1LDAsMCwwLDAtNy4wNyw1LDUsMCwwLDAtNy4wNywwTDE0NS42NywxNy45M1Y1LjMyYTUuMzIsNS4zMiwwLDEsMC0xMC42NCwwVjM5LjYyYTUuMzIsNS4zMiwwLDEsMCwxMC42NCwwVjMyLjA3bDIuNjctMi42N0wxNjIsNDMuMjZhNSw1LDAsMCwwLDcuMTMtN1oiIC8+ICAgICAgPHBhdGggICAgICAgICBpZD0icGF0aDYiICAgICAgICAgc3R5bGU9ImZpbGw6IzEzMTMxMyIgICAgICAgICBkPSJNMjQ5LjgsNi4wNWExNi41NCwxNi41NCwwLDAsMSwxNi42MiwxNi40MkExNi41NCwxNi41NCwwLDAsMSwyNDkuOCwzOC44OUgyMDEuMjhhMTYuNTQsMTYuNTQsMCwwLDEtMTYuNjItMTYuNDJBMTYuNTQsMTYuNTQsMCwwLDEsMjAxLjI4LDYuMDVIMjQ5LjhtMC02SDIwMS4yOGEyMi40MiwyMi40MiwwLDEsMCwwLDQ0Ljg0SDI0OS44YTIyLjQyLDIyLjQyLDAsMSwwLDAtNDQuODRaIiAvPiAgICAgIDxwYXRoICAgICAgICAgaWQ9InBhdGg4IiAgICAgICAgIHN0eWxlPSJmaWxsOiMxMzEzMTMiICAgICAgICAgZD0iTTIwNi41NiwxMi44aC01Ljc4YTIuMTEsMi4xMSwwLDAsMC0yLjEzLDIuMTNWMzAuMTdhMi4xMywyLjEzLDAsMCwwLDQuMjYsMFYyNi4zM2gzLjIzYzQuMzQsMCw3LjgyLTIuMzIsNy44Mi02Ljc5di0uMDZDMjE0LDE1LjU0LDIxMS4xOCwxMi44LDIwNi41NiwxMi44Wm0zLjEsNi44MmMwLDEuNjYtMS4yNCwyLjkzLTMuMzcsMi45M2gtMy4zN1YxNi42NGgzLjI5YzIuMTMsMCwzLjQ1LDEsMy40NSwyLjkzWm0xNS4xMi02LjgyaC02LjcyYTIuMTEsMi4xMSwwLDAsMC0yLjEzLDIuMTNWMzAuMTdhMi4xMywyLjEzLDAsMCwwLDQuMjYsMFYyNS45NWgzLjRsNC4xNSw1LjI1YTIuNTUsMi41NSwwLDAsMCwyLjEsMS4xLDIsMiwwLDAsMCwyLTIsMi40OCwyLjQ4LDAsMCwwLS42OS0xLjYzbC0zLTMuNTlhNS45LDUuOSwwLDAsMCwzLjg3LTUuODh2LS4wNmE2LjA2LDYuMDYsMCwwLDAtMS42Ni00LjQyQTcuNzEsNy43MSwwLDAsMCwyMjQuNzcsMTIuOFptMyw2LjY1YzAsMS42My0xLjE5LDIuNzMtMy4yNiwyLjczaC00LjMxVjE2LjY0aDQuMjNjMi4wNywwLDMuMzQuOTQsMy4zNCwyLjc2Wm0xNi40Mi03YTEwLDEwLDAsMCwwLTEwLjMxLDEwdi4wNmExMC4yOSwxMC4yOSwwLDAsMCwyMC41Ni0uMDZ2LS4wNkE5LjkxLDkuOTEsMCwwLDAsMjQ0LjE3LDEyLjQ3Wk0yNTAsMjIuNTJhNS43OCw1Ljc4LDAsMCwxLTUuOCw2LDUuODcsNS44NywwLDAsMS01Ljg2LTYuMDd2LS4wNmE1Ljc4LDUuNzgsMCwwLDEsNS44LTZBNS44Nyw1Ljg3LDAsMCwxLDI1MCwyMi40N1oiIC8+ICAgICAgPHBhdGggICAgICAgICBpZD0icGF0aDEwIiAgICAgICAgIHN0eWxlPSJmaWxsOiMxMzEzMTMiICAgICAgICAgZD0iTTEwNywuMTlhNC44NCw0Ljg0LDAsMCwwLTYsMy4zM0w5NS40NywyMi44Nyw4OS45NCwzLjUyQTQuODMsNC44MywwLDAsMCw4NS40NywwaC0uNjFhNC44Myw0LjgzLDAsMCwwLTQuNDgsMy40OUw3NC44NywyMi43OSw2OS4zNiwzLjUyQTQuODQsNC44NCwwLDEsMCw2MC4wNSw2LjJMNzAuMTMsNDEuNDRhNC44Myw0LjgzLDAsMCwwLDQuMzgsMy40OWguNzJhNC44Myw0LjgzLDAsMCwwLDQuMzgtMy40OUw4NS4xNiwyMmw1LjU1LDE5LjQyYTQuODMsNC44MywwLDAsMCw0LjQzLDMuNDloLjY2YTQuODMsNC44MywwLDAsMCw0LjQzLTMuNDlMMTEwLjMxLDYuMkE0Ljg2LDQuODYsMCwwLDAsMTA3LC4xOVoiIC8+ICAgICAgPHBhdGggICAgICAgICBpZD0icGF0aDEyIiAgICAgICAgIHN0eWxlPSJmaWxsOiMxMzEzMTMiICAgICAgICAgZD0iTTExNi41LDM5LjYyYTUuMzIsNS4zMiwwLDEsMCwxMC42NCwwVjUuMzJhNS4zMiw1LjMyLDAsMSwwLTEwLjY0LDBaIiAvPiAgICAgIDxwYXRoICAgICAgICAgaWQ9InBhdGgxNCIgICAgICAgICBzdHlsZT0iZmlsbDojMTMxMzEzIiAgICAgICAgIGQ9Ik00My4zMywzOS42M2E1LjMyLDUuMzIsMCwxLDAsMTAuNjQsMFY1LjM0YTUuMzIsNS4zMiwwLDEsMC0xMC42NCwwWiIgLz4gICAgICA8cGF0aCAgICAgICAgIGlkPSJwYXRoMTYiICAgICAgICAgc3R5bGU9ImZpbGw6IzEzMTMxMyIgICAgICAgICBkPSJNMzcuMjksMTZBMTUuOTIsMTUuOTIsMCwwLDAsMjIsLjA5djBINS4zMkE1LjI4LDUuMjgsMCwwLDAsMCw1LjM4VjM5LjU2YTUuMjgsNS4yOCwwLDAsMCw1LjMyLDUuMzIsNS4yOCw1LjI4LDAsMCwwLDUuMzItNS4zMlYzMS45M0gyMnYwQTE1LjkyLDE1LjkyLDAsMCwwLDM3LjI5LDE2Wm0tMTcsNi40N0gxMC42NFY5LjY3aDkuNDZhNi40LDYuNCwwLDAsMSwuMTksMTIuNzlaIiAvPiAgICA8L2c+ICA8L2c+PC9zdmc+" alt="Piwik PRO"></a></span></div>
</div>
<script>
const ppms_ccpa__bottom_bar = document.querySelector("#ppms_ccpa__bottom_bar"),
ppms_ccpa__close = document.querySelector(".ppms_ccpa__close"),
ppms_ccpa__cookie = document.cookie.match(/ppms_ccpa__cookie/);
ppms_ccpa__bottom_bar && ppms_ccpa__close && (null === ppms_ccpa__cookie && ppms_ccpa__bottom_bar.setAttribute("style", "display: block;"), ppms_ccpa__close.addEventListener("click", function() {
document.cookie = "ppms_ccpa__cookie=1; path=/", ppms_ccpa__bottom_bar.remove()
}));
</script>Note: “Do not sell my personal information” directs to /privacy-policy, so you might need to customize this code for your page. For example, you can include an anchor that links to the opt-out form section: /privacy-policy/#no-sale.
Feel free to adjust the <style> </style> to match your website’s design.
To add a custom code, follow these steps:
1. Go to Menu > Tag Manager.
2. Navigate to Tags.
3. Click Add a tag.
4. Select the following type: Custom code (async) and Next.
5. Name your tag.
6. In Tag code, type your code.
7. In Advanced tag settings, set the following type: No consent is required.

Note: Use this option to show the bottom bar to all visitors, regardless of whether they’ve consented to tracking through a opt-out form.
8. Turn on Respect opt-out and DNT.
Note: When this option is on, the tag won’t activate for visitors who opt out of tracking. So, in our case, if a visitor opts out through the privacy policy’s opt-out form, they won’t see the bottom bar again.
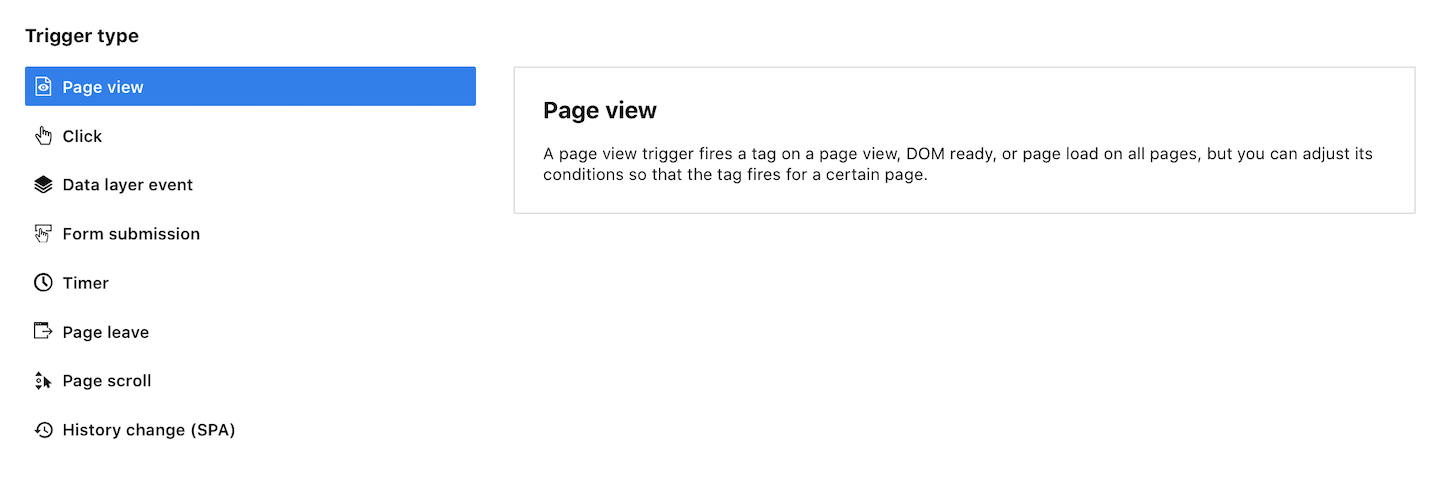
9. In Tag triggers, click Add a trigger.
10. Name the trigger.
11. In Trigger type, choose the following trigger type: Page views.
12. In Event conditions, set Returning visitor is false.
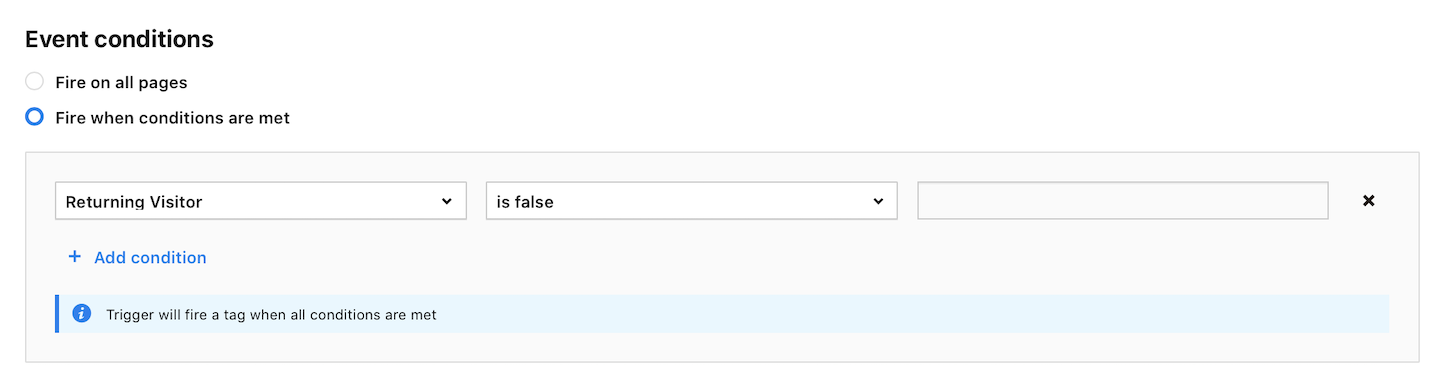
Note: Use this condition to show the bottom bar to first-time visitors.
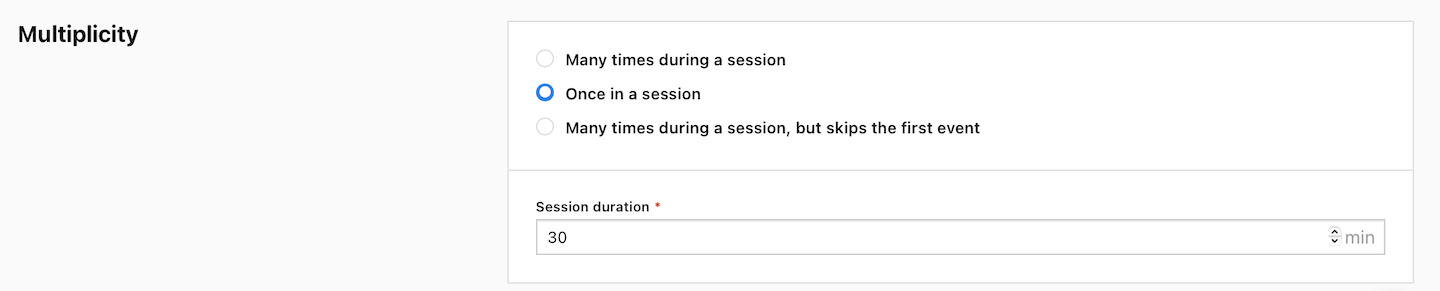
13. (Optional) In Multiplicity, set the trigger to fire the tag once per session.
14. When you’re done, click Save.
15. Click Save to save the tag.
16. Test your tag in debug mode.
17. When you’re happy with how the tag works, click Publish.
18. Voila! Your bottom bar is all set for use.

Note: If you’re using CDP, you can create an audience of users in California and only show the bar to them.
Option #2: Add a link to footer menu
Another way to set up a “Do not sell my personal information” link is to add it to the footer menu.
To add a link to the footer menu, follow these steps:
1. Create an anchor for the opt-out form section on your privacy policy page. Example: /privacy-policy/#no-sale.
2. Add the link to the footer menu.
3. Done!