Piwik PRO displays the IP address of each of your website visitors in various reports and uses it to read location and network data. If you want to protect a visitor’s IP address, you can do so at four levels.
Let’s look at a few examples:
- Full IP address: 192.168.111.255 or 1050:0000:0000:0000:0000:0000:0000:0000
- Masked at level 1: 192.168.100.xxx or 1050:0000:0000:0000:xxxx:xxxx:xxxx:xxxx
- Masked at level 2: 192.168.xxx.xxx or 1050:0000:0000:xxxx:xxxx:xxxx:xxxx:xxxx
- Masked at level 3: 192.xxx.xxx.xxx or 1050:0000:xxxx:xxxx:xxxx:xxxx:xxxx:xxxx
- Masked at level 4: xxx.xxx.xxx.xxx or 1050:00xx:xxxx:xxxx:xxxx:xxxx:xxxx:xxxx
The masking of an IP address happens after the tracker captures the address but before it sends it to the database. So when you mask an IP address, you will never have access to that visitor’s full IP address.
IP addresses are used to read location (country and city) and network data. So, when an address is incomplete, this data will be less precise. The more bytes you mask, the less precise the location data.
Note: Piwik PRO can read location and network data from the full IP address just before it’s masked, so the country and city data will be precise regardless of IP masking.
Before you start
Here are some things to know before you turn on IP masking:
- You can choose to read location and network data from the full or masked IP address.
- When you use Consent Manager, IP masking will apply to visitors who consent to analytics. Location and network data will be captured according to the setup in the IP masking section.
- When you choose Don’t collect data from these IP addresses (Administration > Sites & apps > Data collection) and specify the IP addresses you want to exclude, Piwik PRO will first read the excluded IP address before masking it.
Mask IP address
To mask your visitors’ IP addresses, follow these steps:Available from version 16.0.0. For versions below 16.0.0, go to Menu > Administration > Platform > Global website settings > Privacy settings.
1. Go to Menu > Administration.
2. Navigate to Sites & apps.
3. On the left, choose the site or app you want to work with.
4. Navigate to Privacy.
5. In IP addresses, turn on Mask IP address.
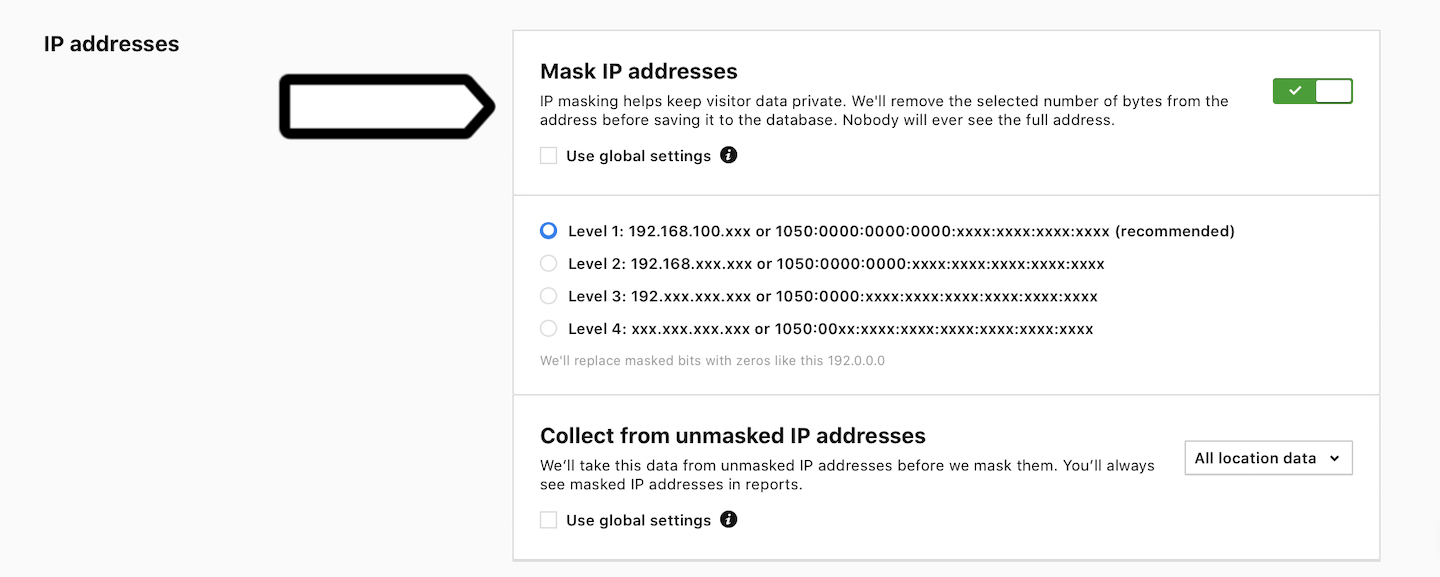
6. Select the masking level.
Note: When you use Consent Manager, IP masking will apply to visitors who consent to analytics. Location and network data will be captured according to the setup in the IP masking section.
7. In Collect from unmasked IP addresses choose one of the following options: All location data, City, Region or Continent.
Note: We’ll take this data from unmasked IP addresses before masking them. You’ll never have access to the visitor’s full IP address.
Note: You can also mask IP addresses for the entire account by going to Administration > Account > Global site & app settings.