Note: In versions below 16.23.0, this tag is called Facebook Pixel.
A Meta Pixel tag lets you add a Meta pixel to your website. This helps you run retargeting campaigns on Facebook or Instagram and see how well they work. The pixel collects data about visitors and shares it with Meta, so you can create a specific audience for future ads. It also tracks visitors who come from Facebook or Instagram ads and helps Meta measure conversions.
In this article, we’ll explain how to use our Meta Pixel tag to install the pixel.
Create a Meta pixel and copy its ID
If you haven’t done so already, create a pixel in Meta Business Suite and copy its ID.
To create a pixel and find its ID, follow these steps:
1. Log in to Meta Business Suite.
2. Navigate to Menu > Events Manager.
3. Click Connect Data Sources and select Web.
4. Select Meta Pixel and click Connect.
5. Add your Pixel Name.
6. Enter your site’s URL to access the easy setup options.
7. Click Continue.
8. Done! Your pixel is now ready to use.
9. Copy the pixel ID located under the site name. You’ll need it in the next steps.
Set up your Meta Pixel tag
Once you have your pixel ready, it’s time to add it to your site using our dedicated tag in Tag Manager.
To set up the Meta Pixel tag, follow these steps:
1. Log in to Piwik PRO.
2. Go to Menu > Tag Manager.
3. Click Add a tag.
4. Name your tag and select the following type: Meta Pixel.
5. Click Next.
6. Paste your pixel ID.
7. In Event, select the following event type: View content.
8. In Advanced tag settings, choose Consent type. Set it up if you use a consent form on your site. This tag will only fire for visitors who accept the selected consent type.
9. Respect opt-out and DNT is turned off by default. Turn it on, if you want to respect visitors who’ve turned on the Do-Not-Track feature in their browsers or who’ve opted out of tracking using our opt-out form.
10. In Flight dates, set the date and time when the tag will fire.
11. In Tag triggers, click Choose existing trigger and pick All page views. The pixel needs to be present on each page.
12. Click Save.
13. Test your tag in debug mode.
14. When you’re happy with how the tag works, click Publish.
15. Done!
Check if your pixel is working
After installing the pixel, test it in Meta Business Suite to make sure it’s working properly.
To see if your pixel is working, follow these steps:
1. Log in to Meta Business Suite.
2. Navigate to Menu > Events Manager.
3. Click Details in the Pixel tab.
4. If the status is Active, your pixel is working properly.
Set up events
Once you’ve got the pixel in place, you can start tracking specific visitor actions on your site by adding Meta events. There are two ways to do this: (1) use the Meta Pixel tag in Piwik PRO or (2) use custom conversions in Meta Business Suite.
Option #1: Piwik PRO and Meta Pixel tag
To track a specific action with the Meta Pixel tag, follow these steps:
1. Log in to Piwik PRO.
2. Go to Menu > Tag Manager.
3. Click Add a tag.
4. Name your tag and select the following type: Meta Pixel.
5. Click Next.
6. Paste your pixel ID and select an event type. Example: Add to cart.
Note: You can also add event properties to each event.
7. In Advanced tag settings, choose Consent type. Set it up if you use a consent form on your site. This tag will only fire for visitors who accept the selected consent type.
8. Respect opt-out and DNT is turned off by default. Turn it on, if you want to respect visitors who’ve turned on the Do-Not-Track feature in their browsers or who’ve opted out of tracking using our opt-out form.
9. In Flight dates, set the date and time when the tag will fire.
10. In Tag triggers, click Add a trigger. Define the trigger as the specific event you want to capture, such as adding an item to a shopping cart.
11. Click Save.
12. Test your tag in debug mode.
13. When you’re happy with how the tag works, click Publish.
14. Done!
Option #2: Meta Business Suite and custom conversions
To create a custom conversion in Meta Business Suite, follow these steps:
1. Log in to Meta Business Suite.
2. Navigate to Menu > Events Manager > Custom Conversions.
3. Click Create Custom Conversion.
4. Name your custom conversion.
5. Add rules for your custom event. You can add multiple parameters by clicking And.
6. Select a category for your custom conversion.
7. (Optional) Set the conversion value.
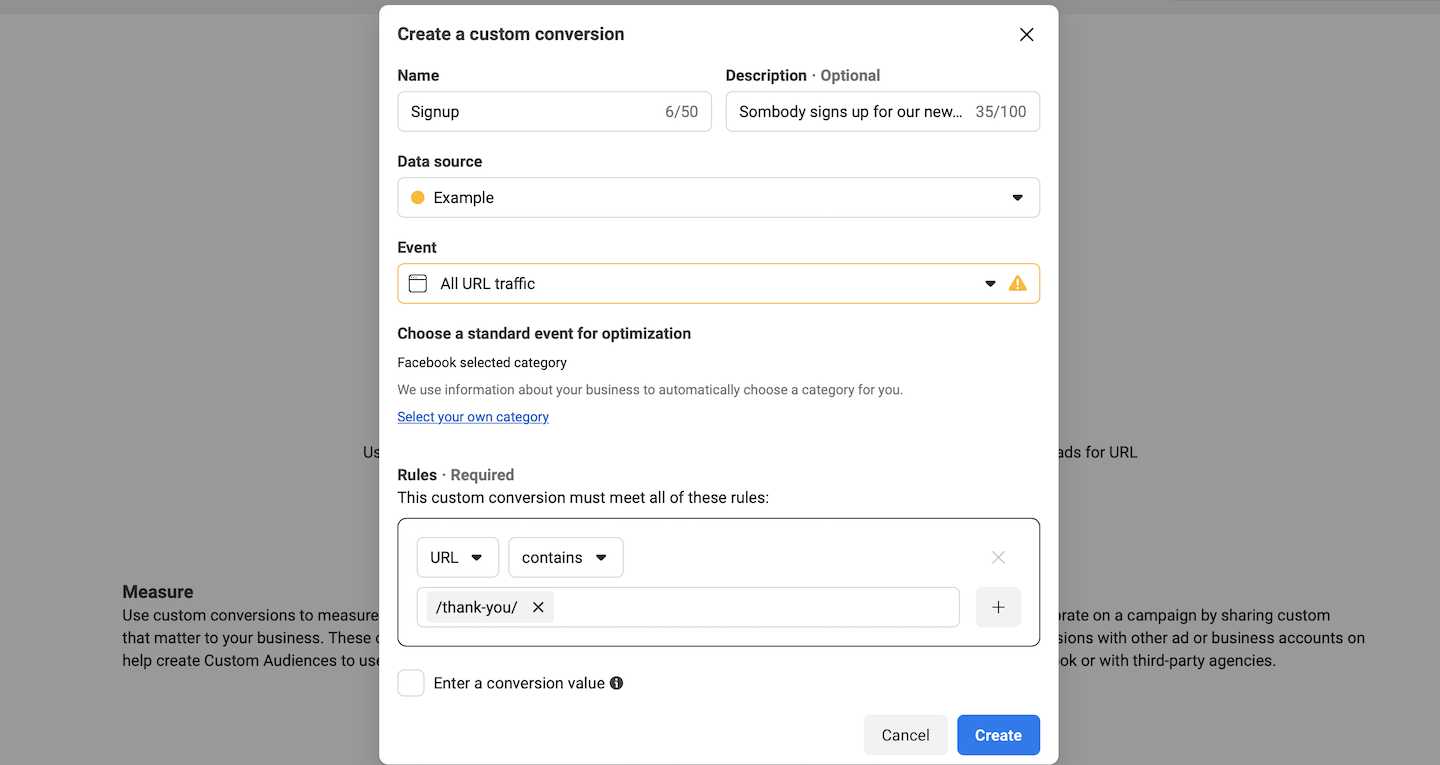
8. Click Create.
9. Done!
Conversion tracking report
Once you’ve set the pixel and events, data will start to flow to Meta Business Suite and will show up in advertising reports as conversions.
To view Facebook or Instagram ad conversions, follow these steps:
1. Log in to Meta Business Suite.
2. Navigate to Menu > Ads Manager.
3. Select Campaigns, Ad Sets or Ads.
4. Select the Columns drop-down menu.
5. Click Customize Columns and check the boxes next to the activities that are important to you.
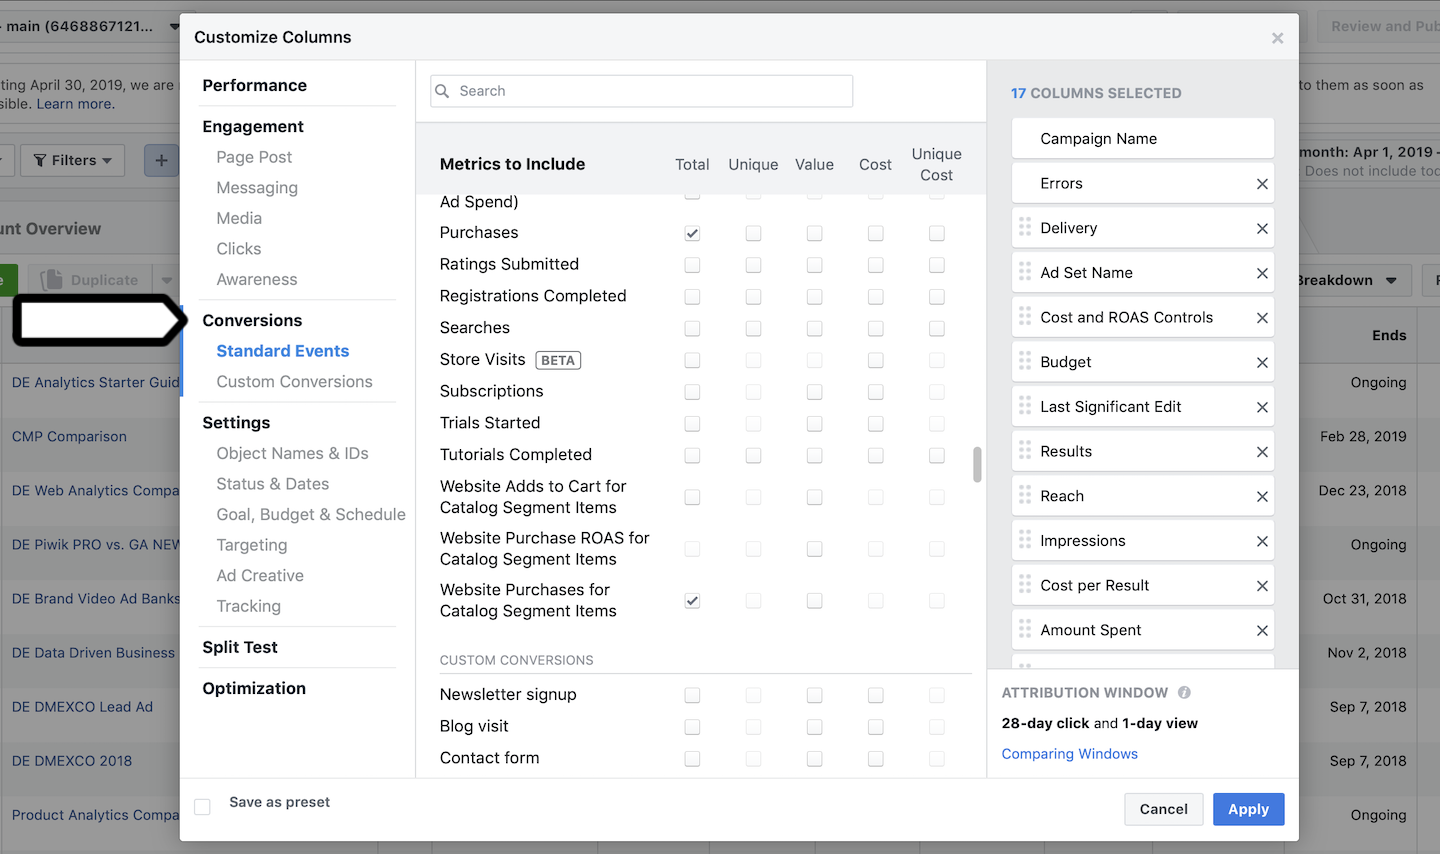
6. Click Apply. You’ll see the selected columns in the ad table.
7. Done!
Create an audience for Facebook or Instagram ads
In addition to tracking conversions, you can create an audience based on the data collected from your site. You can define the audience by using factors like the page URL, time spent on the page or specific events. This will help you effectively target ad campaigns to the people you want to reach.
To create a new audience for Facebook or Instagram ads, follow these steps:
1. Log in to Meta Business Suite.
2. Navigate to Menu > Audiences.
3. Click the Create a Custom Audience.
4. Click Website.
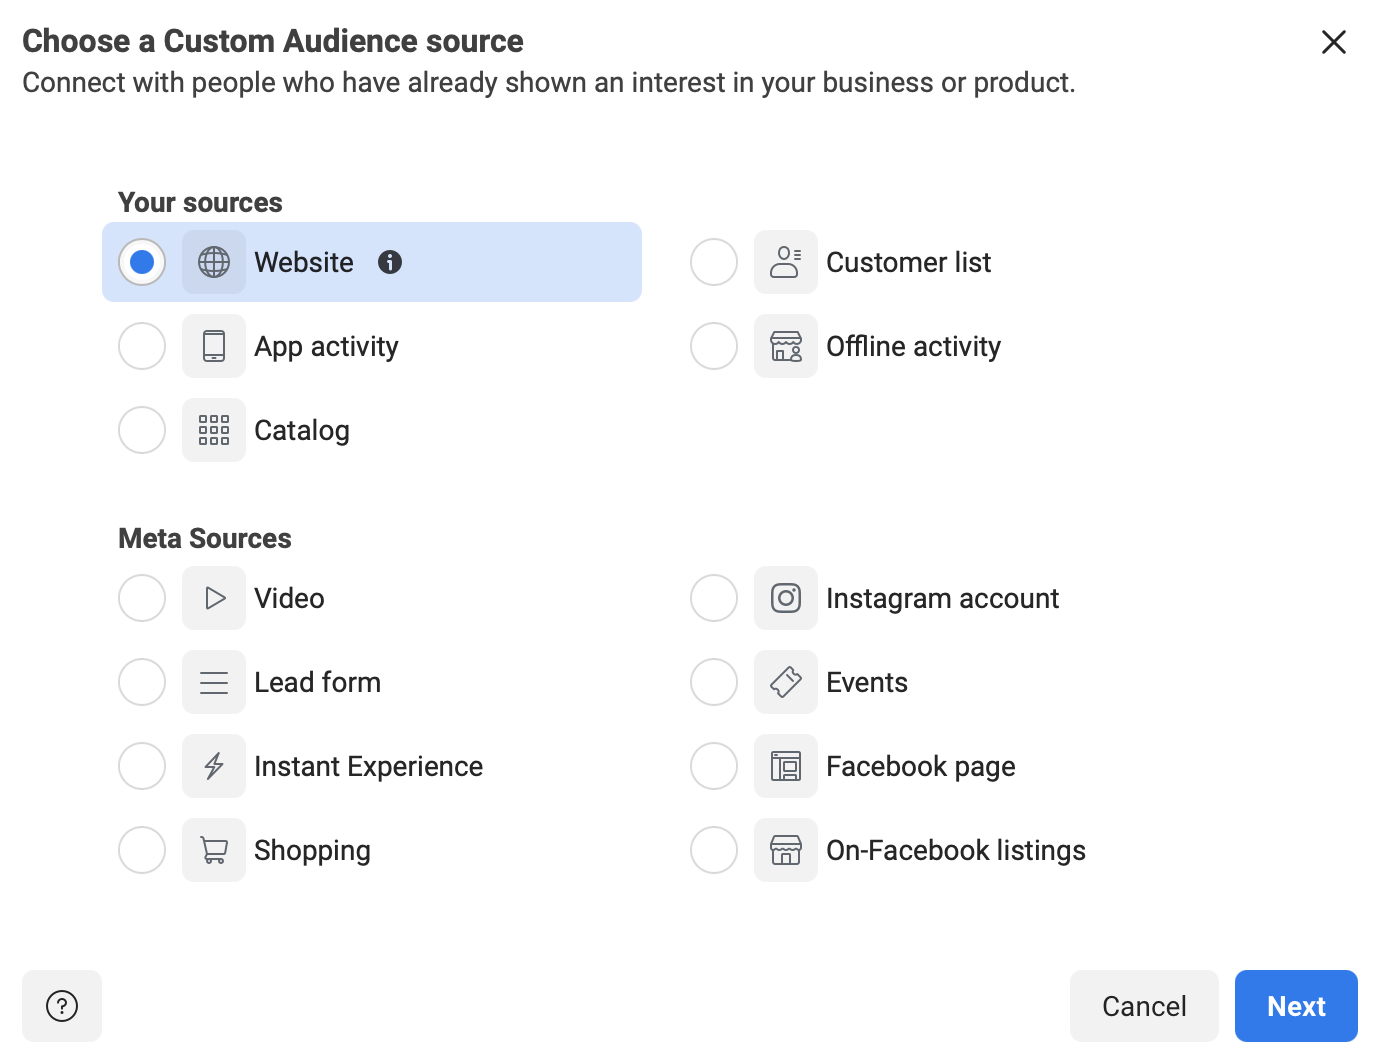
5. Set conditions for your audience.
6. Name the audience.
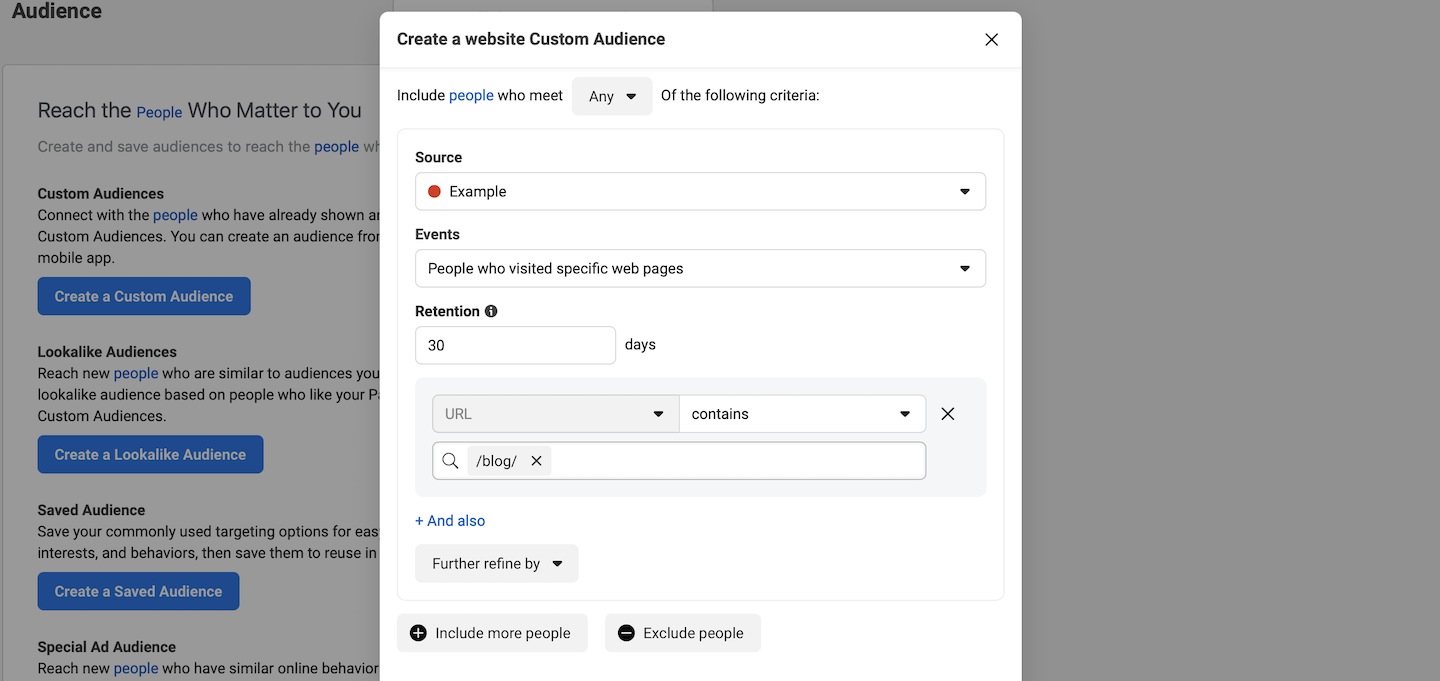
7. Click Create audience.
8. All set! You can now create a new Facebook or Instagram campaign for this audience.