A data layer is a data structure on your site or app where you can store data and access it with tools like Tag Manager. You can include any data you want in your data layer. Here are some examples:
- Page information: category, region, currency
- Product information: product name, category, price
- Order information: order ID, total, shipping
- User information: user ID, new / returning user, city
- Event information: event name, label of a clicked button
Tag Manager can read data from your data layer and use it for tags, triggers and variables – just like it would use data from page’s source code.
Add a data layer to your site or app
To add a data layer to your site, follow these steps:
1. Add information to the data layer with the dataLayer.push() command.
Example:
<script>
    window.dataLayer = window.dataLayer || [];
    window.dataLayer.push({
        'blogCategory': 'Home budget',
        'blogAuthor': 'John Doe',
    });
</script>
The window.dataLayer = window.dataLayer || []; command creates a data layer. The dataLayer.push() command adds information in key-value pairs. In our example, the key-value pairs are:
'blogCategory': 'Home budget''blogAuthor': 'John Doe'
The key is a category of things like a blog category or blog author. Each key can have different values. For example, a blog category key can have values like 'Home budget', 'Savings', 'Investments' and the like.
Note:
- Information in the data layer is assigned to each page so you need to make sure all pages hold the data you need.
- If you want to use information from the data layer before the page loads, add the data layer code above the container’s code.
- The default data layer name is
dataLayer, but you can change it to a custom one. Read more
Set up a data layer variable
When you have your keys ready, you can access it with a data layer variable.
To set up a data layer variable, follow these steps:
1. Go to Menu > Tag Manager.
2. Navigate to Variables.
3. Click Add a variable.
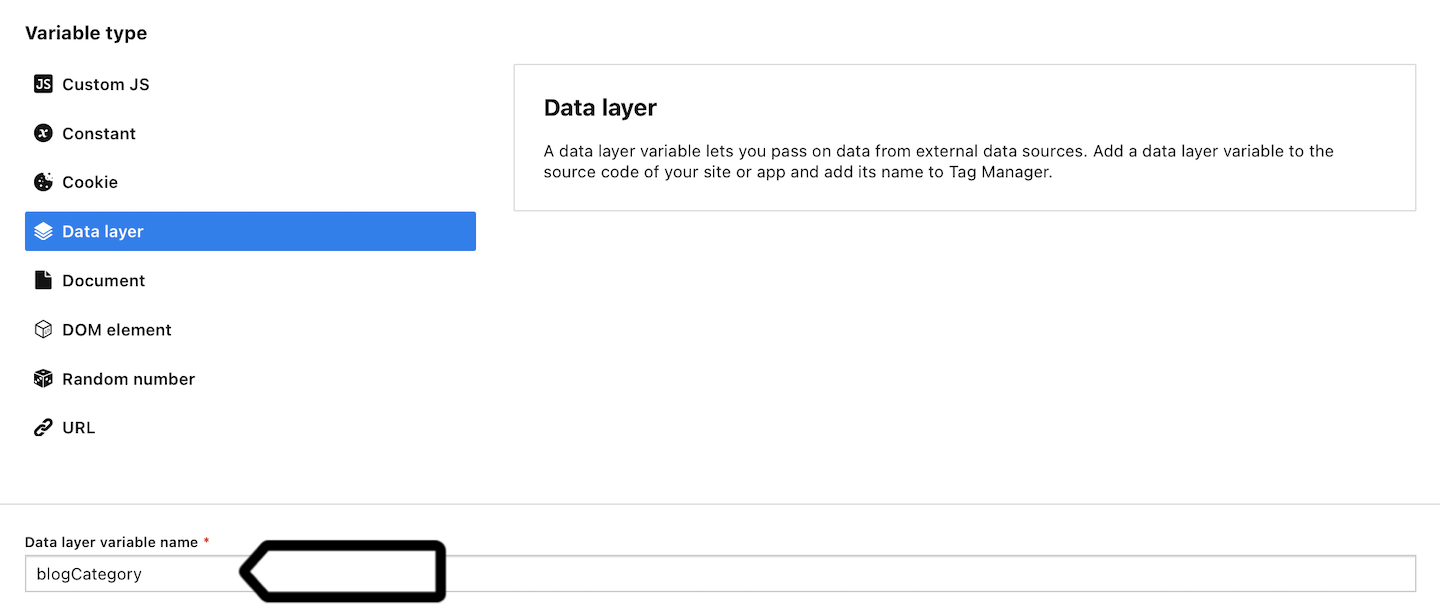
4. Name your variable. Example: Blog category.
5. Select the following variable type: Data layer.
6. In Data layer variable name, type the key exactly as it is written in the code. In our example, it’s blogCategory.

Note: Available from 16.30.0 You can use a variable inside another variable. Just keep in mind that a variable can’t contain a circular dependency. Don’t create a closed loop. Example: A depends on B, B depends on C, C depends on A.
Note: Available from 17.1.0 You can refer to nested object keys and array items in a data layer variable. Example: product.price or products.0.
7. Click Save.
8. Repeat steps 3–7 for every key you want to use as a variable.
9. Test your variable in debug mode.
10. When you’re happy with how the variable works, click Publish.
11. Done!
Add an event to a data layer
So far we’ve shown you how to use a data layer to add information in the form of key-value pairs. But you can also use a data layer to add a new event and then use it in a trigger.
To add an event to a data layer, follow these steps:
1. Add information to the data layer with the dataLayer.push() command.
Example 1
<script>
    window.dataLayer = window.dataLayer || [];
    window.dataLayer.push({
        'event': 'event_name',
    });
</script>
Example 2
<script>
    window.dataLayer = window.dataLayer || [];
    window.dataLayer.push({
        'event': 'event_name',
        'event_key': 'event_value',
    });
</script>
The event field of the event object holds information about the event name. All other fields of the event object hold additional information about the event (Example: event_key in example 2). All fields (except for event) are available as variables.
Set up a data layer event trigger
When you have your events in a data layer ready, you can use it in a data layer event trigger.
To set up a data layer event trigger, follow these steps:
1. Go to Menu > Tag Manager.
2. Navigate to Triggers.
3. Click Add a trigger.
4. Name the trigger.
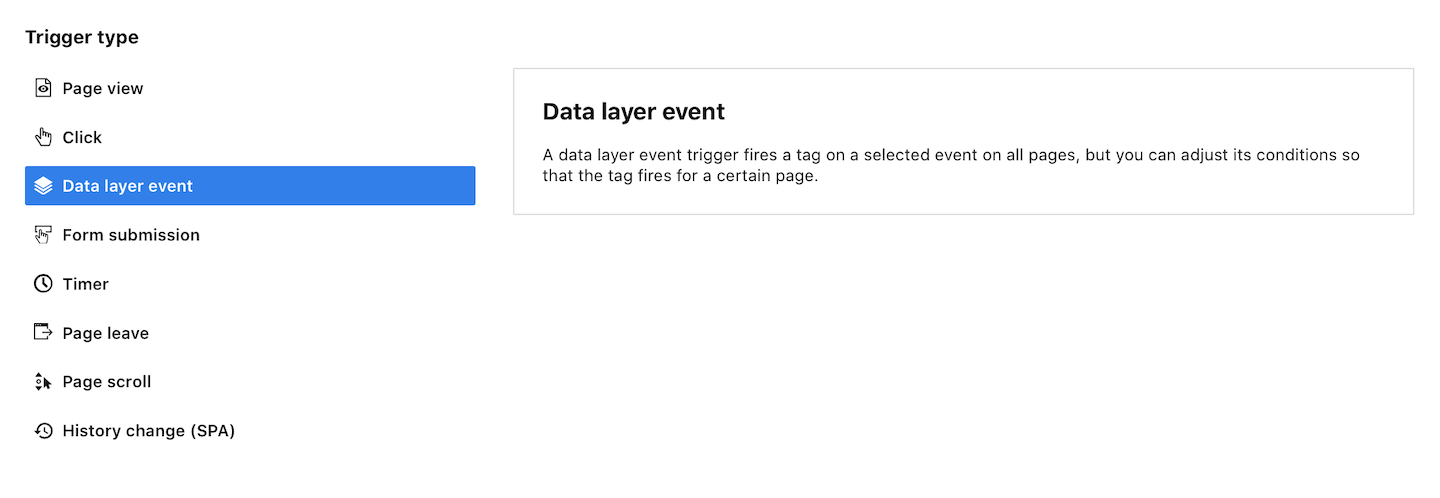
5. In Event type, choose the following type: Data layer event.

6. Click Next.
7. Enter the event name that you set in your data layer.

8. (Optional) Define event conditions.
9. Click Save.
10. Test your variable in debug mode.
11. If everything works correctly, click Publish.
12. Done!
Examples
Here are some examples of information or events pushed to the data layer:
1. Send an event when a visitor clicks on a button.
<button onclick="dataLayer.push({'event': sign_up});">Sign up</button>2. If your forms have a custom validation in JavaScript, you can send an event when a visitor submits or fails to submit a form. Such events can then be used in Tag Manager.
dataLayer.push({'event': 'form_submitted_successfully'}) dataLayer.push({'event': 'form_validation_error'})Troubleshooting
Here are some tips on how to work with the data layer:
1. Don’t overwrite the window.dataLayer variable: Don’t use the data layer directly dataLayer = [{'item': 'value'}]) because it will overwrite all existing values in the data layer. Always declare the data layer with window.dataLayer = window.dataLayer || []; and then use dataLayer.push({'item': 'value'}) to add information in key-value pairs.
2. The dataLayer object name is case-sensitive: Always write dataLayer with correct casing (camel case).
Example:
datalayer.push({'blogCategory': 'Home budget'});    // Bad (lowercase: datalayer)
dataLayer.push({'blogCategory': 'Home budget'});    // Good (camel case: dataLayer)
3. Use quotes for variable names with special characters:
Example:
dataLayer.push({blog-category: 'Home budget'});      // Bad (no quote marks)
dataLayer.push({'blog-category': 'Home budget'});    // Good (quote marks)
4. Keep variable names consistent across pages: When you use the same variable across pages, keep its name consistent.
Bad:
// Homepage:
dataLayer.push({'blogCategory': 'Home budget'});

// Blog post page:
dataLayer.push({'blog-category': 'Home budget'});
Good:
// Homepage:
dataLayer.push({'blogCategory': 'Home budget'});

// Blog post page:
dataLayer.push({'blogCategory': 'Home budget'}); 