If your site has embedded videos, maps or other iframes, you may want to block them for visitors who don’t consent to analytics or remarketing. That’s because the iframes load another site on your site, and while doing so, they can collect some visitor data.
In this article, we’ll show you how to block and unblock iframes on your site depending on the visitor’s consent.
Prepare a placeholder for the blocked iframe
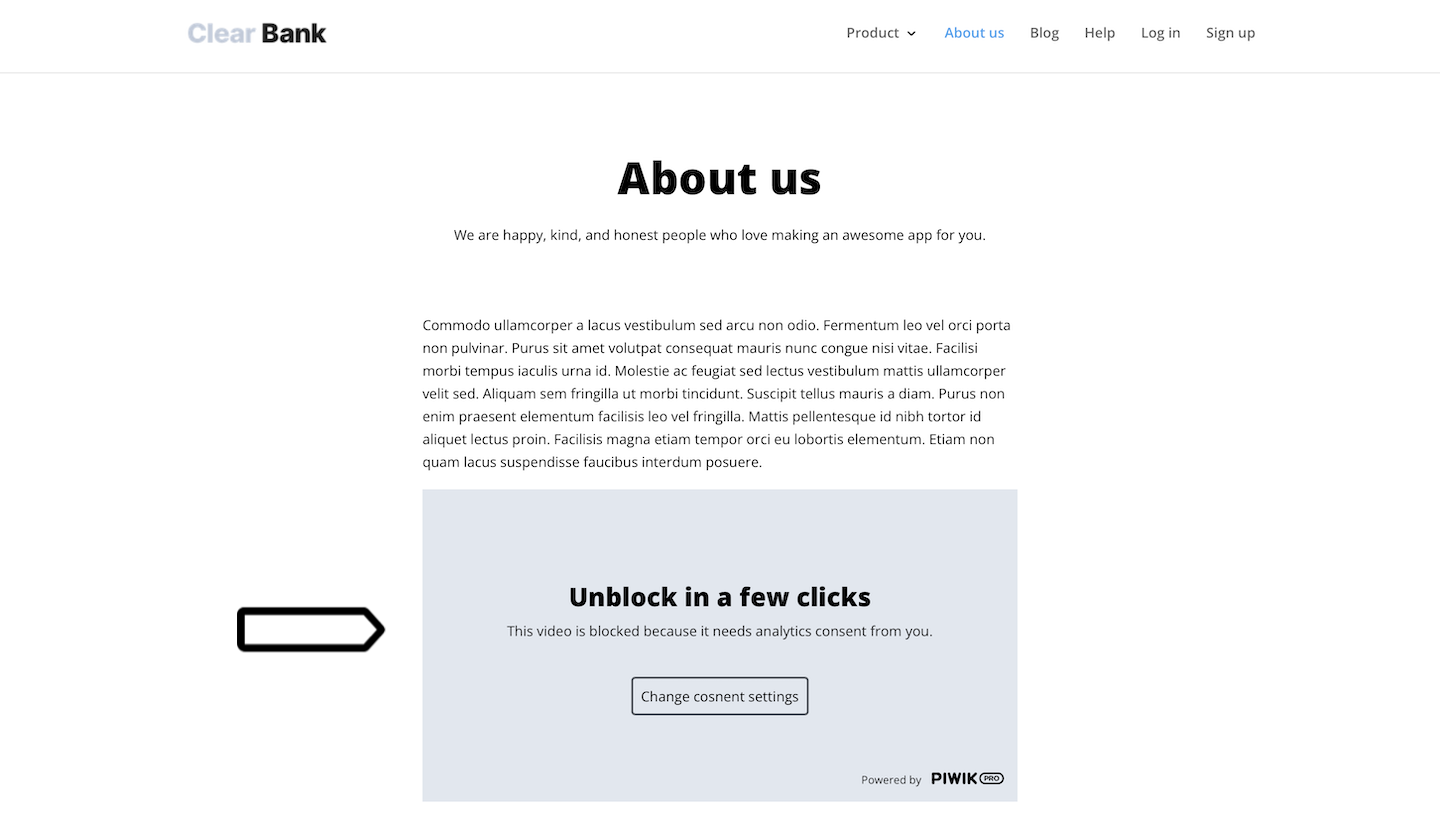
First, you’ll need to remove the iframe from your site and replace it with a friendly placeholder. This placeholder will show up for visitors who haven’t given consent for analytics or are still deciding. Remember, people prefer not to encounter blocked content, so keep the message human and friendly.
To add a placeholder to your site, follow these steps:
1. Open the page containing an iframe.

2. Remove the iframe from your site’s source code. But keep the iframe code for later.
3. Add HTML code with a placeholder. You can customize the message to match your company’s voice and tone.
<div id="pp_block_banner_content">
	<div class="pp_block_banner_main">
		<div class="pp_block_banner_main_content">
			<h2>Unblock in a few clicks</h2>
			<p>This video is blocked because it needs analytics consent from you.</p>
		</div>
		<div class="pp_block_banner_button_wrapper">
			<button id="pp_block_banner_button" class="pp_block_banner_button" onclick="pp_banner_button_pressed()">Change consent settings</button>
		</div>
	</div>
	<div class="pp_block_banner_footer"> <span class="pp_block_banner_powered_by">Powered by </span>
		<a href="https://piwik.pro/?utm_source=App&utm_medium=Consent_Pop_Up&utm_campaign=Consent_Manager_Blocked_content">
			<svg xmlns:dc="http://purl.org/dc/elements/1.1/" xmlns:cc="http://creativecommons.org/ns#" xmlns:rdf="http://www.w3.org/1999/02/22-rdf-syntax-ns#" xmlns:svg="http://www.w3.org/2000/svg" xmlns="http://www.w3.org/2000/svg" version="1.1" viewBox="0 0 272.42 44.95" class="pp_block_banner_footer__logo" data-disable-select="true" id="ppms_cm_footer__logo" aria-labelledby="ppms_cm_footer__logo_title" role="img">
				<title id="ppms_cm_footer__logo_title">Piwik PRO</title>
				<g>
					<path d="M37.29,16A15.92,15.92,0,0,0,22,.09v0H5.32A5.28,5.28,0,0,0,0,5.38V39.56a5.28,5.28,0,0,0,5.32,5.32,5.28,5.28,0,0,0,5.32-5.32V31.93H22v0A15.92,15.92,0,0,0,37.29,16Zm-17,6.47H10.64V9.67h9.46a6.4,6.4,0,0,1,.19,12.79Z"></path>
					<path d="M43.33,39.63a5.32,5.32,0,1,0,10.64,0V5.34a5.32,5.32,0,1,0-10.64,0Z"></path>
					<path d="M107,.19a4.84,4.84,0,0,0-6,3.33L95.47,22.87,89.94,3.52A4.83,4.83,0,0,0,85.47,0h-.61a4.83,4.83,0,0,0-4.48,3.49L74.87,22.79,69.36,3.52A4.84,4.84,0,1,0,60.05,6.2L70.13,41.44a4.83,4.83,0,0,0,4.38,3.49h.72a4.83,4.83,0,0,0,4.38-3.49L85.16,22l5.55,19.42a4.83,4.83,0,0,0,4.43,3.49h.66a4.83,4.83,0,0,0,4.43-3.49L110.31,6.2A4.86,4.86,0,0,0,107,.19Z"></path>
					<path d="M116.5,39.62a5.32,5.32,0,1,0,10.64,0V5.32a5.32,5.32,0,1,0-10.64,0Z"></path>
					<path d="M155.41,22.33,169.19,8.55a5,5,0,0,0,0-7.07,5,5,0,0,0-7.07,0L145.67,17.93V5.32a5.32,5.32,0,1,0-10.64,0V39.62a5.32,5.32,0,1,0,10.64,0V32.07l2.67-2.67L162,43.26a5,5,0,0,0,7.13-7Z"></path>
					<path d="M249.8,6.05a16.54,16.54,0,0,1,16.62,16.42A16.54,16.54,0,0,1,249.8,38.89H201.28a16.54,16.54,0,0,1-16.62-16.42A16.54,16.54,0,0,1,201.28,6.05H249.8m0-6H201.28a22.42,22.42,0,1,0,0,44.84H249.8a22.42,22.42,0,1,0,0-44.84Z"></path>
					<path d="M206.56,12.8h-5.78a2.11,2.11,0,0,0-2.13,2.13V30.17a2.13,2.13,0,0,0,4.26,0V26.33h3.23c4.34,0,7.82-2.32,7.82-6.79v-.06C214,15.54,211.18,12.8,206.56,12.8Zm3.1,6.82c0,1.66-1.24,2.93-3.37,2.93h-3.37V16.64h3.29c2.13,0,3.45,1,3.45,2.93Zm15.12-6.82h-6.72a2.11,2.11,0,0,0-2.13,2.13V30.17a2.13,2.13,0,0,0,4.26,0V25.95h3.4l4.15,5.25a2.55,2.55,0,0,0,2.1,1.1,2,2,0,0,0,2-2,2.48,2.48,0,0,0-.69-1.63l-3-3.59a5.9,5.9,0,0,0,3.87-5.88v-.06a6.06,6.06,0,0,0-1.66-4.42A7.71,7.71,0,0,0,224.77,12.8Zm3,6.65c0,1.63-1.19,2.73-3.26,2.73h-4.31V16.64h4.23c2.07,0,3.34.94,3.34,2.76Zm16.42-7a10,10,0,0,0-10.31,10v.06a10.29,10.29,0,0,0,20.56-.06v-.06A9.91,9.91,0,0,0,244.17,12.47ZM250,22.52a5.78,5.78,0,0,1-5.8,6,5.87,5.87,0,0,1-5.86-6.07v-.06a5.78,5.78,0,0,1,5.8-6A5.87,5.87,0,0,1,250,22.47Z"></path>
				</g>
			</svg>
		</a>
	</div>
</div>
4. Add CSS for your placeholder. Set the width and height to the size of your iframe and adjust the style to match your site’s style.
#pp_block_banner_content {
	background-color: #ffffff !important;
	width: 100% !important;
	height: 100% !important;
	box-sizing: border-box !important;
	font-family: BlinkMacSystemFont, -apple-system, Roboto, Oxygen-Sans, Ubuntu, Cantarell, "Helvetica Neue", sans-serif !important;
	text-align: center !important;
	color: #131313 !important;
	font-size: 14px !important;
	box-shadow: 0px 0px 5px 1px rgb(0 0 0 / 14%) !important;

	position: relative !important;
	display: flex !important;
	justify-content: center !important;
	flex-direction: column !important;
	align-items: center !important;
}
.pp_block_banner_main {
	position: absolute !important;
	box-sizing: border-box !important;
}
.pp_block_banner_main_content {
	box-sizing: border-box !important;
	padding: 10px !important;
}
.pp_block_banner_button {
	font-family: BlinkMacSystemFont, -apple-system, Roboto, Oxygen-Sans, Ubuntu, Cantarell, "Helvetica Neue", sans-serif !important;
	background-color: #2775f2 !important;
	color: white !important;
	border: 1px solid #0b4bb3 !important;
	border-radius: 2px !important;
	padding: 8px !important;
	font-weight: 400 !important;
	cursor: pointer !important;
}
.pp_block_banner_button:hover {
	box-shadow: 0 1px 1px 0 rgb(0 0 0 / 5%), 0 0 2px 1px rgb(0 125 255 / 50%);
}
.pp_error_button {
	box-sizing: border-box !important;
	background-color: #e3301b !important;
	color: white !important;
	padding: 8px !important;
	text-align: center !important;
	border: 1px solid #bb210f !important;
	border-width: 1px !important;
	border-style: solid !important;
	border-radius: 2px !important;
	cursor: pointer !important;
}
.pp_error_button:hover {
	box-shadow: 0 1px 1px 0 rgb(0 0 0 / 5%), 0 0 2px 1px rgb(227 48 27 / 50%);
}

.pp_block_banner_footer {
	box-sizing: border-box !important;
	position: absolute !important;
	width: 100% !important;
	bottom: 0 !important;
	padding: 11px !important;
	background-color: #fafafa !important;
	box-shadow: inset 0 1px 1px 0 #ddd !important;
	text-align: right !important;
}
.pp_block_banner_powered_by {
	color: #999 !important;
	padding-right: 5px !important;
}
.pp_block_banner_footer__logo {
	cursor: pointer !important;
	height: 13px !important;
	width: 79px !important;
	display: inline-block !important;
	border-style: none !important;
}
5. Add JavaScript code anywhere in your site’s source code. This code makes the button on the placeholder work. When visitors click on the button, they will see your consent form.
<script>
    function pp_banner_button_pressed() {
        function pp_block_banner_error_handler(error) {
            console.error(error);
            document.getElementsByClassName("pp_block_banner_main_content")[0].innerHTML = "<h2>Something went wrong</h2> Try to reload this page.";
            document.getElementsByClassName("pp_block_banner_button_wrapper")[0].innerHTML = '<button class="pp_error_button" onclick="location.reload()">Reload page</button>';
        }
        try {
            ppms.cm.api('openConsentForm', console.log, function(error) {
                pp_block_banner_error_handler(error);
            });
        } catch (error) {
            pp_block_banner_error_handler(error)
        }
    }
</script>
6. Done! Now your page has a placeholder instead of an iframe.
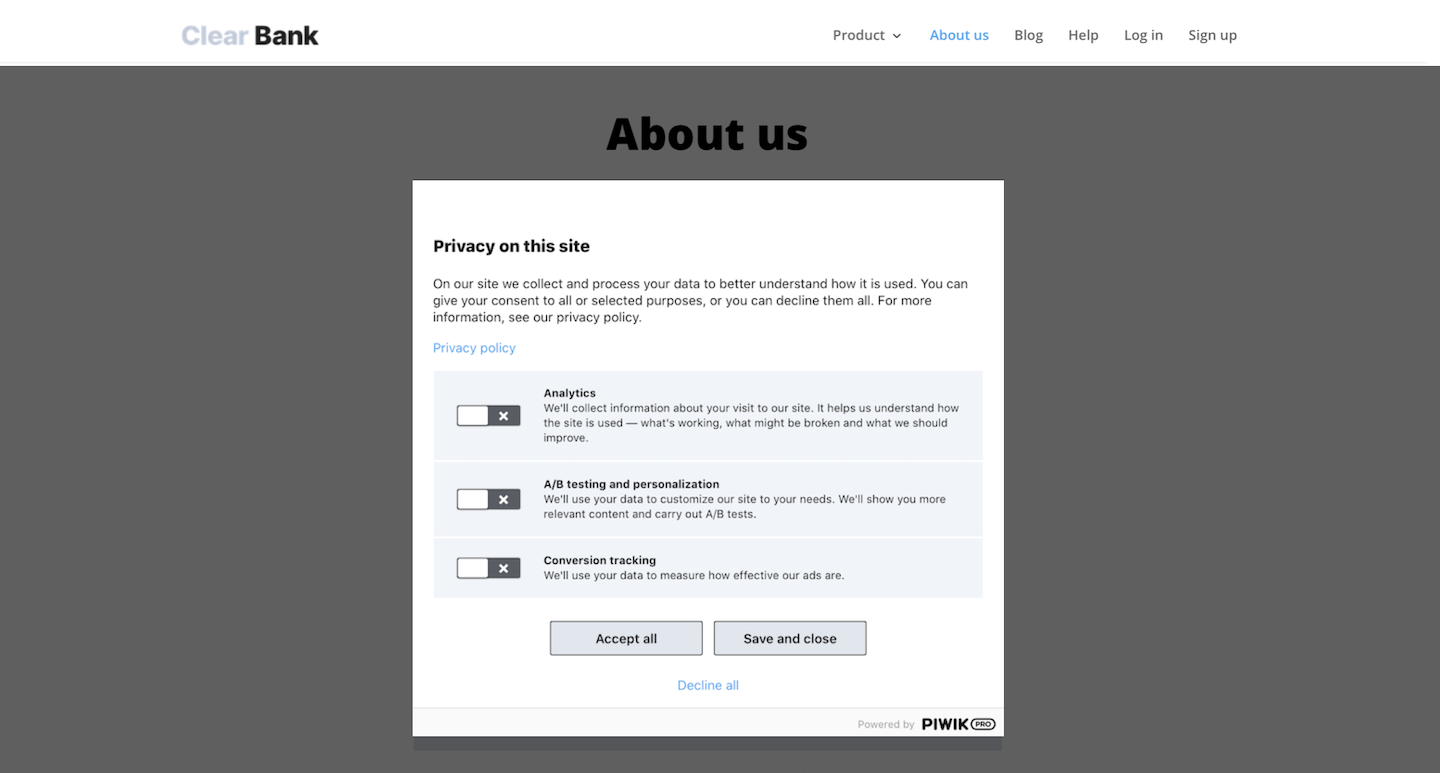
7. To test it, click on the button on the placeholder. You should see a consent form pop up.
Add your iframe as a tag
In the second step, you’ll need to insert your iframe as a tag. This tag activates when visitors grant analytics consent, loading your iframe on your site instead of the placeholder. This ensures that visitors who agree to data collection can view your embedded video, map or other content.
To add your iframe as a tag, follow these steps:
1. Go to Menu > Tag Manager.
2. Navigate to Tags.
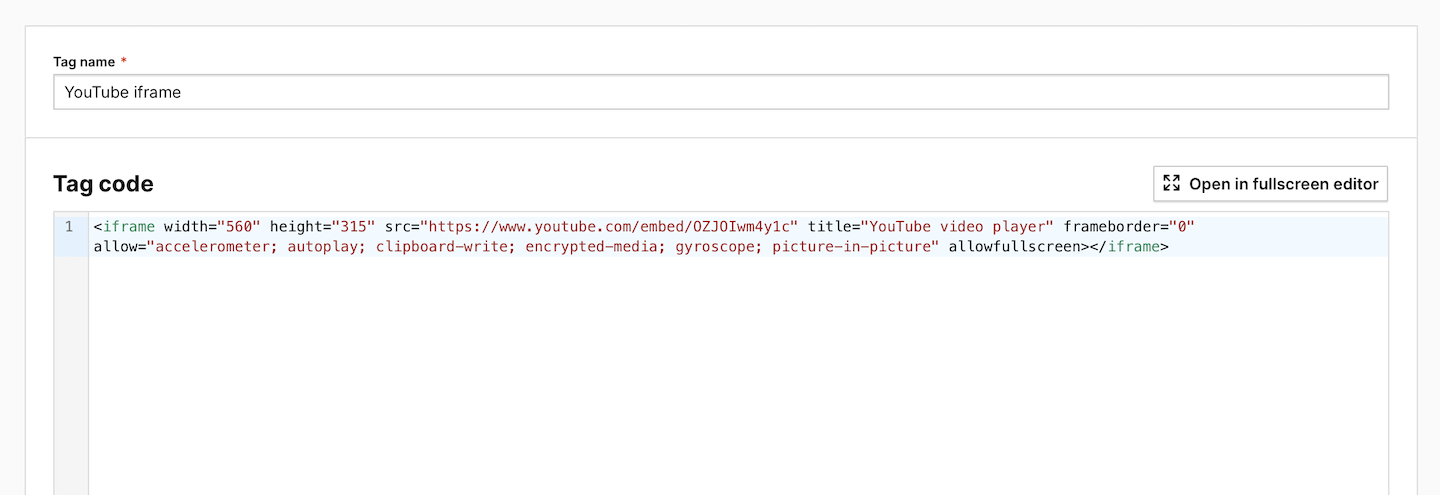
3. Click Add a tag.
4. Name your tag. Example: YouTube iframe.
5. Choose Custom content tag and click Next.
6. In Tag code, paste your iframe’s code.
7. In Content placement > Element ID, enter pp_block_banner_content. This is the div ID from our code, but you can use your own element ID. Your iframe will be placed inside the element with this ID.

8. In Advanced tag settings > Consent type, set Analytics. This ensures that the iframe will only be visible to visitors who consent to analytics. You can choose a different type of consent if you want.

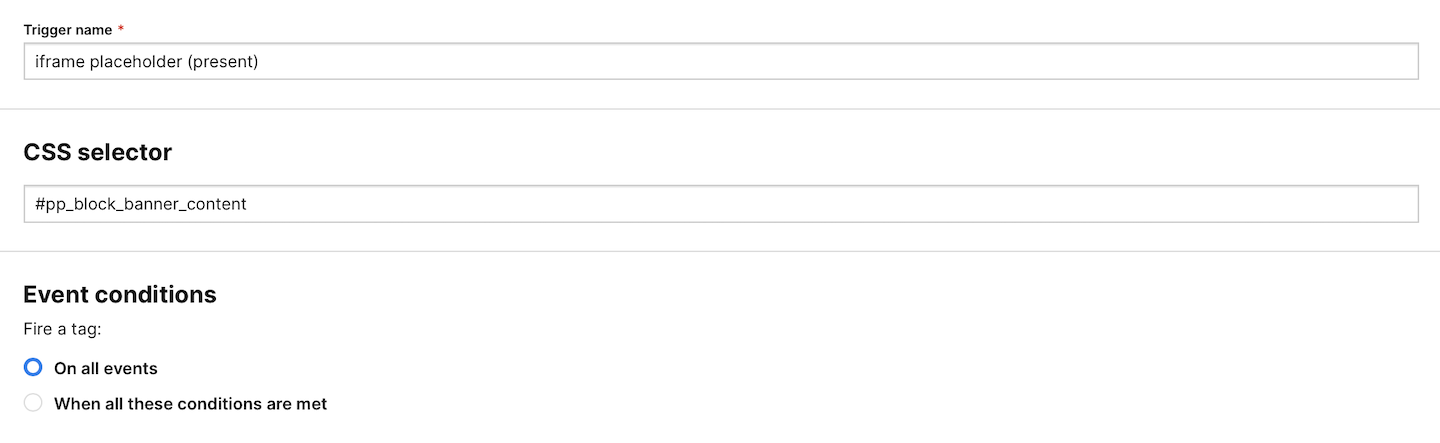
9. In Tag triggers, click Add a trigger.
10. Name the trigger and choose the following type: Element presence.
11. Click Next.
12. In CSS selector, enter #pp_block_banner_content. This is the div ID from our code, but you can use your own element ID. The trigger will fire the tag when it sees the element with such ID on a page.
13. Click Save.
14. Test your tag in debug mode.
15. When you’re happy with how the tag works, click Publish.
16. Done! Now your iframe will be loaded instead of the placeholder for visitors who agree to analytics.