A Cookie Information tag lets you use Cookie Information and Piwik PRO together. The tag maps cookie categories from Cookie Information to consent types in Piwik PRO. This lets you trigger tags based on consents collected via a Cookie Information banner. Plus, you get to check consent statistics easily in your Piwik PRO reports.
In this article, we’ll explain how to set up this tag.
Before you start
Here are a few things to know before you start:
1. For the integration to function properly, you need to install Cookie Information consent popup. To get the detailed instructions on how to do it, read this article.
2. For the integration to function properly, set the following settings in Piwik PRO:
- Turn on Ask visitors for consent in Menu > Administration > Sites & apps > Privacy.
- Turn on Use a custom consent form in Menu > Administration > Sites & apps > Privacy > Ask visitors for consent > Consent settings.
3. For the integration to function properly, set the following settings in Cookie Information:
- Turn off: Shared consent in Cookie Information.
Note: When this feature is on, it creates a third-party cookie. Piwik PRO doesn’t use third-party cookies due to privacy and support concerns, so it can’t sync consents if shared consent is enabled.
5. A Cookie Information banner automatically includes details about cookies used by Piwik PRO. No manual addition is necessary. Keep in mind that the cookie details will appear once the cookie scanner completes its task. If you don’t see them immediately, it means the scanner is still at work.
6. You can read more about the benefits of integrating Cookie Information with Piwik PRO in this detailed article.
Set up a Cookie Information tag
To set up a Cookie Information tag, follow these steps:
1. Go to Menu > Tag Manager.
2. Navigate to Tags.
3. Click Add a tag.
4. Select the following type: Cookie Information and click Next.
5. Name your tag.
6. In Consent mapping, map cookie categories to consent types.
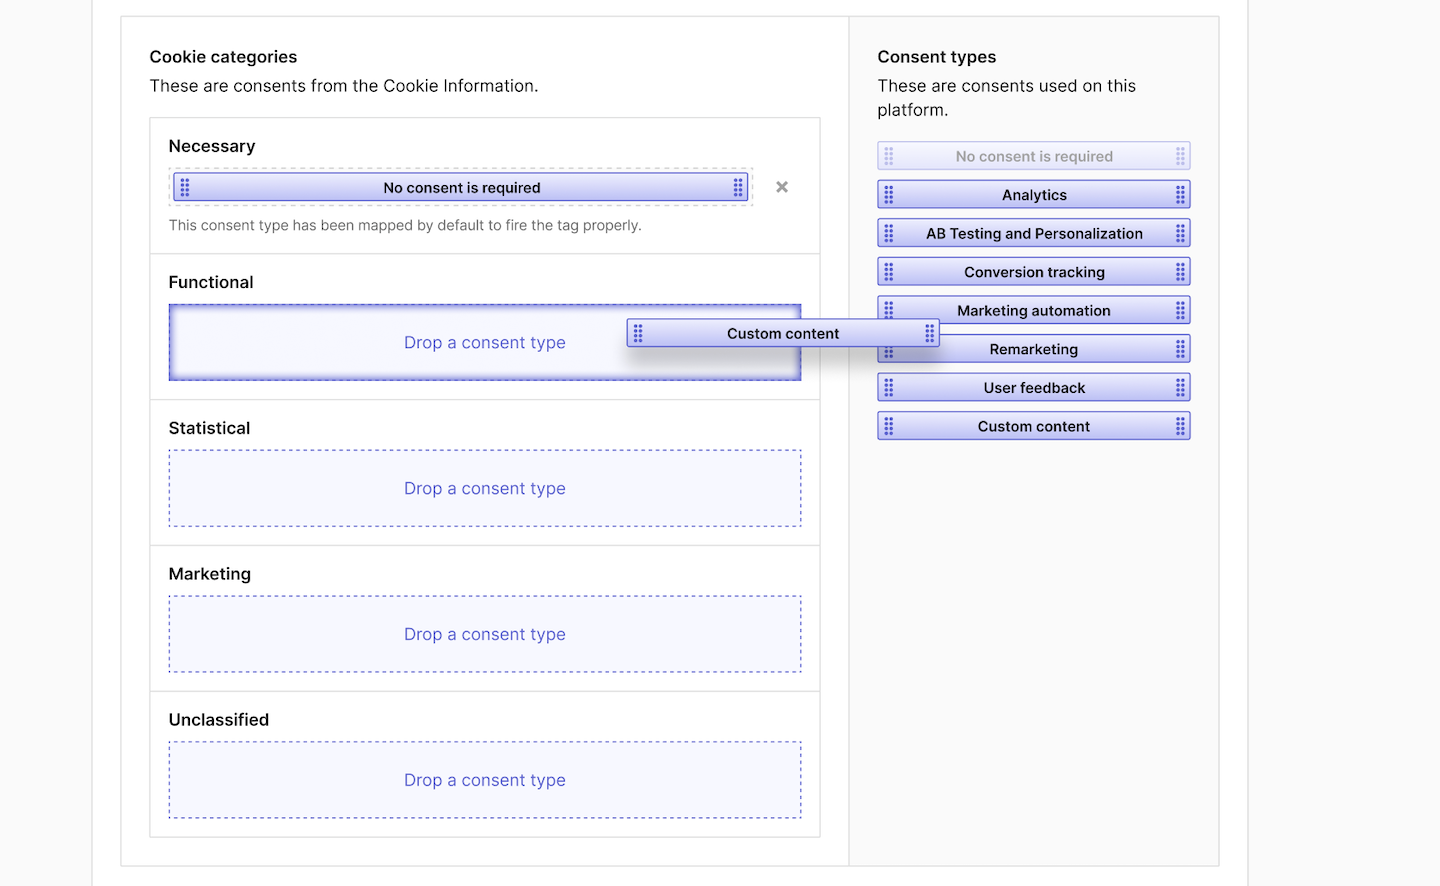
Note:
- You can use the default mapping by clicking ‘Set defaults’, but you can always change it.
- You can map multiple consent types to a single cookie category. For example, ‘Statistical’ can be mapped to both ‘Analytics’ and ‘Remarketing’.
- You can leave cookie categories and consent types unmapped. However, it’s a good practice to map all of them, just in case you decide to use them in the future.
- If you use an unmapped consent type in a tag, it won’t fire.
- ‘Necessary cookies’ are mapped to ‘No consent is required’ without the ability to change them.
- The Piwik PRO tag, responsible for collecting visitor data, requires ‘Analytics’ consent by default. So, if you want to collect such data, you need to map it to the right cookie type. Keep in mind that, by default, this tag will fire and collect anonymous data from visitors who haven’t consented. However, you can always turn off anonymous data collection. You can also change the default ‘Analytics’ consent set for the Piwik PRO tag.
- Reset consent only after significant changes that may affect the scope, purpose, or legal basis of data processing. For example, when you add new cookie categories, change processing purposes, or update the legal basis for data collection.
To reset consent, go to Cookie Information > Consent solutions > Settings > Ask visitors for consent again and click Reset consent. Read more
When in doubt, check with your DPO or legal team.
7. In Consent type, make sure the type is set to: No consent is required. This tag is set this way because it only maps consents. We need it to fire this tag, no matter consent information flows between Cookie Information and Piwik PRO.
8. Turn off Respect opt-out and DNT. This tag is not tracking and should fire no matter the privacy options set in the browser.
9. In Flight dates, keep the settings as they are.
10. In Tag triggers, select Choose existing trigger.
11. Select the following trigger: All page views and click OK.
12. Click Add to save the tag.
13. Test your tag in debug mode.
14. When you’re happy with how the tag works, click Publish.
15. All set! You are now integrated with Cookie Information. This means you can trigger tags based on consents collected via a Cookie Information banner.
Note:
- Consent statistics will be available in reports within 2 hours, or you can instantly view them in the tracker debugger.
- The Consent report shows the Piwik PRO consent types that have been mapped, not the Cookie Information cookie categories.
- If you ever change the mapping of cookie categories to consent types, you’ll need to reset consent by clicking Reset consent in Cookie Information > Consent solutions > Settings > Ask visitors for consent again.