With geotargeting, you can use location data to decide which visitors should see your Data Activation content. This helps you create more relevant experiences for specific regions, countries, or markets.
In this article, we’ll show you how to create an audience with geographic targeting.
Before you start
Here are a few things to know before you start:
- A cookie-based setup is required only for Tag Manager activations. Webhook activations will still work for users who have consented, even if no cookie is used.
- Visitors need to consent. This solution works only for visitors who have given consent.
Create a geotargeted audience
To create an audience with geographic targeting, follow these steps:
1. Go to Menu > Data Activation.
2. Navigate to Audiences.
3. Click Add an audience.
4. Select Create a custom audience.
5. Name your audience and add a description.
6. Set Membership duration. This is how long someone stays in the audience after they join. Time starts when they enter. They’ll stay until the duration ends, unless they stop meeting the criteria and are removed earlier. Activity doesn’t change the duration.
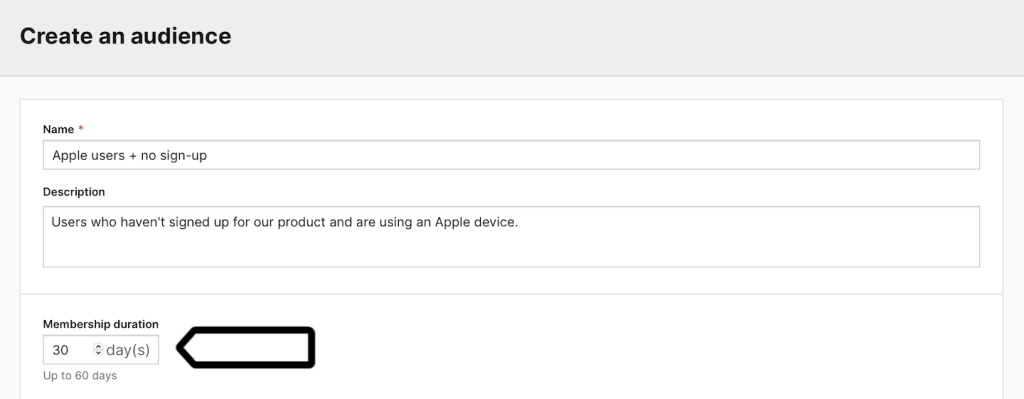
Note: The maximum membership duration is 540 days.
Example: The membership duration is set to 30 days. Membership starts when a user joins the audience. They’ll stay in it for 30 days, unless they stop meeting the criteria and are removed immediately. Activity doesn’t affect the membership duration.
7. Set the conditions for your audience. For example, users in New York, New York, United States.
8. Add the City attribute and set it to New York (New York, United States).

Note: Use AND between the conditions so the audience includes only users who match all selected location attributes.
9. (Optional) To target users by geographic coordinates, add Longitude and/or Latitude to your audience conditions. For example, New York City, New York, United States has the following coordinates: latitude 40.730610 and longitude -73.935242.
10. Under All users who…, add the Latitude attribute.
11. Set the condition to is greater than and enter 40.4774.
12. Add the Latitude attribute again.
13. Set the condition to is less than and enter 40.9176.
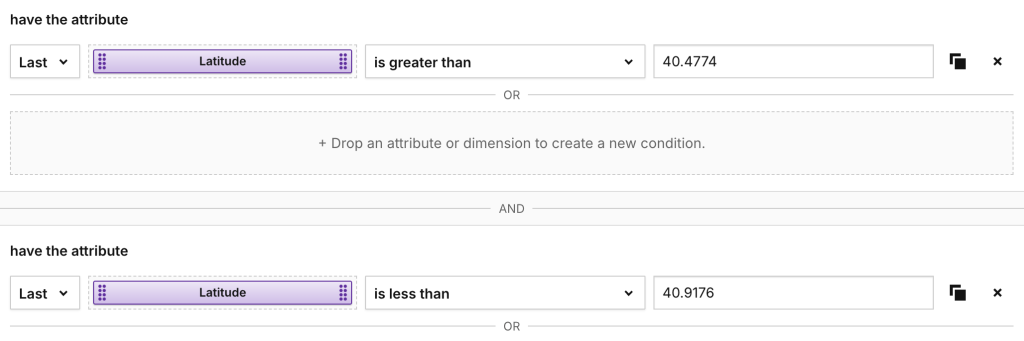
Note: Use AND between all conditions so the audience includes only users who match the selected latitude and longitude range.
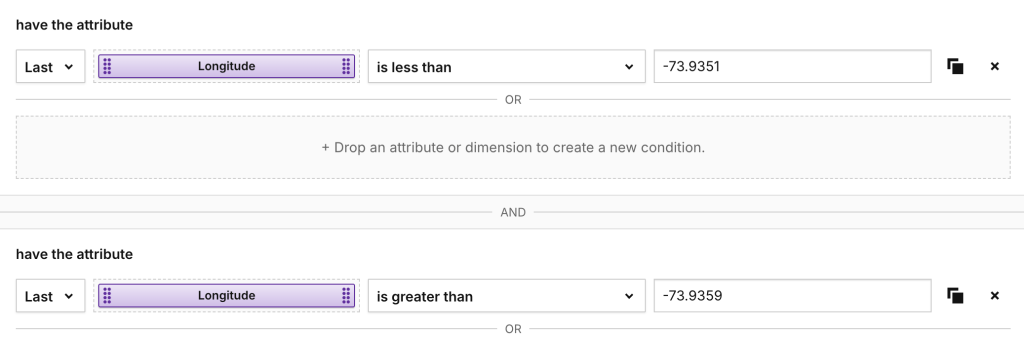
14. Add the Longitude attribute.
15. Set the condition to is less than and enter -73.9351.
16. Add the Longitude attribute again.
17. Set the condition to is greater than and enter -73.9359.
Note: Use AND between all conditions so the audience includes only users who match the selected latitude and longitude range.
18. Review Number of profiles based on the last 7 days. The estimate is based on historical data from Analytics.

Note: If you’re using attributes that aren’t available as dimensions in Analytics, the estimated value will be 0.
19. Click Create.
20. All set! Your audience is ready and will now start collecting profile data.
In the next step, you can:
- Create an activation to send audience data to an external tool through a webhook.
- Use the audience detection (Data Activation) trigger in Tag Manager to personalize the visitor experience on your site.