According to Google’s policy, Google ads are displayed only to visitors who have consented to analytics and advertising cookies. They won’t pop up if the visitor hasn’t given their consent.
Google relies on two consent mechanisms: IAB TCF 2.2 and Google consent mode v2. To be compliant with Google’s regulations, you can use Consent Manager and our integration with Google consent mode v2.
In this article, we’ll explain how to set it up.
Before you start
Here are some things to know before you start:
- This integration will only work if you have a Google tag (gtag.js) installed on your site. To add it, follow Google’s instructions.
- This integration doesn’t work with Google Tag Manager. To integrate with Google Tag Manager, use these instructions.
- You need to use Consent Manager, which collects visitors’ consents. This integration will only pass on the information received by Consent Manager.
- Google consent mode v2 is automatically applied in all countries.
- If Google receives any data between the page opening and the consent update, it will be treated as anonymous or null.
Integrate with Google consent mode v2
To integrate with Google consent mode v2, follow these steps:
1. Make sure to fire the default consent command on each page before any tracking scripts. If you need help, see Google’s documentation. Here’s an example of the default settings, but make sure it complies with your legal requirements:
<script>
window.dataLayer = window.dataLayer || [];
function gtag() {
dataLayer.push(arguments);
}
gtag('consent', 'default', {
'ad_storage': 'denied',
'ad_user_data': 'denied',
'ad_personalization': 'denied',
'analytics_storage': 'denied',
'wait_for_update': 1500
});
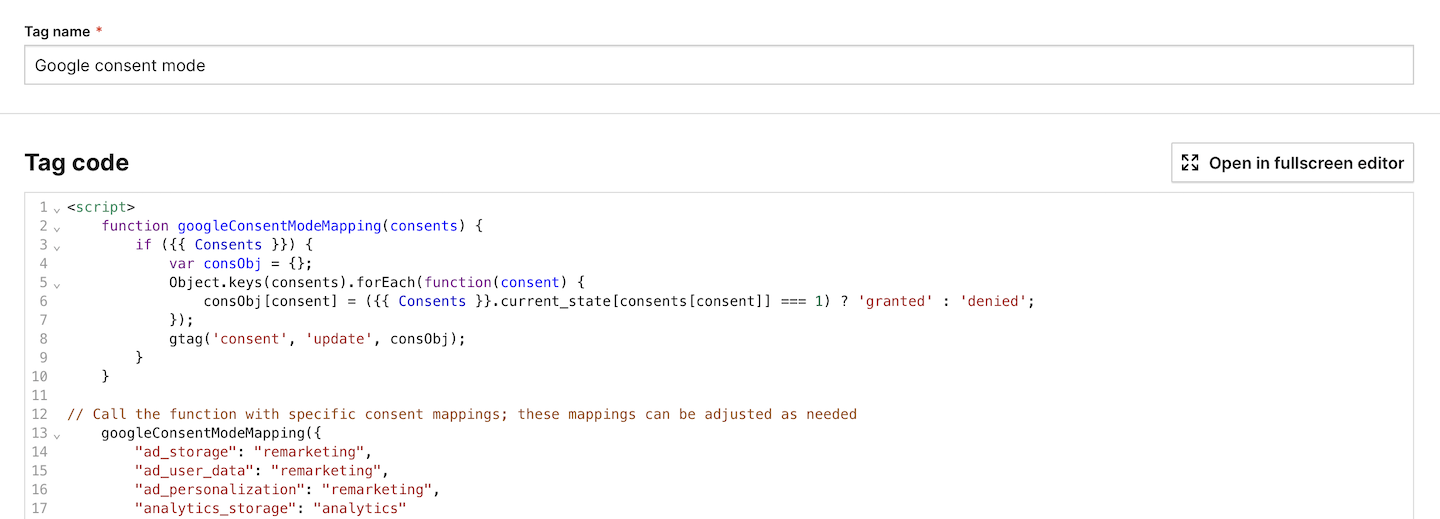
</script>2. Here’s the code to map consents between the two tools and pass consent data from Piwik PRO to Google. Review it carefully, and then modify it as needed.
<script>
    window.gtag = window.gtag || function(){dataLayer.push(arguments)};

    function googleConsentModeMapping(consents) {
        if ({{ Consents }}) {
            var consObj = {};
            Object.keys(consents).forEach(function(consent) {
                consObj[consent] = ({{ Consents }}.current_state[consents[consent]] === 1) ? 'granted' : 'denied';
            });
            gtag('consent', 'update', consObj);
        }
    }

// Call the function with specific consent mappings; these mappings can be adjusted as needed
    googleConsentModeMapping({
        "ad_storage": "remarketing",
        "ad_user_data": "remarketing",
        "ad_personalization": "remarketing",
        "analytics_storage": "analytics"
    });
</script>
Note:
- For Google’s consent details, refer to their documentation. For information on Piwik PRO’s consents, see our documentation.
- To display a consent type on the Piwik PRO consent form, make sure that at least one tag uses that consent type.
3. Log in to Piwik PRO.
4. Go to Menu > Tag Manager.
5. Navigate to Tags.
6. Click Add a tag.
7. Select the following tag template: Custom code.
8. Click Next.
9. Name your tag.
10. In Tag code, type your code from step 2.
11. In Advanced tag settings > Consent type, choose the following type: No consent is required.
12. In Tag triggers, click Choose existing trigger.
13. Select the following type: All page views.
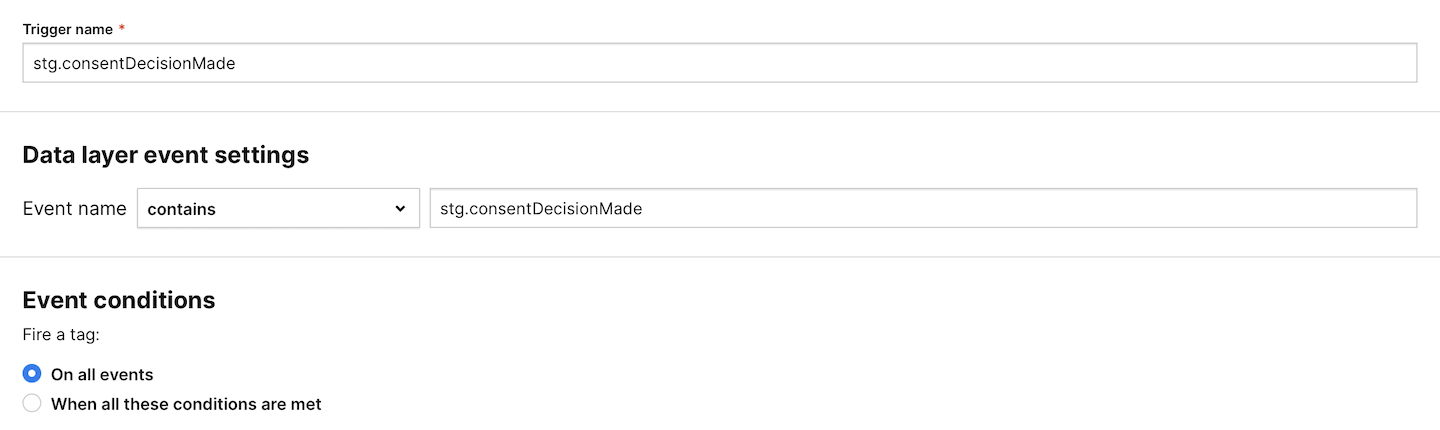
14. In Tag triggers, click Add a trigger.
15. Select the following type: Data layer event.
16. Set the following condition: Event name contains stg.consentDecisionMade.
17. Click Add.
18. When you’re done, click Save.
19. (Optional) Go to Settings > Tag priority and add this tag to Prioritized tags. This will make sure the tag fires first, before others that might send data to Google.
20. Test your tag in debug mode.
21. When you’re happy with how the tag works, click Publish.
22. All done!
Note: If Google receives any data between the page opening and the consent update, it will be treated as anonymous or null.