If you’re running an online store on Shopify, it’s easy to track how it’s being used. All you need to do is add your store to Piwik PRO, install a few pieces of code and you’re done. You’ll have access to Analytics, and optionally Consent Manager popup.
As Shopify is deprecating the checkout.liquid file customization, we can no longer officially support the Piwik PRO Tag Manager and Consent Manager in Shopify.
In this article, we’ll provide a step-by-step guide on how to install our tracking code in Shopify.
Note: If you prefer to install our app in the Shopify app store, follow these instructions.
Add a site in Piwik PRO
To add your Shopify store as a site in Piwik PRO, follow these steps:
1. Go to Menu > Administration.
2. Navigate to Sites & apps.
3. Click Add a site or app.
4. Type the site name and address and click Save.

5. Set the time zone and currency.
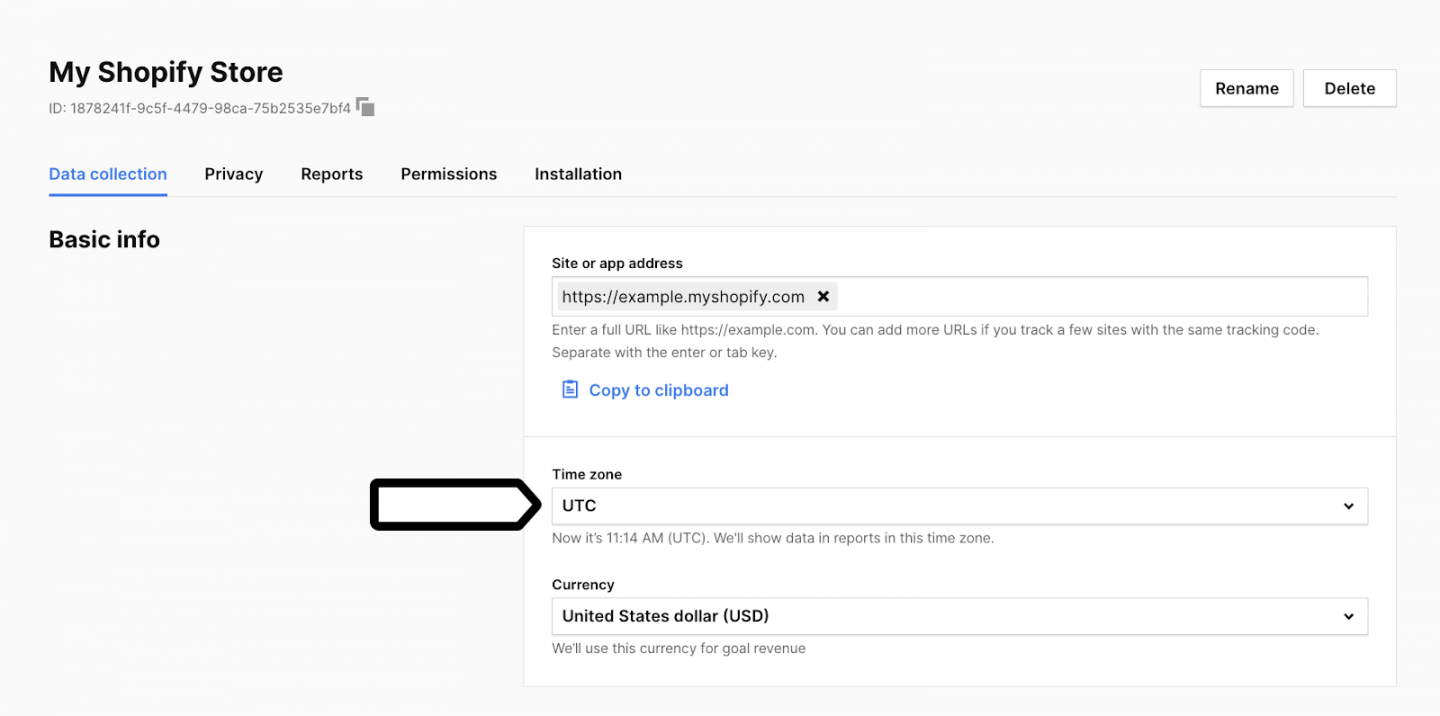
Note: We’ll show data in reports in this time zone. We’ll use this currency for goal revenue.
6. That’s done!
Install the tracking code in Shopify
To install the Piwik PRO tracking code in your Shopify store, follow these steps:
1. Log in to Shopify.
2. Go to Settings > Customer events.
3. Click Add custom pixel and name the pixel. Example: Piwik PRO Analytics.
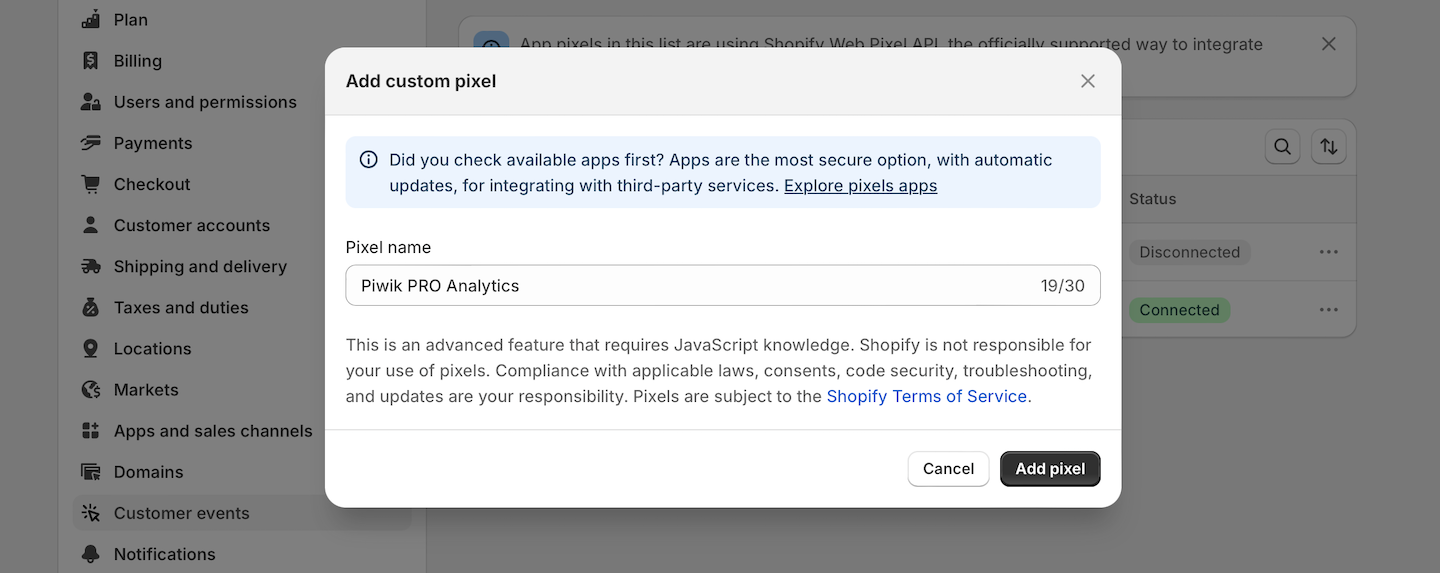
4. Click Add pixel.
5. In Customer privacy, adjust the settings to suit your needs.

6. Prepare the tracking code by replacing some key parameters described below the code:
// Piwik PRO Tracking Code
(function() {
	window._paq = window._paq || [];
	_paq.push(['setTrackingSource', 'shopify_custom_pixel', '1.0.0']);
	_paq.push(['enableLinkTracking']);
	_paq.push(['setDomains', ['https://example.com']]);
      _paq.push(['setCookieDomain','example.com']);
	_paq.push(['enableJSErrorTracking']);
	(function(p,i,w,ik) {
    	var g=ik.createElement('script'),s=ik.getElementsByTagName('script')[0];
    	_paq.push(['setTrackerUrl', p]);
    	_paq.push(['setSiteId', w]);
  	g.type='text/javascript';g.async=true;g.defer=true;g.src=i;s.parentNode.insertBefore(g,s);
	})('https://example.piwik.pro/ppms.php','https://example.containers.piwik.pro/ppms.js','your site id',document)
})();
// Page view
analytics.subscribe("page_viewed", (event) => {
  window._paq = window._paq || [];
  window._paq.push(['setCustomUrl', event.context.window.location.href]);
  window._paq.push(['trackPageView', event.context.document.title]);
});
// Ecommerce product detail view
analytics.subscribe('product_viewed', (event) => {
  window._paq = window._paq || [];
  // Example for accessing event data
  const cartLine = event.data.productVariant;
  var products = [{
  	sku: cartLine?.sku,
  	name: cartLine?.product?.title,
  	category: cartLine?.product?.type,
  	price: cartLine?.price?.amount,
  	brand: cartLine?.product?.vendor,
  	// variant: cartLine.variant,
  	// quantity: cartLine?.quantity,
      // example usage of product scope custom dimension (optional)
  	customDimensions: {
      	1: cartLine?.product?.untranslatedTitle,
  	}
	}];
  _paq.push(["ecommerceProductDetailView", products]);
});
// Ecommerce add to cart
analytics.subscribe('product_added_to_cart', (event) => {
	window._paq = window._paq || [];
	// Example for accessing event data
	const cartLine = event.data.cartLine;
	var products = [{
    	sku: cartLine?.merchandise?.sku,
    	name: cartLine?.merchandise?.product?.title,
    	category: cartLine?.merchandise?.product?.type,
    	price: cartLine?.merchandise?.price?.amount,
    	brand: cartLine?.merchandise?.product?.vendor,
    	// variant: cartLine.variant,
    	quantity: cartLine?.quantity,
      // example usage of product scope custom dimension (optional)
    	customDimensions: {
        	1: cartLine?.merchandise?.product?.untranslatedTitle,
    	}
  	}];
	_paq.push(["ecommerceAddToCart", products]);
});
// Ecommerce remove from cart
analytics.subscribe('product_removed_from_cart', (event) => {
	window._paq = window._paq || [];
	// Example for accessing event data
	const cartLine = event.data.cartLine;
	var products = [{
    	sku: cartLine?.merchandise?.sku,
    	name: cartLine?.merchandise?.product?.title,
    	category: cartLine?.merchandise?.product?.type,
    	price: cartLine?.merchandise?.price?.amount,
    	brand: cartLine?.merchandise?.product?.vendor,
    	// variant: cartLine.variant,
    	quantity: cartLine?.quantity,
      // example usage of product scope custom dimension (optional)
    	customDimensions: {
        	1: cartLine?.merchandise?.product?.untranslatedTitle,
    	}
  	}];
	_paq.push(["ecommerceRemoveFromCart", products]);
});
// Ecommerce order
analytics.subscribe('checkout_completed', (event) => {
  	window._paq = window._paq || [];
	const cartLine = event.data.checkout;
	var products = cartLine.lineItems.map(function(item) {
  	return {
    	sku: item?.id,
    	name: item?.title,
    	category: item?.variant?.product?.type,
    	price: item?.variant?.price?.amount.toString(),
    	brand: item?.variant?.product?.vendor,
    	variant: item?.variant?.id,
    	quantity: item?.quantity
  	};
	});
	var paymentInformation = {
    	orderId: cartLine?.order?.id,
    	grandTotal: cartLine?.totalPrice?.amount.toString(),
    	subTotal: cartLine?.subtotalPrice?.amount.toString(),
    	tax: cartLine?.totalTax?.amount.toString(),
    	shipping: cartLine?.shippingLine?.price?.amount.toString()
	};
	_paq.push(["ecommerceOrder", products, paymentInformation]);
  });
// Cart view (Custom event)
analytics.subscribe('cart_viewed', (event) => {
  window._paq = window._paq || [];
  let productNames = [];
  let totalPrice = 0;
  event.data.cart.lines.forEach(line => {
	productNames.push(line.merchandise.product.title);
	totalPrice += line.merchandise.price.amount * line.quantity;
  });
  const productNamesString = productNames.join(', ');
  _paq.push(["trackEvent", "Ecommerce", "Cart view", productNamesString, totalPrice]);
});
// Checkout started (Custom event)
analytics.subscribe('checkout_started', (event) => {
  window._paq = window._paq || [];
  const checkout = event.data.checkout;
  const checkoutTotalPrice = checkout.totalPrice.amount;
  const orderToken = checkout.token;
  // Generate list of product names and calculate total price
  const productNames = checkout.lineItems.map(item => item.title);
  const productNamesString = productNames.join(', ');
  _paq.push(["trackEvent", "Ecommerce", "Checkout started", productNamesString, checkoutTotalPrice, {
      // event scope custom dimensions
	"dimension1": orderToken,
}]);
});
Parameters
Example
Replace with the name of your account in these pieces: https://example.piwik.pro/ppms.php and https://example.containers.piwik.pro/ppms.js
Your site id
Replace with your site or app ID. Where to find it?
Your website’s URL in setDomains
Replace with your site’s URL in this piece: _paq.push([‘setDomains’, [‘https://example.com’]]);
Your website’s domain in setCookieDomain
Replace with your site’s domain in this piece: _paq.push([‘setCookieDomain’,’example.com’]);
Note: Cart view and checkout started functions are tracked as custom events, not ecommerce events. These are optional and can be removed as needed.
7. Paste the modified code in Shopify.
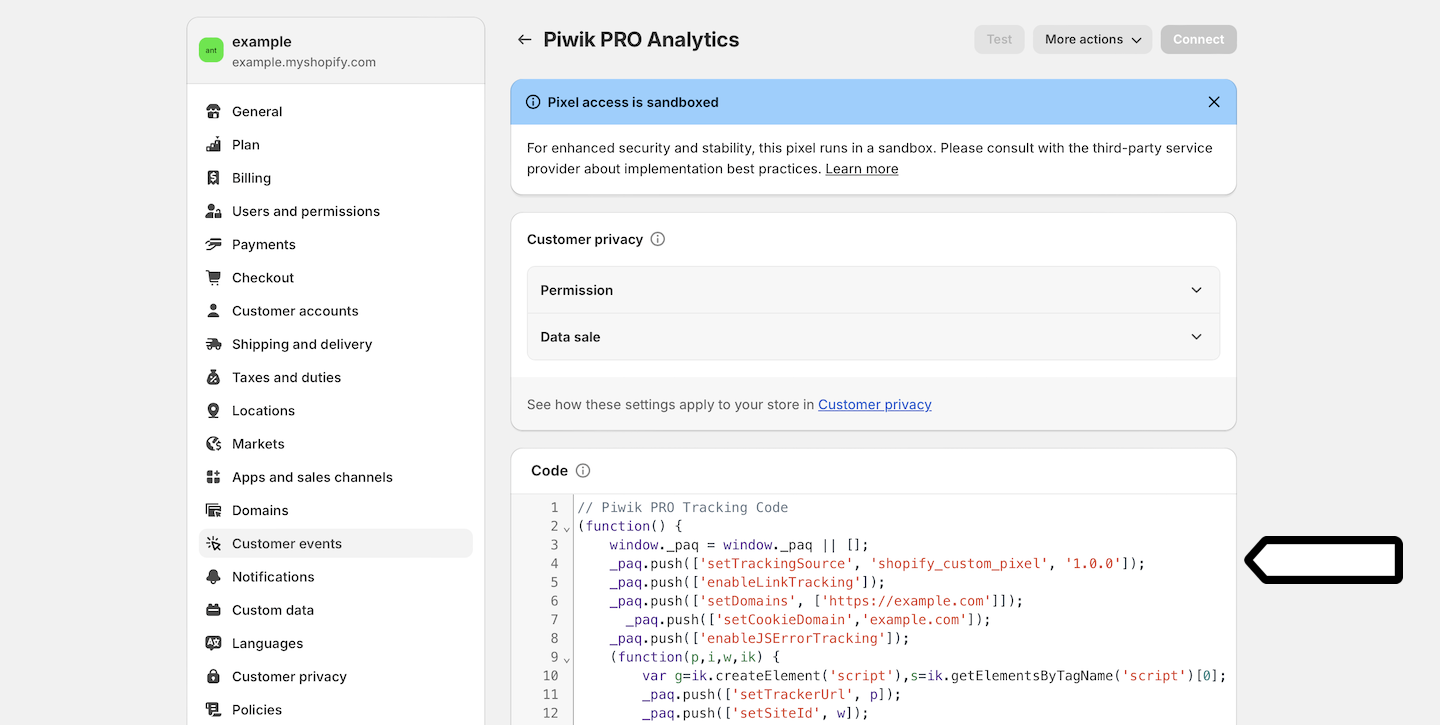
8. Click Connect.
9. Well done! Data will appear in reports in about two hours. Data in the tracker debugger will appear instantly.
Tip: You can also check manually to see if your tracking works. Read more
Tip: To change the way your data is collected, you can use the following settings:
Integrate Piwik PRO Consent Manager with Shopify’s privacy API
If you want to keep using the Piwik PRO Consent Manager, follow the steps below to integrate it with Shopify’s privacy API and handle the consent decision event.
Note:
- The Piwik PRO Consent Manager will not be available during the checkout process due to the deprecation of the checkout.liquid file.
- You won’t be able to collect data on visitors’ consent decisions or track other events directly from Tag Manager. This is because the tracking code used in Shopify’s custom pixel is added through a ‘sandbox environment,’ which enhances security but creates a barrier between the custom pixel content and the rest of your website.
To integrate Piwik PRO Consent Manager with Shopify’s privacy API, follow these steps:
1. Log in to Piwik PRO.
2. Go to Menu > Administration.
3. Navigate to Sites & apps.
4. Select you Shopify’s site.
5. Navigate to Installation.
6. In Sites, click Install manually.
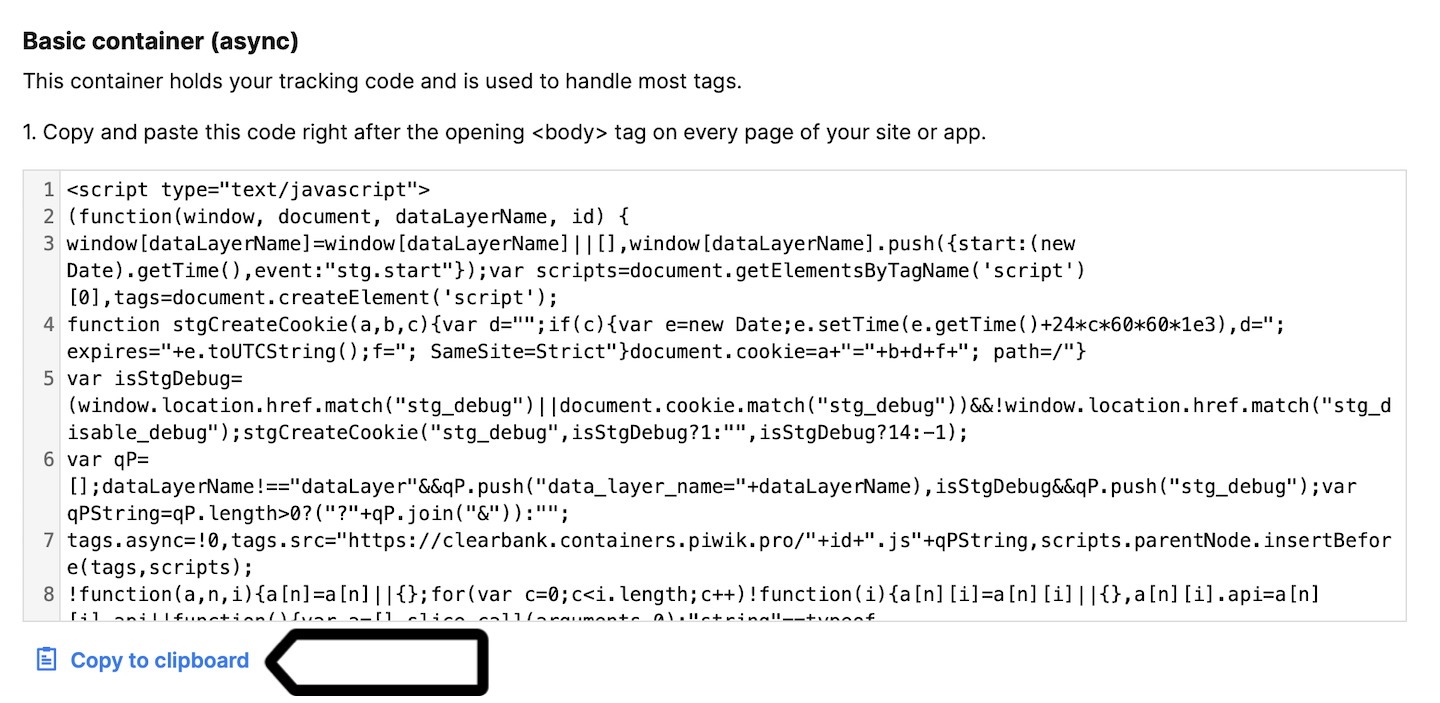
7. Copy the code from Basic container (async).
8. Log in to Shopify.
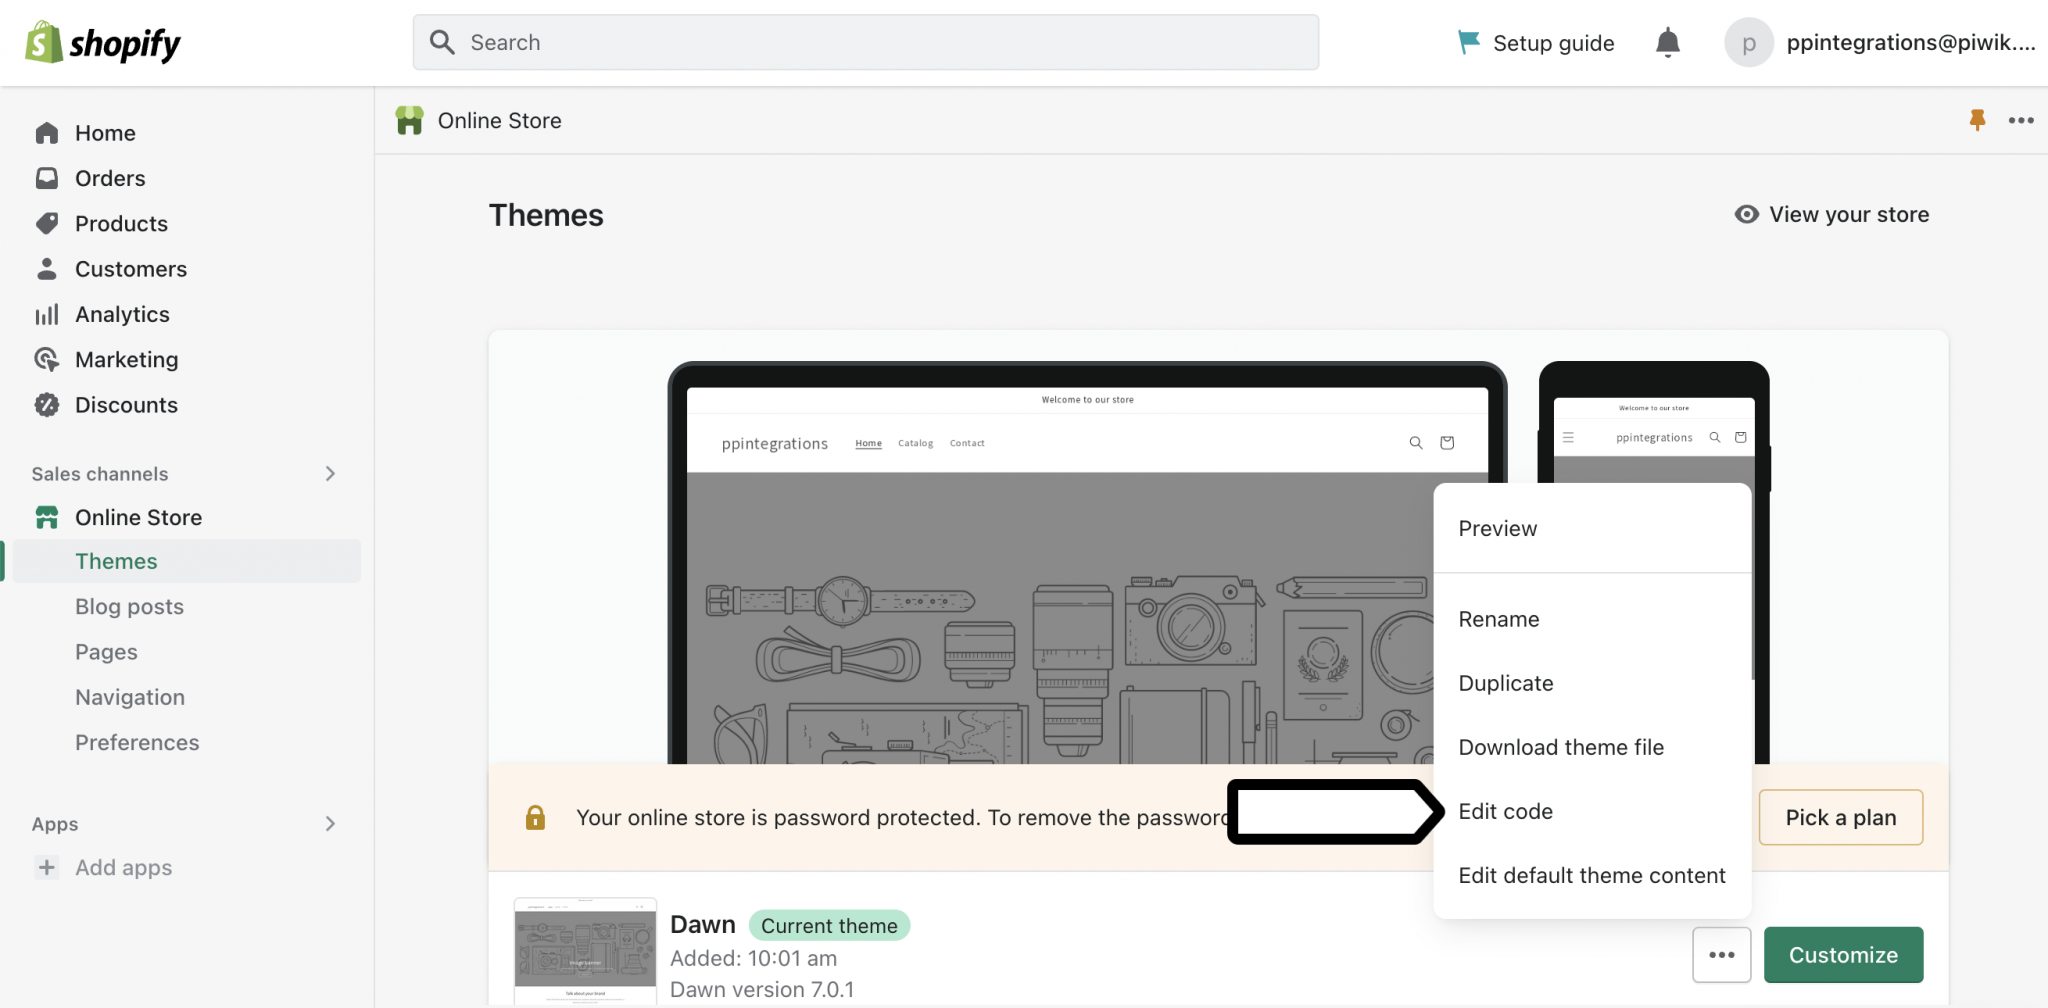
9. Go to Online Store > Themes.
10. In the section with your current Shopify theme, click the ⋯ three-dot icon.
11. Click Edit code.
12. The theme code will be opened in Shopify’s Code Editor.
13. In Layout, find your theme.liquid file that defines the look and feel of your theme.
14. Paste the container code right after the opening <body> tag in the theme’s HTML code.
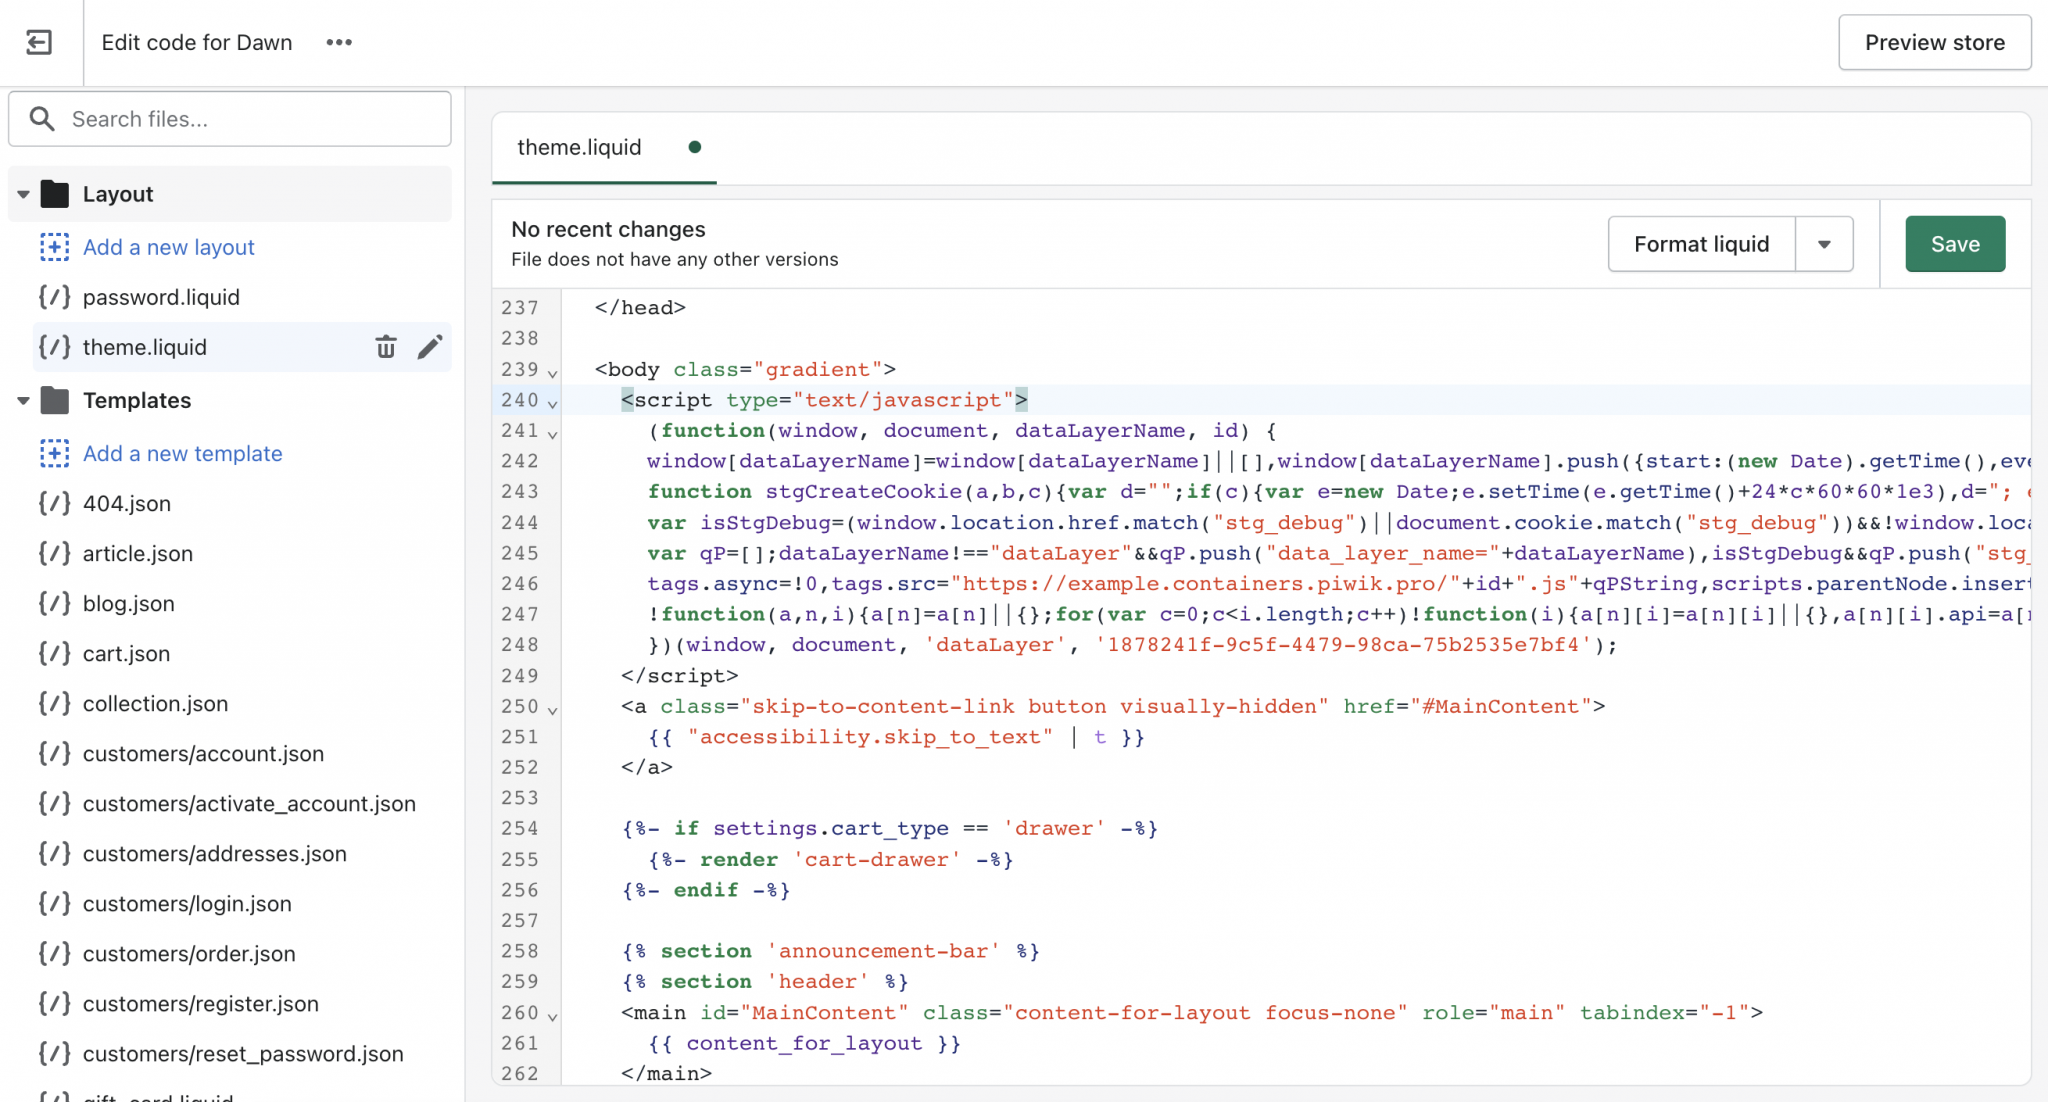
15. Click Save.
16. Log in to Piwik PRO.
17. Go to Menu > Tag Manager.
18. Navigate to Tags.
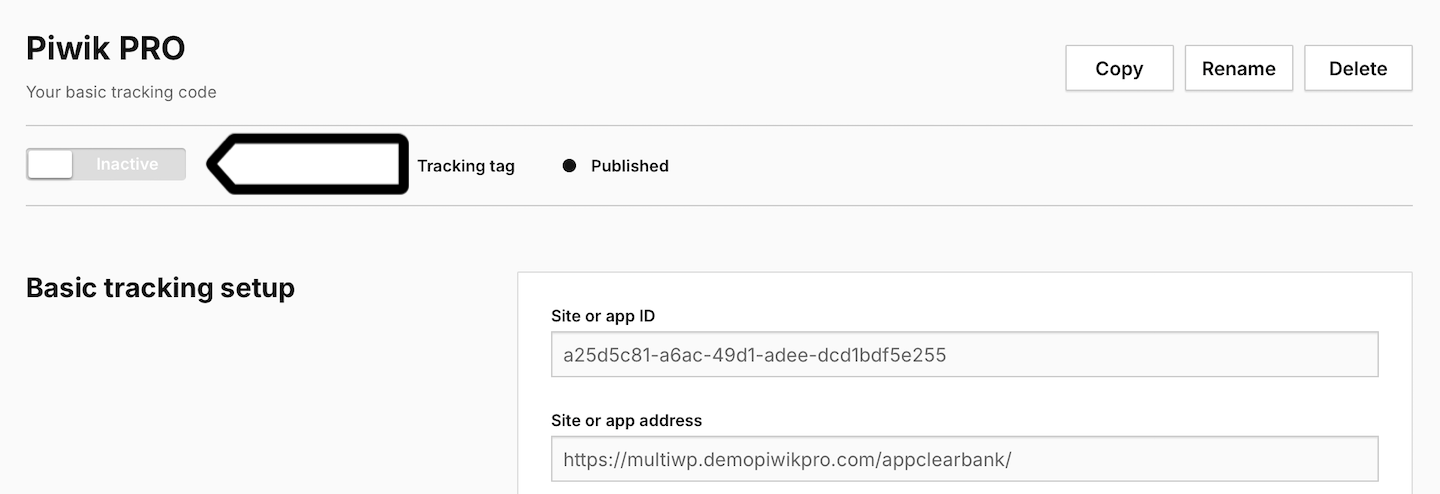
19. Select the Piwik PRO tag, which is responsible for tracking and deactivate it. We won’t use this tag since we’re using the tracking code in Shopify’s custom pixel.
20. Add a new custom HTML code tag.
21. Add the following piece of code:
<script>
    if(Shopify){
      window.Shopify.loadFeatures(
       [
         {
           name: 'consent-tracking-api',
           version: '0.1',
         },
       ],
       error => {
          if (error) {
            throw error;
          }
          PrivacyAPIMapping({
            "analytics":"analytics",
            "marketing":"remarketing",
            "preferences":"custom_consent"
          });
       },
      );
    };

    function PrivacyAPIMapping(consents) {
        if ({{ Consents }}) {
            var consObj = {};
            Object.keys(consents).forEach(function(consent) {
                consObj[consent] = ({{ Consents }}.current_state[consents[consent]] === 1) ? true : false;
            });
            window.Shopify.customerPrivacy.setTrackingConsent(
              consObj,
              () => console.log("Piwik PRO consent status mapped to Shopify Privacy API!")
            );
        }
    }
</script>
22. Set the consent type to the following type: No consent is required.
23. Select the following trigger: All page views.
24. Select one more trigger: Data layer event. And add the following conditions: Event equals stg.consentDecisionMade.
25. Save the tag.
26. Click Publish.
27. Done!
For each consent type you want to map, you need to add a dummy tag to make it appear in the consent form. Here’s an example for analytics consent:
1. Log in to Piwik PRO.
2. Go to Menu > Tag Manager.
3. Navigate to Tags.
4. Add the following tag: Custom code (async).
5. Add the following piece of code:
<script>
console.log("Analytics consent granted");
Shopify.analytics.publish('deanonymization');
</script>
Note: If you are using a different consent manager, make sure to trigger this piece of code when the consent to analytics is given: Shopify.analytics.publish('deanonymization');
6. Select the following trigger: All page views.
7. Save the tag.
8. Click Publish.
9. Repeat the process for any other consent types you want to include.
10. Check to see if the consent decision made using Piwik PRO Consent Manager was correctly mapped to Shopify’s privacy API. Add the following code to your browser’s developer console:
window.Shopify.customerPrivacy.currentVisitorConsent();11. The outcome should look something like this:

12. All done!
Use Piwik PRO anonymous tracking
The method above doesn’t include anonymization or deanonymization because the Piwik PRO Consent Manager is disconnected from the tracking code. Depending on your configuration of Shopify > Settings > Customer events > Add custom pixel > Customer privacy, data is either fully collected (without anonymization) or not collected at all.
If you want to set up the tracking code to support anonymous tracking and deanonymization, you’ll need to follow these steps:
1. Log in to Shopify.
Note:
- If you’re using Piwik PRO Consent Manager, make sure you’ve successfully integrated Piwik PRO Consent Manager with Shopify’s privacy API.
- If you are using a different consent manager, make sure to trigger this piece of code when the consent to analytics is given:
Shopify.analytics.publish('deanonymization');
2. Go to Settings > Customer events.
3. Select the pixel you’ve created in the previous steps. For example: Piwik PRO Analytics.
4. In Customer privacy, select Not required. We’ll check the consent status when anonymizing or deanonymizing the visitor.
5. Prepare the tracking code by replacing some key parameters described below the code:
// Piwik PRO Tracking Code
(function() {
	window._paq = window._paq || [];
	_paq.push(['setTrackingSource', 'shopify_custom_pixel', '1.0.0']);
	_paq.push(['enableLinkTracking']);
_paq.push(['setUserIsAnonymous', 1]);
    	_paq.push(['setVisitorCookieTimeout', 1800]);
	_paq.push(['setDomains', ['https://example.com']]);
      _paq.push(['setCookieDomain','example.com']);
	_paq.push(['enableJSErrorTracking']);
	(function(p,i,w,ik) {
    	var g=ik.createElement('script'),s=ik.getElementsByTagName('script')[0];
    	_paq.push(['setTrackerUrl', p]);
    	_paq.push(['setSiteId', w]);
  	g.type='text/javascript';g.async=true;g.defer=true;g.src=i;s.parentNode.insertBefore(g,s);
	})('https://example.piwik.pro/ppms.php','https://example.containers.piwik.pro/ppms.js','your site id',document)
})();
Parameters
Example
Replace with the name of your account in these pieces: https://example.piwik.pro/ppms.php and https://example.containers.piwik.pro/ppms.js
Your site id
Replace with your site or app ID. Where to find it?
Your website’s URL in setDomains
Replace with your site’s URL in this piece: _paq.push([‘setDomains’, [‘https://example.com’]]);
Your website’s domain in setCookieDomain
Replace with your site’s domain in this piece: _paq.push([‘setCookieDomain’,’example.com’]);
6. Paste the modified code in Shopify. But replace just the tracking code part, not the entire code.
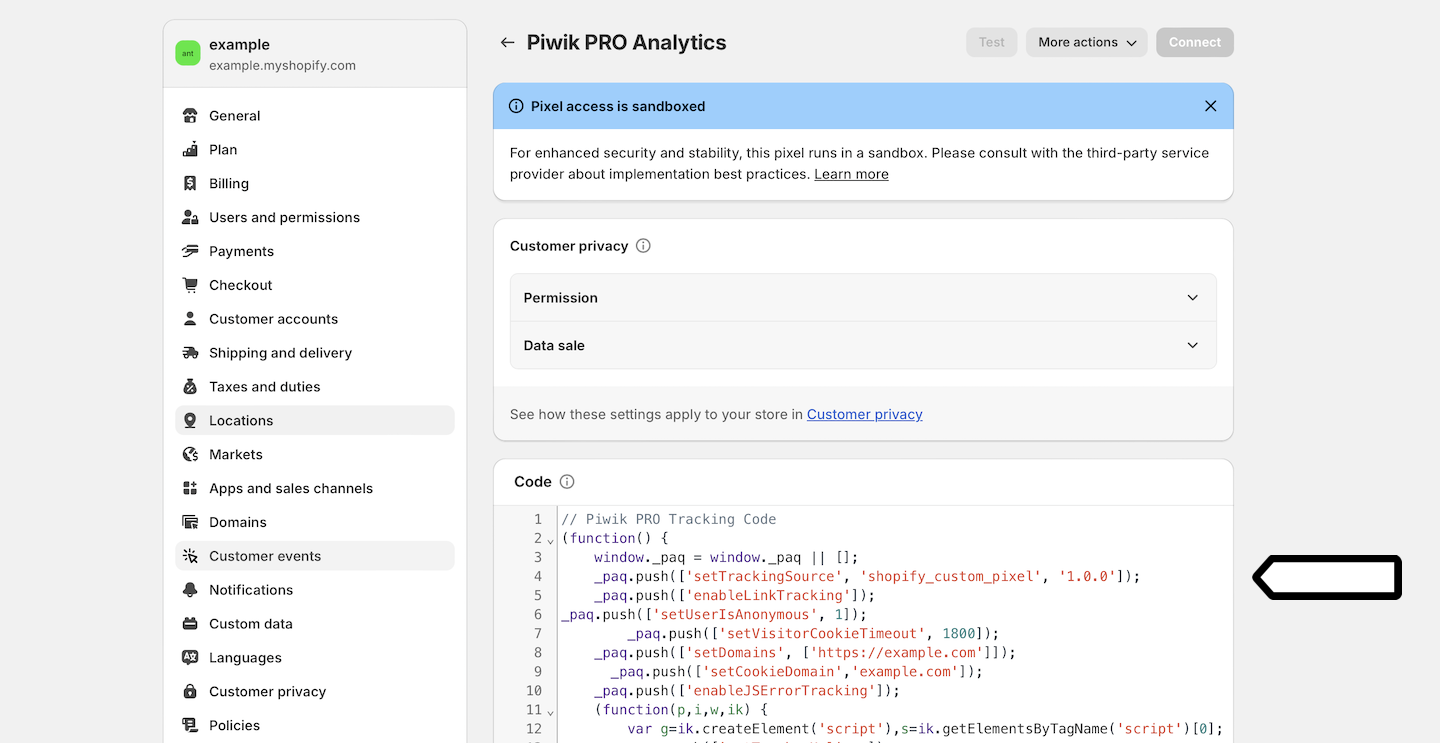
7. Add the following code, which is a listener for the deanonymization event, just below the tracking code:
// Deanonymization event
analytics.subscribe('deanonymization', (event) => {
  window._paq = window._paq || [];
  window._paq.push(['setVisitorCookieTimeout', 33955200]);
  window._paq.push(['deanonymizeUser']);
});
8. Click Connect.
9. Check to see if the deanonymization and anonymization process works correctly. Go to Piwik PRO > Analytics > Settings > Tracker debugger. See if the visitors IP address is anonymized (0.0.0.0), masked or fully visible, depending on your settings.
10. Job done!
