Installation for: Analytics
If you’re using Google Tag Manager, you can easily add the Piwik PRO tracking code to your website. Just installing the tracking code will give you access to Analytics. However, if you want to unlock all the modules, like Tag Manager, Customer Data Platform and Consent Manager, you’ll need to install the entire container.
To get started, you’ll need to add your site to Piwik PRO and then set up our tag in Google Tag Manager.
In this article, we’ll walk you through this process step by step.
Before you start
Here are a few helpful things to know before you start:
1. Needed permissions in Google Tag Manager: edit or higher for your container.
2. Needed permissions in Piwik PRO: owner.
3. The current tag template was updated to version 2.0.0 on July 17, 2024. We recommend that you update it and then check your tracking.
4. If you want to contribute to the template development, here’s the link to our GitHub repository.
5. If you want to use all modules in Piwik PRO, install the entire Piwik PRO container via Google Tag Manager.
6. Enterprise plan If you install Piwik PRO using a tag manager other than ours, we won’t be able to provide the same level of technical support as we do with our recommended installation methods.
Our aim is to deliver the best possible service. However, for third-party tools, our expertise is limited to publicly available information. Therefore, some issues are best addressed by the vendor responsible for the tool.
In such cases, we will pass your inquiries as feedback to the product team responsible for the integration or inform you that support is handled by a third-party vendor.
Add a site or app in Piwik PRO
To add a site or app in Piwik PRO, follow these steps:
1. Log in to Piwik PRO.
2. Go to Menu > Administration.
3. Navigate to Sites & apps.
4. Click Add a site or app.
5. Type the site or app name and address and click Save.
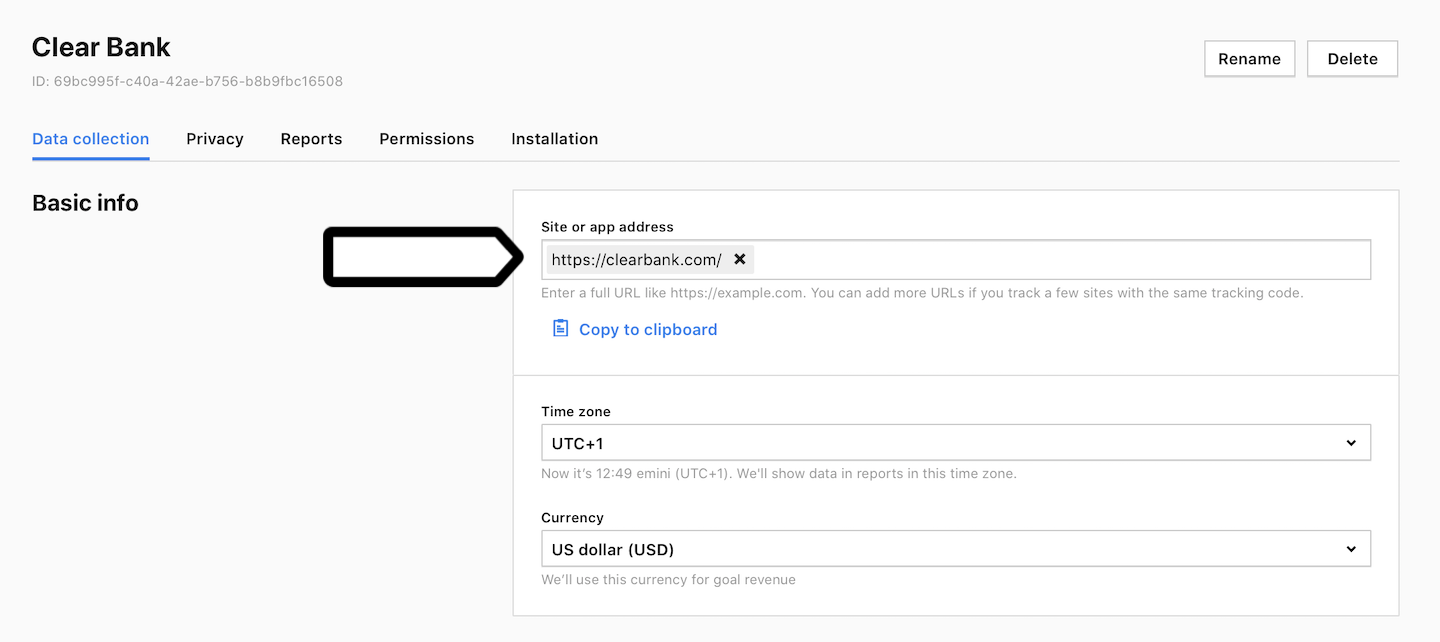
Note: If you want to track a few domains with the same tracking code, add their addresses.
6. Set the time zone and currency.
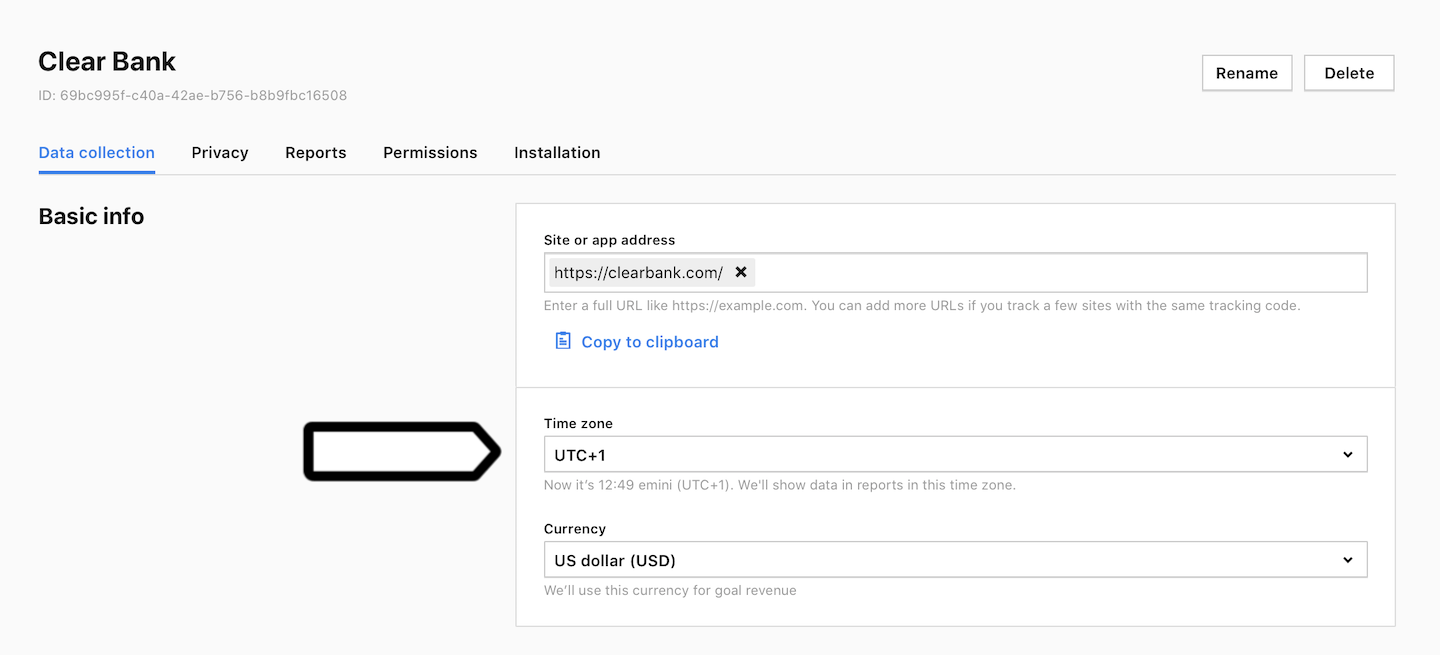
Note: We’ll show data in reports in this time zone. We’ll use this currency for goal revenue.
Install a tracking code using Google Tag Manager
To install the Piwik PRO tracking code with Google Tag Manager, follow these steps:
1. In Google Tag Manager, choose the container for your site or app.
2. Go to Tags.
3. Click New to add a new tag.
4. Name your tag. Example: Piwik PRO tracking code.
5. Click Choose a tag type to begin setup…
6. Click Discover more tags in the Community Template Gallery.
7. Click on the search icon and type in Piwik PRO Analytics. Our tag will appear in the search results.
8. Click Piwik PRO Analytics.
9. Click Add to workspace.
10. Click Add to confirm your choice.
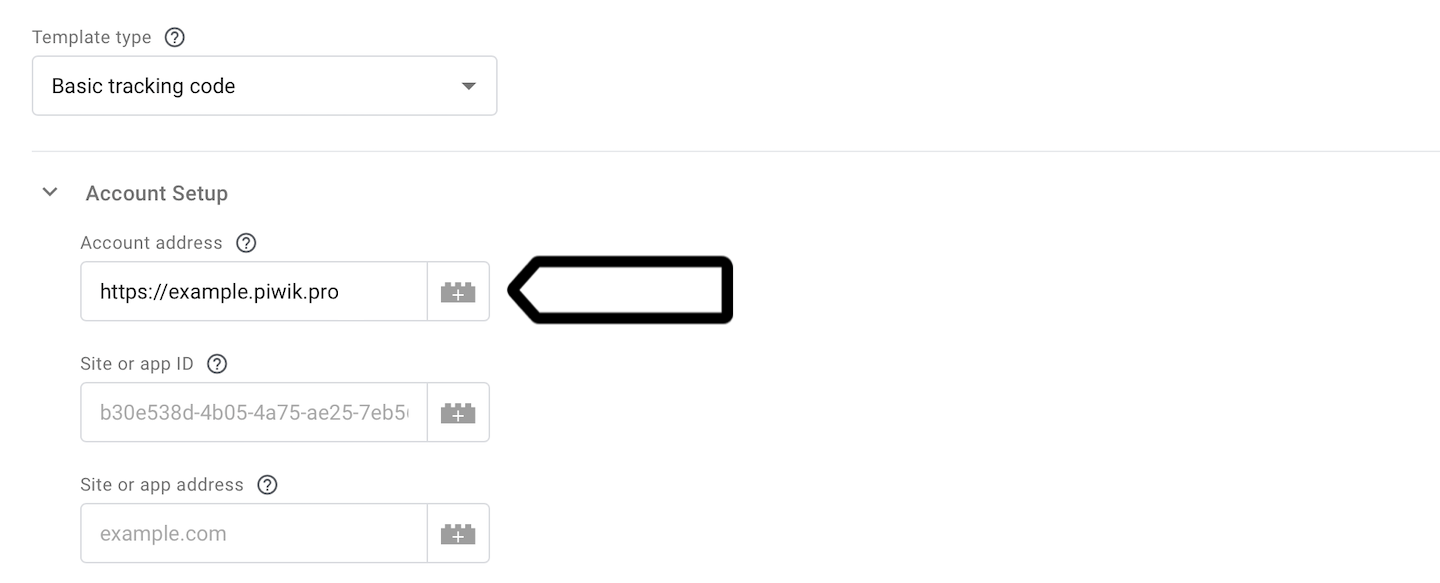
11. Now, set up the tag. In Template type, select Basic tracking code.
Note: All template types are described in the table at the end of this article.
12. In Account address, type in your Piwik PRO account address. Example: https://example.piwik.pro.
13. In Site or app ID, type in your site ID. Where to find it?
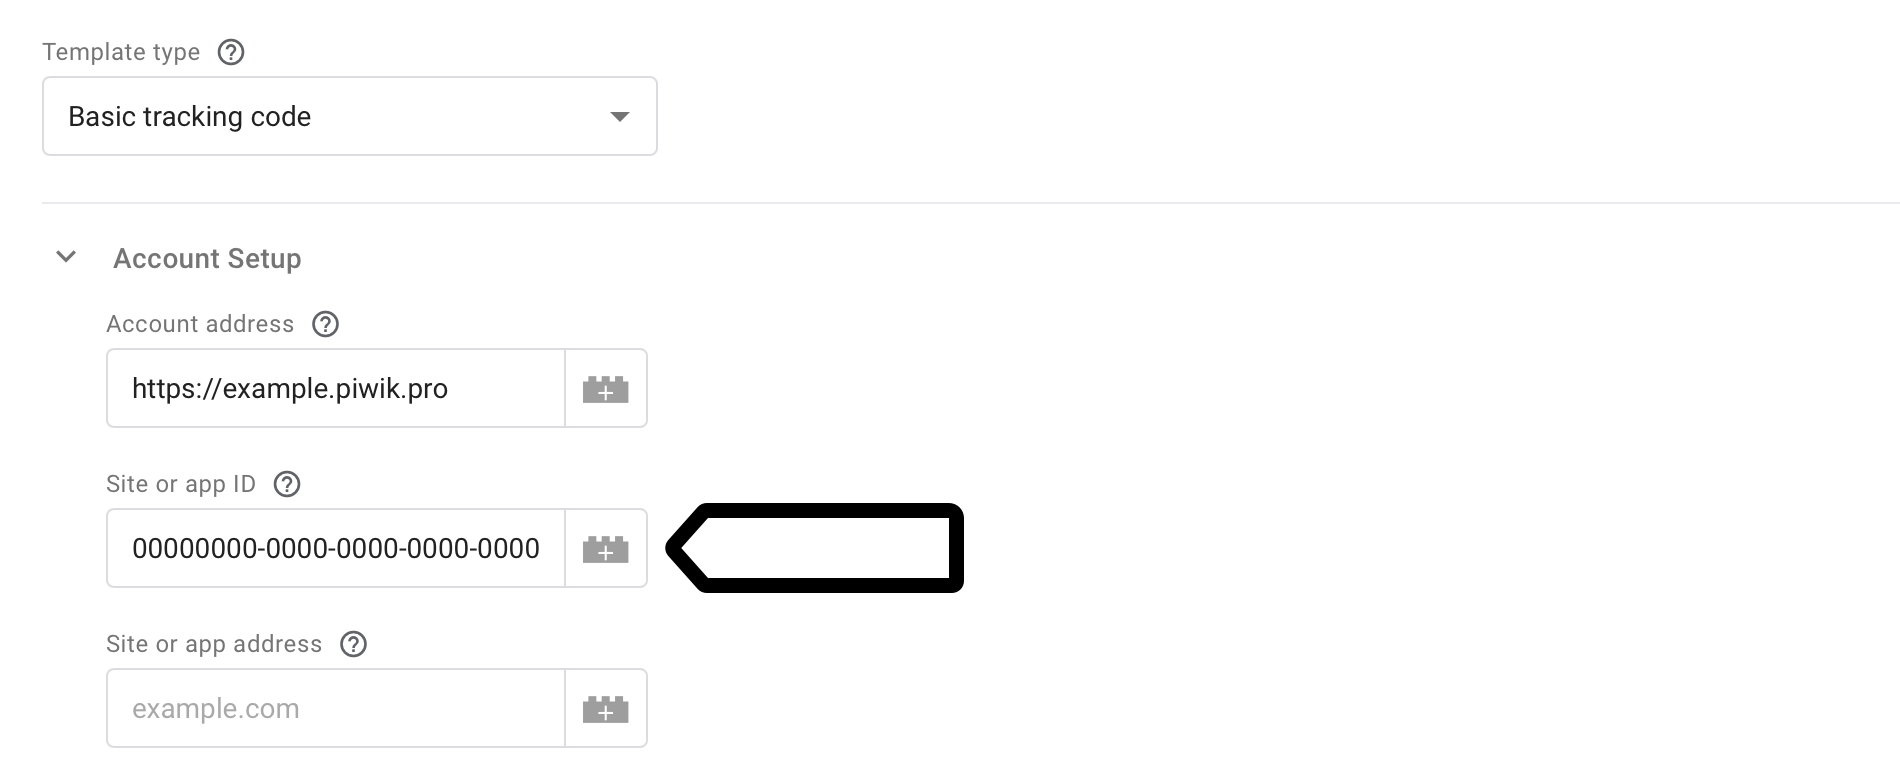
14. In Site or app address, type in your site or app address. You’ll collect data for this site or app.
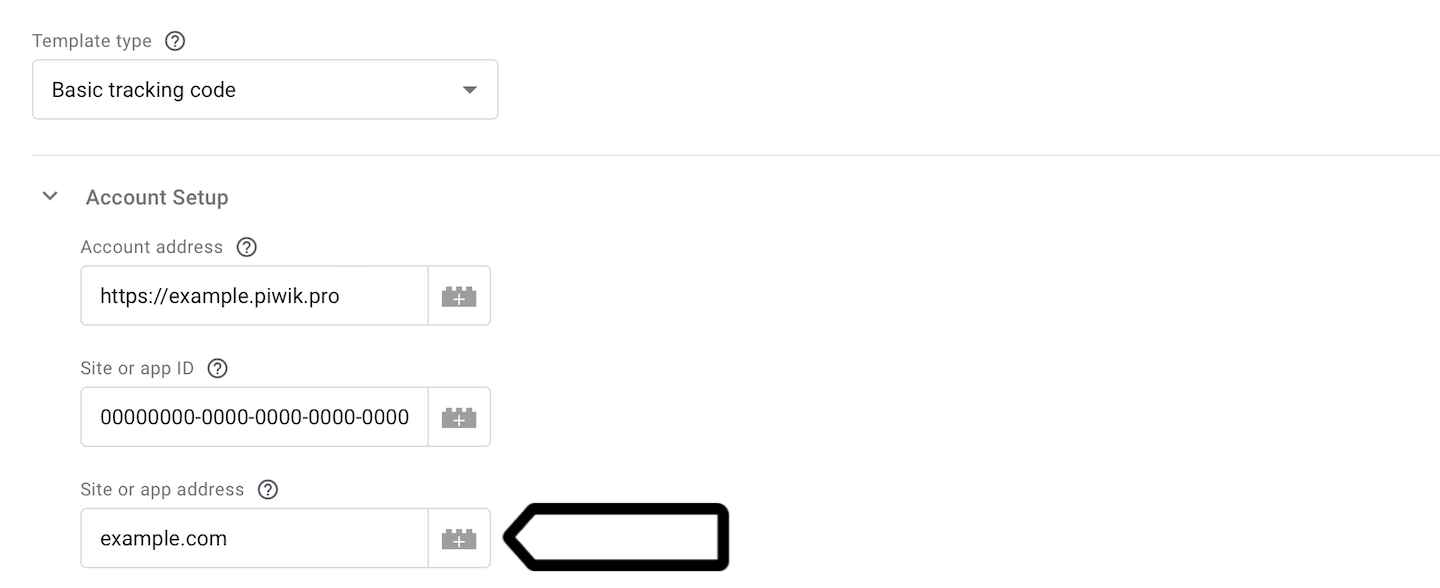
Note: Enter a domain like example.com or a host like www.example.com. You can add more hosts if you track multiple sites with the same tracking code. Separate entries with a comma. Leave blank if you want to keep the default setting from your account. You can use * as a wildcard or a leading “.”
15. Use template settings described in the table below this instruction to adjust your tracking.
16. In Triggering, click Choose a trigger to make this tag fire…
17. Select All pages.
18. Click Save.
19. Click Submit and then click Publish to push changes to your site or app.
20. Done! Data will appear in reports in about two hours Data in the tracker debugger will appear instantly.
Tip: You can also check manually to see if your tracking works. Read more
Basic tracking code template settings
Here’s a list of settings available when you use our basic tracking code template type.
| Section | Feature | Description |
|---|---|---|
| Account setup | Use a custom tracker URL | Optionally, define a custom endpoint to which tracking requests will be sent. Note: For use with Piwik PRO first-party collector or Server-side Google Tag Manager. |
| Disable injection of the tracking client | Disable injection of the Piwik PRO JavaScript Tracking Client (JSTC). This setting is only useful in case you are hosting JSTC (ppms.js) on your own, for example when caching in Server-side Google Tag Manager. | |
| Data collection | Set a user ID | If turned on, you’ll recognize visitors by their user ID. A user ID can be a visitor’s email, username or some other unique identifier. We store IDs under the dimension called user ID. You can use this dimension in custom reports, segments and filters. |
| Outlinks and downloads | If turned on, you’ll count outlinks and downloads. Outlinks are links that take the visitor outside your website. Downloads are links to all kind of files on your website. You’ll see collected data under Analytics > Reports > Outlinks or Analytics > Reports > Downloads. | |
| Interactions with popups and content | If turned on, you’ll count times when people see and interact with your popup or content. Impressions and interactions are counted for: (1) popups added under Tag Manager > Tags > Add new tag > Custom popup, (2) content added under Tag Manager > Tags > Add new tag > Custom content, (3) any page content you tag in your website’s code. You’ll see collected data under Analytics > Reports > Content performance. | |
| Detect JavaScript errors | If turned on, you’ll record all kinds of JavaScript errors on your website. The errors will be saved as custom events with the error type and the URL of the page where they occurred. You’ll see them under Analytics > Reports > Custom events or if you create a custom report. | |
| Count session time precisely | If turned on, you’ll measure the end of a session more accurately. Session time is the period between opening the first page and closing the last one, but it’s hard to know exactly when a visitor closes the last page. This option will send ping requests to check if a visitor is still on the last page. | |
| Recognize a visitor across domains | If turned on, the visitor who goes from one website to the other will be recognized as the same visitor. Sessions that would be treated as separate for each website, will be treated as one session. This option works only for domains that use the same tracking code and are added under Administration > Websites & apps > URLs. We add the pk_vid parameter to the page URL to pass the visitor ID between domains. | |
| Recognize a visitor across subdomains | If turned on, the visitor who goes from one subdomain to the other will be recognized as the same visitor. Sessions that would be treated as separate for each subdomain, will be treated as one session. This option works only for subdomains that use the same tracking code. You need to pick a domain where you’ll store a cookie with the visitor ID. | |
| Send the traffic source to the tracker debugger | If checked, you’ll see Google Tag Manager as a traffic source in Piwik PRO > Analytics > Settings > Tracker debugger. (Available for 16.12+) | |
| Privacy | IP collection mode | Collect, mask or completely drop IP addresses. The level of IP address masking and geolocation data impact can be adjusted in the Piwik PRO Administration module under Privacy settings. Accepted variable values: collectIpAddresses, anonymizeIpAddresses, removeIpAddresses, followGCM. |
| Use visitor cookies | If turned off, you won’t set visitor cookies like _pk_id.* and _pk_ses.* that are responsible for recognizing visitors and their sessions. Accepted variable values: true, false, followGCM. |
|
| Don’t collect visitor’s device data | If turned on, the tracker will not send information that can be used to fully or partially identify an individual visitor’s browser, even if persistent cookies are disabled. Information about the browser blocked by this setting: screen resolution and installed browser plugins like PDF, Flash, Silverlight, Java, QuickTime, RealAudio. Accepted variable values: true, false, followGCM. |
|
| Use secure cookies | If turned on, you’ll receive information from first-party cookies over a secure connection. Only websites with the HTTPS protocol will be able to access these cookies. | |
| Remove the visitor cookie at custom time | The visitor cookie (_pk_id.*) is removed after 13 months by default. You can delete it at a different time. |
|
| Remove the session cookie at custom time | The session cookie (_pk_ses.*) is removed after 30 minutes by default. You can delete it at a different time. |
|
| Other options | Override event URL | Optionally, define a custom URL to be tracked with this tag. |
| Set a custom document title | Overwrite document title. This and all events afterwards will use the provided document title. | |
| Override page referrer | Define a custom page referrer. This and all events afterwards will use the provided referrer value. | |
| Use an alternative namespace | If turned on, the tracking code won’t conflict with other tracking codes used on the website. We’ll change _paq to _ppas and Piwik to PPAS. |
All template types
Here’s a list of all the template types you can use with our Piwik PRO Analytics tag in Google Tag Manager.
| Template type | Description | Notes |
|---|---|---|
| Basic tracking code | It lets you install our tracking code on your website and start collecting web data. |
All settings for this template are described in the table above. It’s best to fire the basic tracking code tag before any other event tags. |
| Basic tracking code (no page view event) | It lets you install our tracking code on your website and start collecting web data without page view events. |
This template is useful when you want the page view event to fire independently of the main tracking code. It’s best to fire the basic tracking code tag before any other event tags. |
| Goal conversion | It lets you track goal conversion events and custom dimensions along with them. |
You can optionally define custom dimension objects when sending a goal conversion. These dimensions only apply to the current tracking request. To define a custom dimension, add a new row to the table, enter the ID (index) of the dimension defined for your site, and select a variable or enter a constant string as the dimension value. |
| Custom event | It lets you track custom events and custom dimensions along with them. |
You can optionally define custom dimension objects when sending a custom event. These dimensions only apply to the current tracking request. To define a custom dimension, add a new row to the table, enter the ID (index) of the dimension defined for your site, and select a variable or enter a constant string as the dimension value. |
| E-commerce events | It lets you track ecommerce events and product custom dimensions along with them. |
When your website provides an ecommerce dataLayer in a format suitable for Google Analytics (Universal or GA4) and the event names match the GA4 ecommerce standard event scheme (like view_item, add_to_cart, remove_from_cart and purchase), you can use the option ‘Auto detect from dataLayer event’ to populate all parameters without manual configuration. If you still use a Universal Analytics dataLayer, the most recent ecommerce type containing a products key (purchase, remove, add or detail) will define the ecommerce event type if the current dataLayer event name does not match the GA4 standard names described above. |
| Site search | It lets you manually track additional site search events. |
You can optionally define custom dimension objects when sending a site search. These dimensions only apply to the current tracking request. To define a custom dimension, add a new row to the table, enter the ID (index) of the dimension defined for your site, and select a variable or enter a constant string as the dimension value. |
| Virtual page view | It lets you track page view events independently of the main tracking code. | |
| Content impression | It lets you manually track additional content impression events. | |
| Content interaction | It lets you manually track additional content interaction events. | |
| Downloads and outlinks | It lets you manually track additional download and outlink events. |
You can optionally define custom dimension objects when sending downloads or outlinks. These dimensions only apply to the current tracking request. To define a custom dimension, add a new row to the table, enter the ID (index) of the dimension defined for your site, and select a variable or enter a constant string as the dimension value. |
| Set custom dimensions | It lets you set the value of a custom dimension without assigning it to a specific event. | The custom dimension value set by this template type will remain in the tracker’s memory until we clear it or perform a page reload. This means that any event that occurs after the custom dimension value is set and before it’s removed will include the custom dimension. |
| Delete custom dimension | It lets you delete the custom dimension value. |