If you run an online store and want to keep track of transactions and other shopping data, our ecommerce tracking and reports can help. To use our ecommerce tracking, you’ll need to add a few tags or JS methods to your online store and track events like adding or removing a product from the cart, viewing product details and completing the order. Once these events are collected, our ecommerce reports will display them using dedicated ecommerce dimensions and metrics.
In this article, we’ll walk you through the steps to set up ecommerce tracking in your online store.
The basics of ecommerce tracking
Piwik PRO offers a few ecommerce tracking methods:
- Data layer events (Recommended): If your online store sends ecommerce events to the data layer, you can use a set of dedicated tags designed to capture these events. This method is described in this article.
- JS methods: If your online store uses different techniques, you can use JS methods. For more, see our developer documentation.
- WooCommerce: If your online store is on WooCommerce, you can install our container on WooCommerce and ecommerce events will be tracked automatically. Read more
Ecommerce events
No matter which tracking method you use, you’ll track ecommerce events that happen at different shopping stages. The image and table below display which tag or JS method to apply for each stage. If a particular stage doesn’t have a specified tracking method, you can use custom events.

We recommend using scenario 1B, where you track when users add items to their cart and when they remove items from it. This scenario lets you collect metrics such as Adds to cart, Removes from cart and Cart-to-detail rate; use the add-to-cart and remove-from-cart events as funnel steps and; analyze how users interact with the cart in the user flow report.
If you can’t track the add-to-cart and remove-from-cart events separately, you can use scenario 1A, which tracks updates to the cart. But it’s better to use scenario 1B when you can.
| Shopping stage | Dedicated tags or custom events | JS methods or custom events |
|---|---|---|
| View a product | Ecommerce product detail view tag | JS method: ecommerceProductDetailView() |
| Click product details | Custom events | Custom events |
| Cart update (1A scenario) | Ecommerce cart update tag | JS method: ecommerceCartUpdate() |
| Add to a cart (1B scenario) | Ecommerce add-to-cart tag | JS method: ecommerceAddToCart() |
| Remove from a cart (1B scenario) | Ecommerce remove-from-cart tag | JS method: ecommerceRemoveFromCart() |
| Checkout | Custom events | Custom events |
| Shipping information | Custom events | Custom events |
| Order | Ecommerce order tag | JS method: ecommerceOrder() |
| Promotions | Custom events and content tracking tag | Custom events and content tracking tag |
| Promo codes | Custom events | Custom events |
Note: Payment in the shopping process is usually processed by an external payment gateway like PayPal or Google Pay, and therefore can’t be tracked.
Additional setup information
Note: With the Piwik PRO update to version 18.37.0, we introduce currency conversion. It will turn on automatically on February 24, 2025. The currency in your site or app settings differs from the currency in the tracking request. The site or app currency is the target currency for conversion. For more details, read this article.
Besides the events we track, there are a few other important things you need to know before setting up ecommerce tracking. Let’s talk about abandoned carts, reported shopping stages, product scope, product deduplication and making sure each order has a unique ID.
Abandoned carts
The abandoned cart doesn’t have its own tag for tracking. It’s calculated in the backend if the following conditions are met:
- There was at least one of the following cart interactions tracked: cart update, add to cart or remove from cart.
- The session ended without completing an order, meaning the order was not tracked.
To calculate the products in the abandoned cart, all events related to the cart are considered. Here’s an example to illustrate this:
- The add-to-cart event tracked 1 product.
- The add-to-cart event tracked 1 product.
- The remove-from-cart event tracked 1 product.
In this sequence of events, the abandoned cart would eventually have 1 product.
Reported shopping stages
Piwik PRO reports shopping stages based on the tracked ecommerce events. The shopping stages are recorded in a dimension called Shopping stage, which receives its value after the session ends. Here are the possible values:
- No shopping activity: Set when no ecommerce event was tracked.
- Viewed product details: A visitor viewed the details of at least one product (
Product detail view), but no activity related to the cart was recorded (Cart update,Add to cart,Remove from cart) and no order was placed. - Ordered: A visitor placed an order.
- Abandoned cart: A visitor had interactions with a cart (
Cart update,Add to cart,Remove from cart) but did not place an order. - Ordered and abandoned cart: A visitor placed an order and, during the same session, had at least one interaction with a cart (
Cart update,Add to cart,Remove from cart).
Product scope
The product scope lets you use dimensions and metrics related to products to get a deeper understanding of how they are performing. We use it when a report or its filter includes at least one product-scoped dimension. However, when this product-scoped dimension is converted to a metric, it no longer has a product scope because it must match the event and session scope. The product scope is available in all reports, including custom reports, web API and raw data.
It’s important to note that certain combinations of dimensions and metrics are not possible due to conflicting scopes. Read more
Product-scoped custom dimensions
You can create up to 20 product-scoped custom dimensions and enrich your ecommerce data. If your online store uses a data layer for tracking, you can easily use tracking IDs from the data layer as dimension IDs for these custom dimensions. Read more
Product deduplication
Our ecommerce setup uses a product deduplication process. To avoid merging products into one entry, a unique identifier called a hash is created based on SKU, name, price, category, brand and variant. Products will not be merged as long as there is at least one difference in the listed elements.
Uniqueness of the order ID
The Order ID is unique. You can only track the same Order ID once during a single session. If you try to track multiple orders with the same ID, it’s considered a problem with the setup and won’t be included in the report. We treat this as a broken event.
Set up ecommerce tracking using tags
Moving on, let’s discuss how to set up your ecommerce tracking using tags and view the collected data in reports.
To set up ecommerce tracking using tags on your site, follow these steps:
1. Check to see if your online store is sending ecommerce events in the data layer. Go to Tag Manager > Debug mode.

Note: Read more about the data layer.
2. Choose the site or app you want to work with. Use the site/app picker in the upper right corner.
3. In Your site address, type in or select your site or app address.
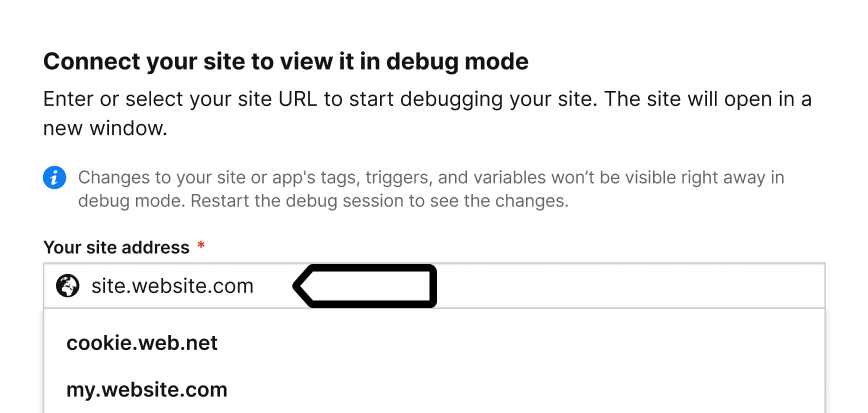
4. Click Connect.
5. Once your site is connected, it will open in a new tab.
Note: If you have any trouble connecting, check that:
- Your browser allows popups. Some browsers, e.g. Safari, block them by default.
- The necessary code is installed on your site.
- You entered the correct site address.
- Ad blockers are turned off.
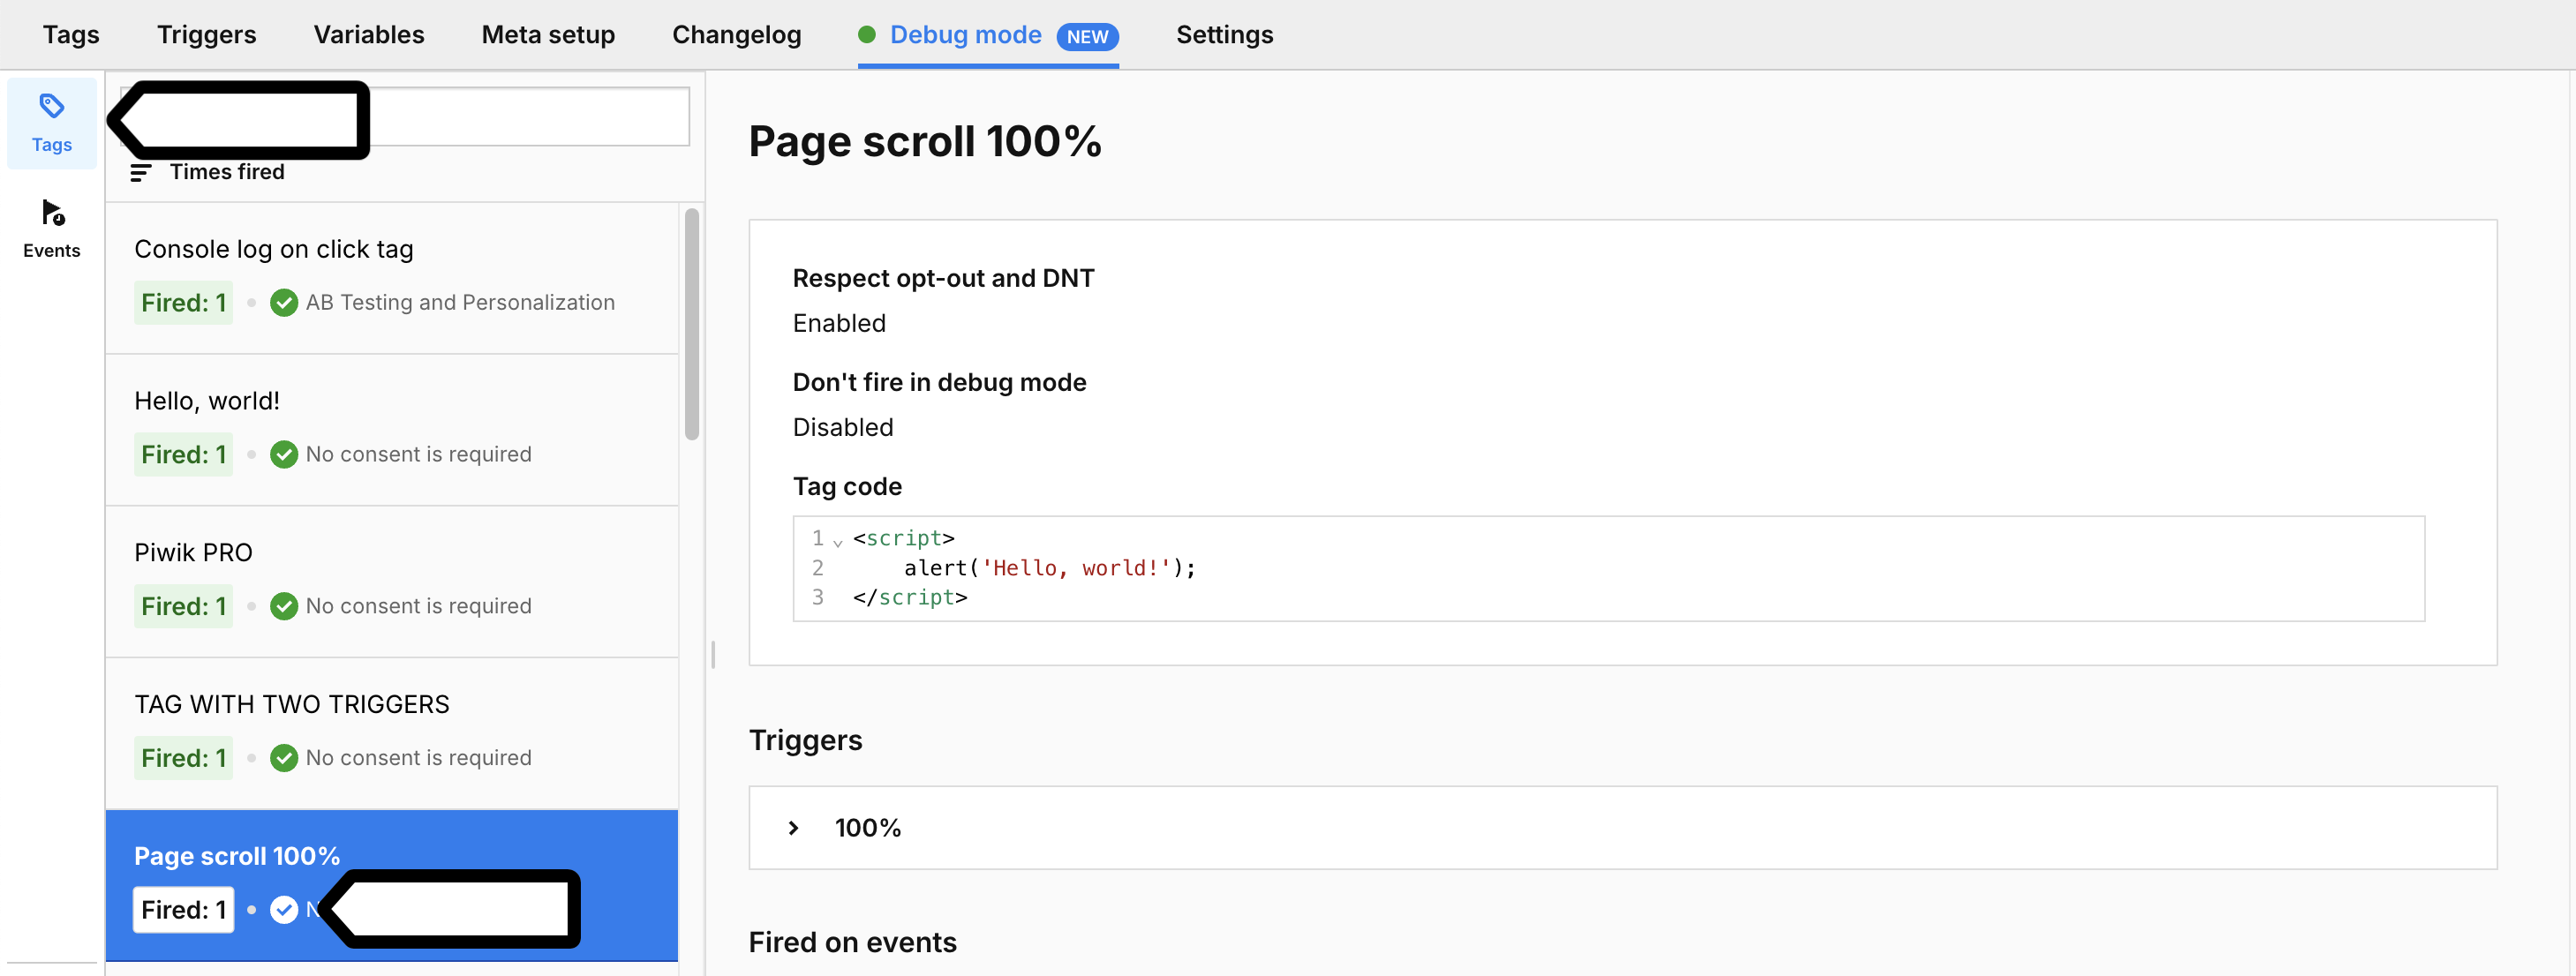
6. Perform an action like adding items to the cart, removing items from the cart, placing an order, or scrolling the entire page.
7. To check if the tag named Page scroll 100% was fired, go back to Tag Manager > Debug mode.
8. In Tags, you’ll see that the Page scroll 100%tag was fired.
9. If the event is visible, go to step 18. If the event isn’t visible, add support for ecommerce events in your store. Start by checking if there are any plugins available on your popular platform that allow you to push ecommerce data to the data layer. If there is no suitable plugin, you’ll need to implement a custom solution, which may require the help of your IT team.
10. Check to see how you push data about ecommerce events. While in debug mode, look at the event details. If the event name doesn’t include the prefix "arguments," you pass ecommerce event data directly to the data layer. However, if the event name does have the prefix "arguments," you use the gtag function from the gtag.js script to handle the ecommerce event data.
Here are example event details for both scenarios.
Example data layer structure (compatible with GA4)
{
  "event": "add_to_cart",
  "ecommerce": {
    "currency": "USD",
    "value": 40,
    "items": [
      {
        "item_id": "1111",
        "item_name": "Basic T-Shirt",
        "price": "40.00",
        "quantity": 1,
        "item_brand": "Basic Brand",
        "item_category": "T-Shirts",
        "item_variant": "S"
      }
    ]
  }
}
Example gtag.js structure (compatible with GA4)
{
  "event": "arguments.add_to_cart",
  "currency": "USD",
  "value": 40,
  "items": [
    {
      "item_id": "1111",
      "item_name": "Basic T-Shirt",
      "price": "40.00",
      "quantity": 1,
      "item_brand": "Basic Brand",
      "item_category": "T-Shirts",
      "item_variant": "S"
    }
  ]
}
Note: All events passed to the data layer using the gtag function are automatically transformed and receive the "arguments" prefix.
11. Check to see if the structure of the event data passed to the data layer meets Google’s standards. Compare your structure with the examples given in Google’s documentation:
- Data layer (Google Analytics 4)
- Data layer (Google Universal Analytics)
- Google tag (Google Analytics 4)
- Google tag (Google Universal Analytics)
If your data structure meets Google’s standards, you can use presets to set up ecommerce tracking tags in Tag Manager. If it doesn’t meet the standards, you’ll need to properly map the data structure while setting up these tags.
12. Set up the following tags in Tag Manager:
- Ecommerce add-to-cart tag
- Ecommerce order tag
- Ecommerce product detail view tag
- Ecommerce remove-from-cart tag
- Ecommerce cart update tag (instead of “Ecommerce add to cart” and “Ecommerce remove from cart”)
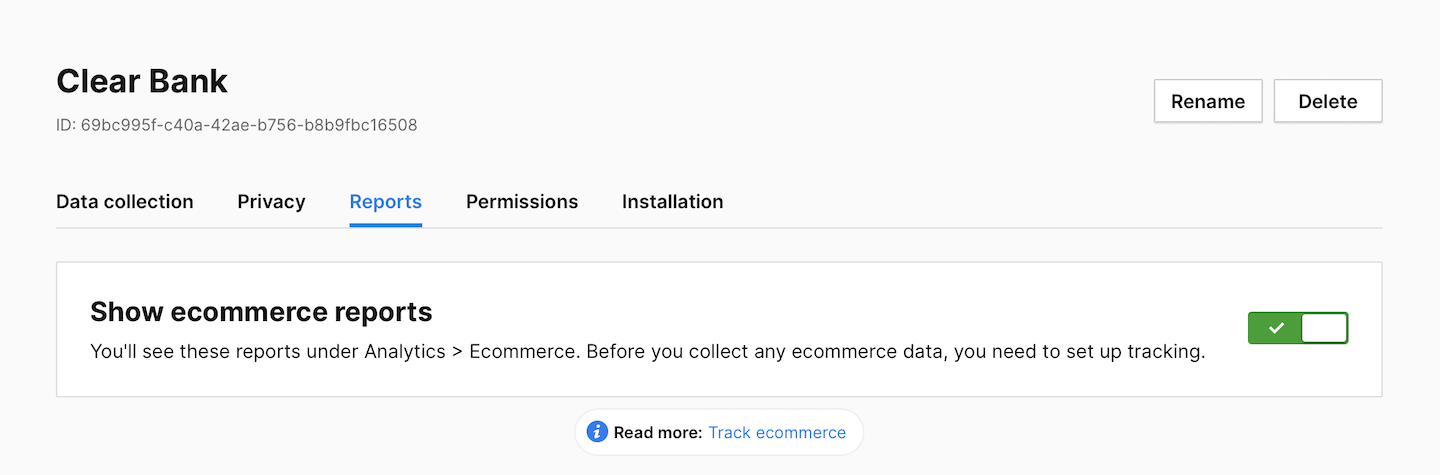
13. Turn on ecommerce reports in Menu> Administration > Pick a site/app > Reports > Show ecommerce reports (on). The reports are not displayed by default.
14. Navigate to Menu > Analytics > Ecommerce.
15. Job done! Your ecommerce reports will now start filling up with data.
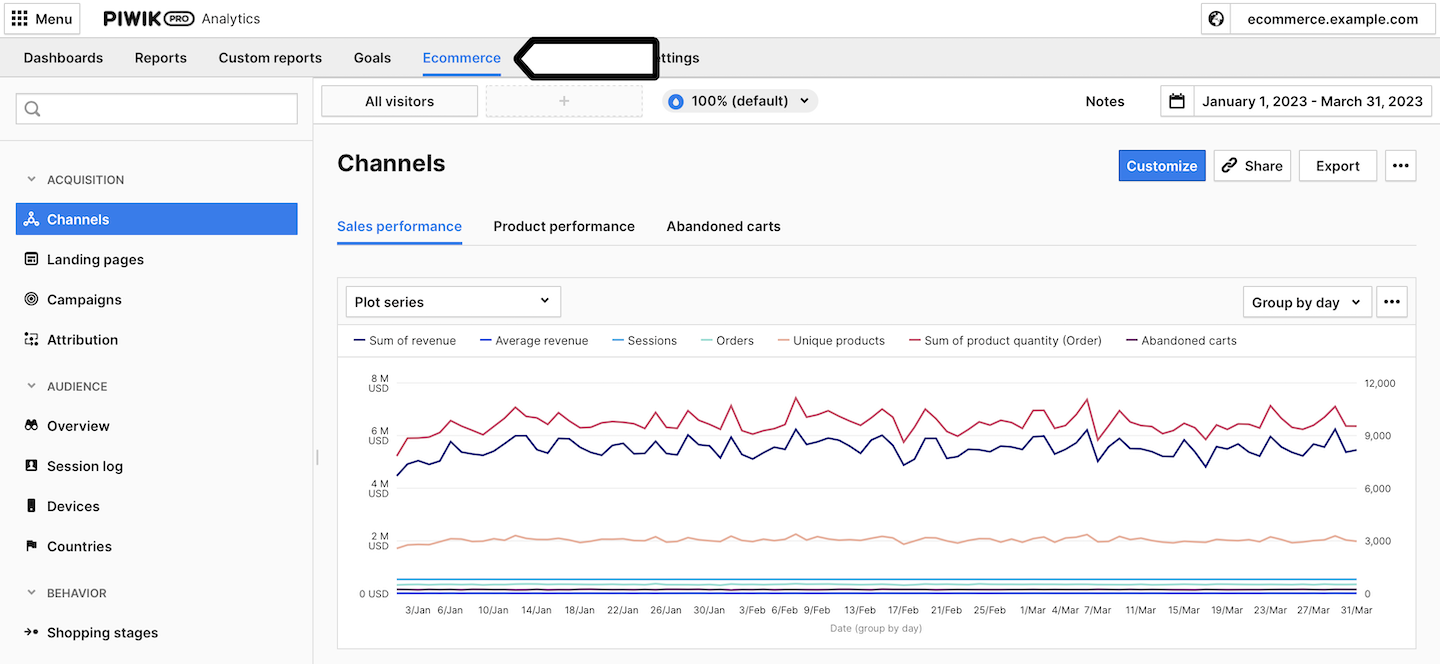
Tip: Read more about ecommerce reports.