
After installing the Piwik PRO container on your site, the consent form will automatically appear on it with its default settings. However, you can change some of the form settings or turn it off completely if you wish.
In this article, you’ll learn how to choose the consent management option available for your account, turn consent management on or off, and change your consent settings.
Use this table to choose the right setup path.
| Your setup | Use this option |
| Your account doesn’t include Consent Manager (legacy) | Cookie Information Consent Management Platform |
| Your account includes Consent Manager (legacy) | Consent Manager (legacy) |
| You use a third-party consent banner, like Cookiebot | Third-party consent management integration guide |
Before you start
Here are a few things to know before you start:
- You need a Cookie Information account connected to Piwik PRO. If you don’t have one yet, set it up first. Read more
- Our consent system works with Tag Manager. Every tag in Tag Manager is linked to a consent category and only activates when consent is given (there’s also a category that doesn’t require consent). This integration shows you how to match up the analytics consent category between your cookie consent tool and Piwik PRO.
- You need to install our container code on each page of your website. Read more
- The Piwik PRO tag (tracking code) in Tag Manager needs to have the following consent type: Analytics. This is the default setting.
- You’ll need to add some JavaScript methods to your site’s source code that will make the visitor non-anonymous. You may need the help of a web developer to do this. But if you can’t find such help, you can skip these methods and collect anonymous data from all visitors.
- If you want to synchronize other consent types, use our JavaScript methods.
- The integration with a third-party consent management tool doesn’t collect or pass consent statistics. However, you can use our JavaScript methods to create such an integration.
Note: We’ll no longer offer Consent Manager (legacy) for new Piwik PRO accounts.
Set up Cookie Information consent management in Piwik PRO
Note: This guide applies to the Piwik PRO version without Consent Manager (legacy) included in the offer. If you’re using a version with Consent Manager (legacy), see this guide instead.
To set up consent management in Piwik PRO with Cookie Information Consent Management Platform (CMP), follow these steps:
1. Log in to Piwik PRO.
2. Go to Menu > Administration.
3. Navigate to Sites & apps.
4. On the left, pick the site or app you want to work with.
5. Navigate to Privacy.
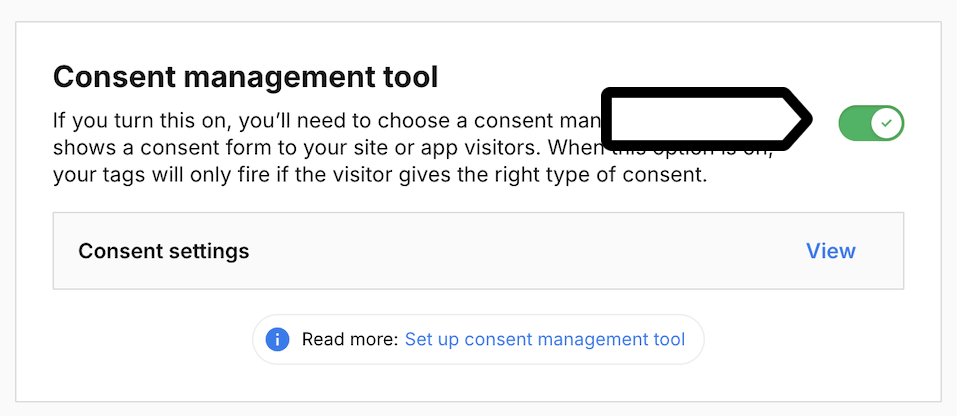
6. Turn on or off Consent management tool. Turn it on to show the consent form on your site. Turn it off to hide the form.
7. Select Cookie Information CMP.
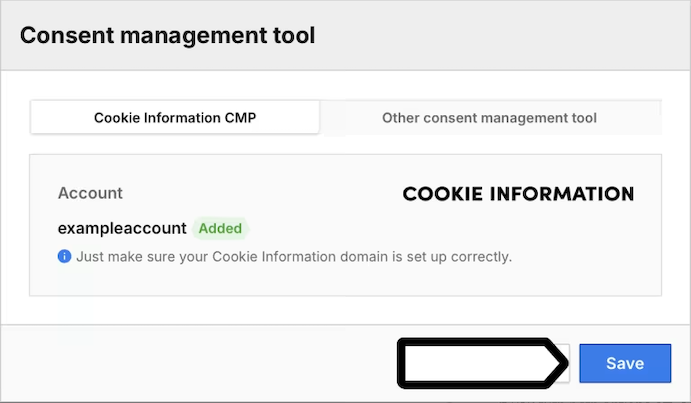
8. Click Save.
Note: If you don’t have a Cookie Information account, follow this guide.
9. (Optional) Click View to customize the consent settings.
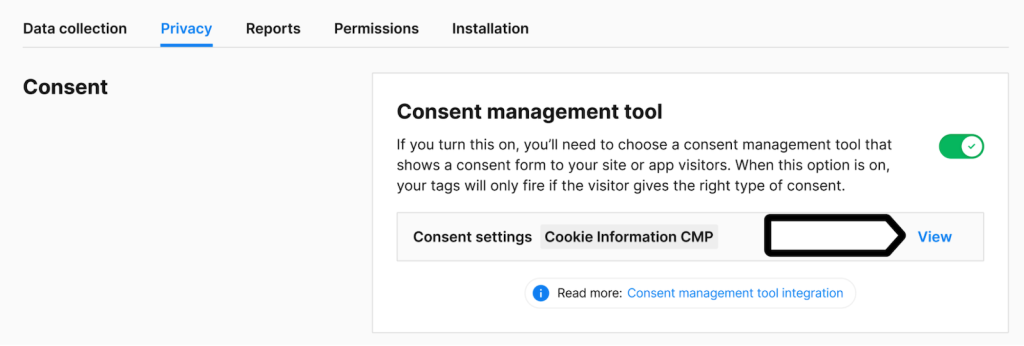
Note: Remember to make sure your Cookie Information domain is set up correctly. You can edit your consent form in your consent management tool. Read more
10. (Optional) Turn on Collect anonymous data from non-consenting visitors: You can collect anonymous data from visitors who haven’t given consent. We’ll fully mask their IP addresses, so you won’t recognize new or returning visitors. You’ll only know their country.
You can also choose how we group events from these visitors into sessions:
- Use a session hash: We’ll create a hash for each session based on the visitor’s IP address, operating system, browser name and version, browser language, enabled browser plugins, and site or app ID. The hash helps us recognize events from the same session. This setting only applies to non-consenting visitors.
- Use visitor cookies: We’ll use visitor cookies, such as _pk_id and _pk_ses, to recognize events that belong to the same session. They expire 30 minutes after the last event. Note: This setting only applies to non-consenting visitors.
Note: Some triggers in Tag Manager create cookies to function correctly. If you use one of the following conditions in triggers, we’ll set a cookie:
- Event condition > Traffic source
- Event condition > Returning visitor
- Event condition > Campaign
- Event condition > External referrer
- Multiplicity > Fire tag once per session
- Multiplicity > Fire tag multiple times per session, excluding first
Make sure that tags with those triggers are set with the right consent type.
We also set essential cookies that store visitor’s consent decision. More about cookies
- Consent is valid for: The cookie storing consent preferences will expire after this time, and your form will ask a visitor for consent again.
- Share consent between subdomains: You can add subdomains to share consent between them. Enter a domain, subdomain or a wildcard like
*.example.com.
Note: If you enter a few values, each will create a bucket of shared consent. Let’s look at an example.
We have the following domains:
example.comblog.example.comhelp.example.com
We only want to share consent between the first two: example.com and blog.example.com. So we need to type in: *.example.com and help.example.com.
This will create two buckets of shared consents:
- One bucket for:
example.comandblog.example.com. - And another bucket for:
help.example.com.
- Use a custom consent form: This consent form overrides those from Consent Manager. You can add it via the JavaScript API. Read more
11. When you’re done, click Save. Make sure each tag in Tag Manager has the correct consent type.
12. Go to Tag Manager and open a tag.
13. In Advanced tag settings, select the correct Consent type.
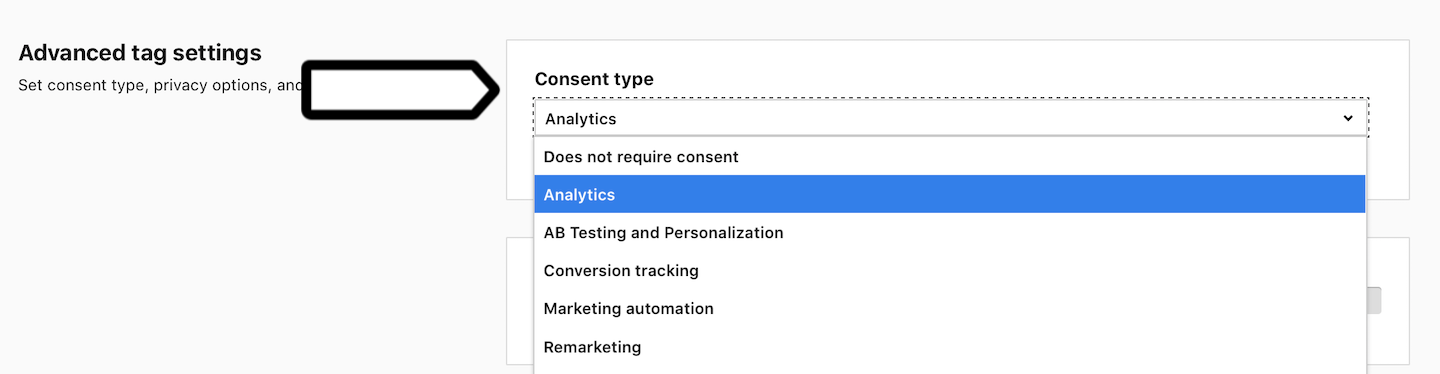
14. Click Save. Repeat these steps for each tag that requires consent.
15. Click Publish.
16. Done. Your consent form is visible on your site, and your tags are set to respect visitors’ consent choices.
Use Piwik PRO Consent Manager (legacy)
Note: Use these steps if Consent Manager (legacy) is available in your Piwik PRO account. You can turn the consent form on or off and change its consent settings. If you’re using a version with Consent Manager, see this guide instead.
To use Consent Manager (legacy), follow these steps:
1. Log in to Piwik PRO.
2. Go to Menu > Administration.
3. Navigate to Sites & apps.
4. On the left, pick the site or app you want to work with.
5. Navigate to Privacy.
6. Turn on Consent management tool to show the consent form on your site. Turn it off to hide the form.
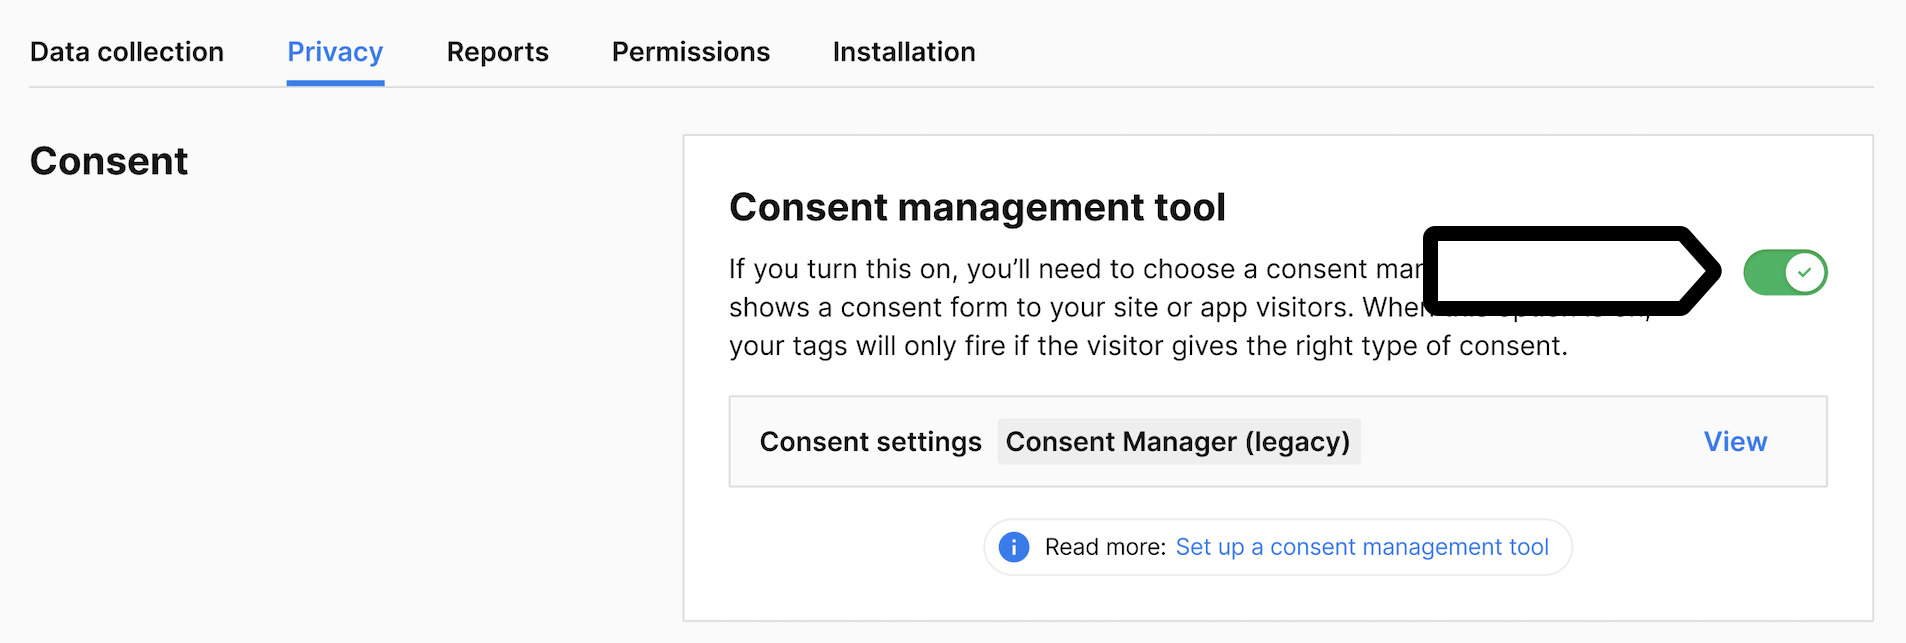
7. To change the consent management option, click View and select the option you want to use.
8. To change the current consent settings, in Consent settings, click View.
9. Consent Manager (legacy) is selected by default. If you want to use a different consent management option, select it here.
10. (Optional) Turn on Collect anonymous data from non-consenting visitors: You can collect anonymous data from visitors who haven’t given consent. We’ll fully mask their IP addresses, so you won’t recognize new or returning visitors. You’ll only know their country.
You can also choose how we group events from these visitors into sessions:
- Use a session hash: We’ll create a hash for each session based on the visitor’s IP address, operating system, browser name and version, browser language, enabled browser plugins, and site or app ID. The hash helps us recognize events from the same session. This setting only applies to non-consenting visitors.
- Use visitor cookies: We’ll use visitor cookies, such as _pk_id and _pk_ses, to recognize events that belong to the same session. They expire 30 minutes after the last event. Note: This setting only applies to non-consenting visitors.
Note: Some triggers in Tag Manager create cookies to function correctly. If you use one of the following conditions in triggers, we’ll set a cookie:
- Event condition > Traffic source
- Event condition > Returning visitor
- Event condition > Campaign
- Event condition > External referrer
- Multiplicity > Fire tag once per session
- Multiplicity > Fire tag multiple times per session, excluding first
Make sure that tags with those triggers are set with the right consent type.
We also set essential cookies that store visitor’s consent decision. More about cookies
- Consent is valid for: The cookie storing consent preferences will expire after this time, and your form will ask a visitor for consent again.
- Share consent between subdomains: You can add subdomains to share consent between them. Enter a domain, subdomain or a wildcard like *.example.com.
Note: If you enter a few values, each will create a bucket of shared consent. Let’s look at an example.
We have the following domains:
example.comblog.example.comhelp.example.com
We only want to share consent between the first two: example.com and blog.example.com. So we need to type in: *.example.com and help.example.com.
This will create two buckets of shared consents:
- One bucket for:
example.comandblog.example.com. - And another bucket for:
help.example.com.
11. When you’re done, click Save. Make sure each tag in Tag Manager has the correct consent type.
12. Go to Tag Manager and open a tag.
13. In Advanced tag settings, select the correct Consent type.
14. Click Save. Repeat these steps for each tag that requires consent.
15. Click Publish.
16. Done. Your consent form is visible on your site, and your tags are set to respect visitors’ consent choices.
Comparison of options
Here’s a comparison table to help you choose the right option. Each setting uses different mechanisms for collecting data and for recognizing visitors and their sessions. Settings also affect what data you collect.
| Consenting visitors | Non-consenting visitors | |||||
|---|---|---|---|---|---|---|
| Cookies & session hash | Visitor cookies & session hash | Visitor cookies only | Session hash only | No visitor cookies & session hash | Don’t collect data | |
| Mechanisms used to collect data | ||||||
| First-party cookies | ||||||
| Local storage | ||||||
| Session hash | ||||||
| Collected data | ||||||
| Visitor’s IP address | Yes / No | |||||
| Visitor ID | ||||||
| Capture all traffic | ||||||
| New vs. returning visitors | ||||||
| Visitor’s session | ||||||
| Visitor’s location | Latitude, Longitude, Organization, Provider, City, Region, Country, Continent | Country, Continent | Country, Continent | Country, Continent | Country, Continent | |
| Events | ||||||
| Traffic sources | ||||||
| Channel attribution | Last-click, position-based, first-click, last-non-direct-click, time-decay, linear and custom models | Last-click | Last-click | Last-click | ||
| Consent stats | ||||||
| Privacy laws | ||||||
| Compliant with | LGPD PDPA GDPR UK GDPR/ PECR TDDDG HIPAA |
LGPD PDPA GDPR HIPAA |
LGPD PDPA GDPR HIPAA |
LGPD PDPA GDPR UK GDPR/PECR TDDDG HIPAA |
LGPD PDPA GDPR UK GDPR/PECR TDDDG HIPAA |
LGPD PDPA GDPR UK GDPR/PECR CCPA HIPAA |
How does consent management work in Piwik PRO?
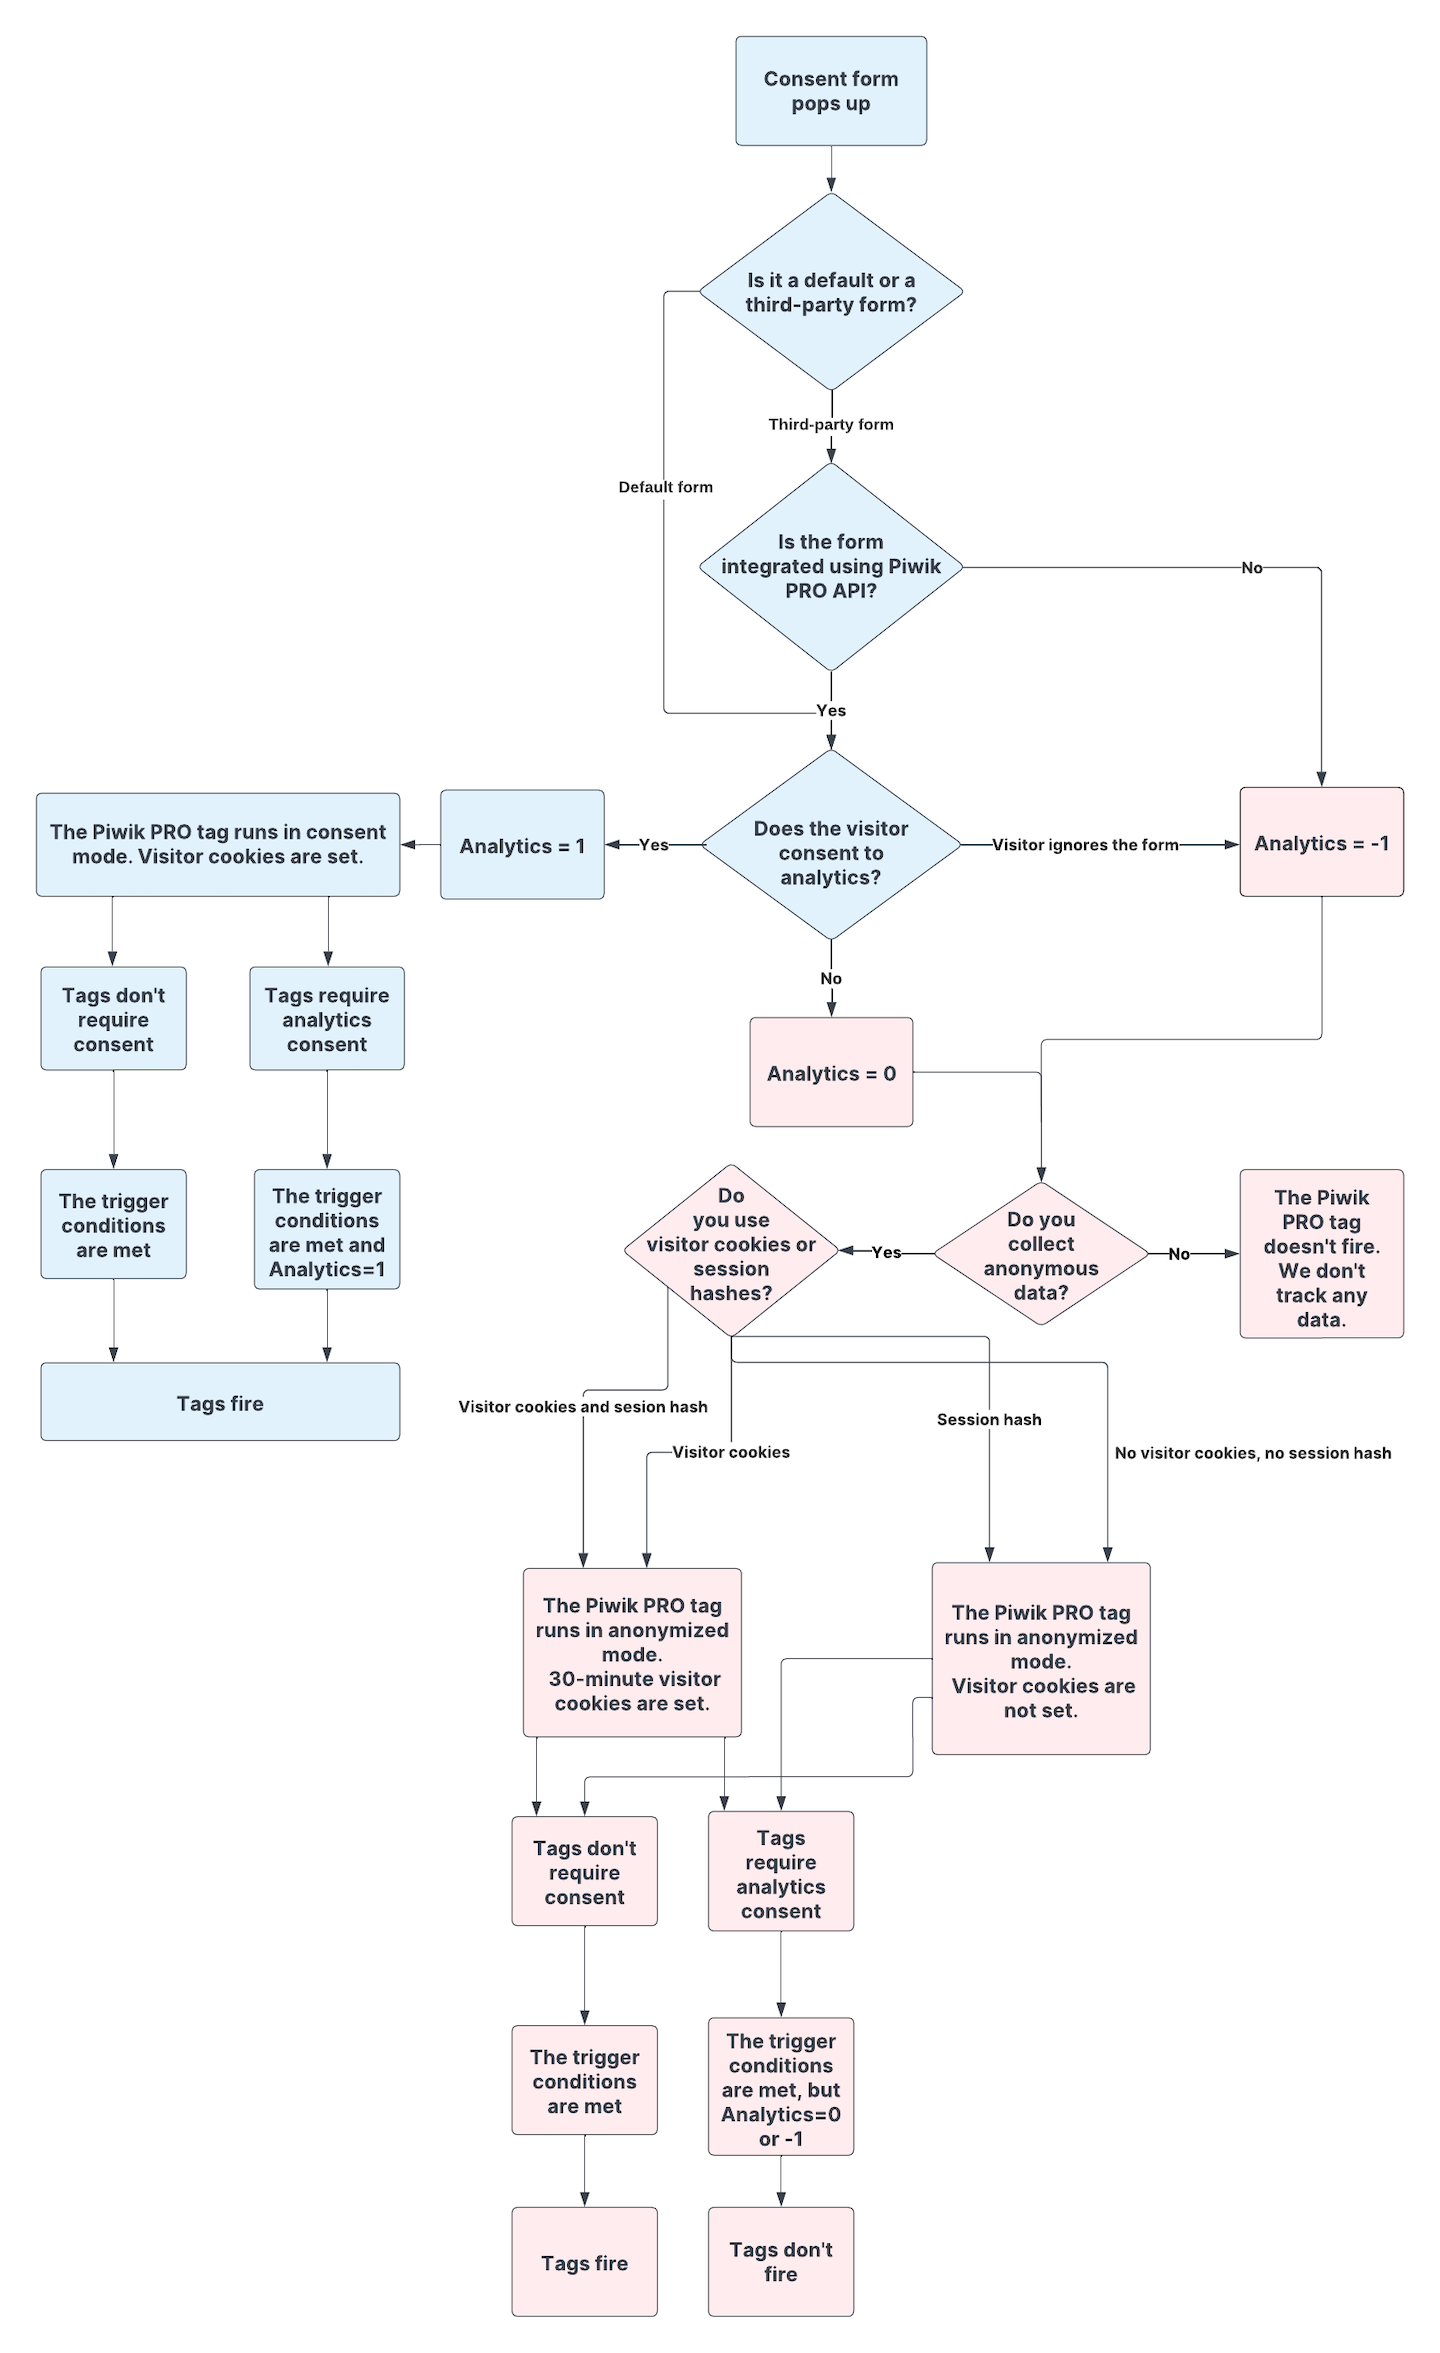
Consent Manager is connected to Tag Manager and fires tags only when visitors give their consent, assuming tags require it. It also controls how the tracking tag works. Depending on the settings you choose and the visitor’s consent, the Piwik PRO tag, containing the tracking code, will activate in consent mode, anonymous mode, or not activate at all.
Note: If you’re using a Piwik PRO version without Consent Manager, you can still use your own consent management tool the same way. Read more on how to integrate your consent management tool with Piwik PRO.
The graph below illustrates how the tracking tag fires and what happens to tags that require analytics consent.
Note:
- The Piwik PRO tag that contains the tracking code requires analytics consent by default. This can be changed. However, if you’re collecting anonymous data, don’t set it to “No consent is required” as this will cause errors.
- Anonymous data collection only works for the Piwik PRO tag.
- The mechanism sets three values for the consent parameter: 0, 1 or -1. -1 is set when visitors ignore the form and informs Piwik PRO that these visitors can be asked for consent again.
- If third-party consent forms are not integrated and don’t communicate with Piwik PRO via API, all visitors are treated as if they ignored the form, and the analytics parameter is set to -1.