Now that you have contact form tracking under your belt, you can use these skills to record newsletter signups. Obviously, people who subscribe to your newsletter appear on the email list in your MailChimp, Aweber, Feedburner or other email marketing account.
But if you want to collect data about visitors who filled out the signup form and see it in Analytics, you can use Tag Manager and a custom event tag. In this chapter, we’ll show you how.
About newsletter signup forms
The newsletter signup forms are similar to contact forms. When you peek into the code, you will usually find the <form></form> construction. Thanks to that, you can use the form submission trigger to capture the moment when visitors subscribe to your newsletter.
In cases when the newsletter signup is not a HTML form, you can use our old friend the click trigger to track signup button clicks.
Find the HTML attribute of the newsletter signup
To get ourselves ready for defining a tag and trigger, we need to collect some information about our newsletter signup form. Like in the previous chapter, we’ll use debug mode.
Check if we are working with a form HTML element, and to pull out HTML attributes that will pinpoint the form we want to track.
Remember, when we’re dealing with HTML attributes for buttons or forms, we need to double-check that we’re tracking the exact elements we want to. Sometimes it happens that many buttons or forms have identical attributes.
To find the CSS attribute of the newsletter signup form using debug mode, follow these steps:
1. Go to Tag Manager > Debug mode.

2. Choose the site/app you want to work with. Use the site/app picker in the upper right corner.
3. In Your site address, type in or select your site or app address.
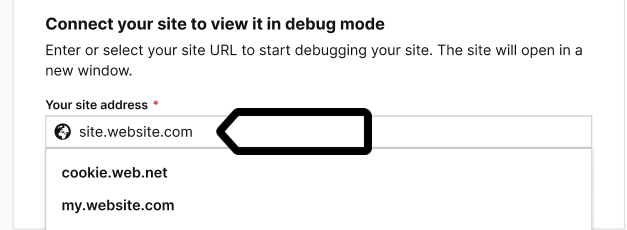
Note: The available sites depend on those you’ve added to your account in
Administration > Sites & apps > Choose your site from the list > Data collection > Site or app address.
4. Click Connect.
5. Once your site is connected, it will open in a new tab.
Note: If you have any trouble connecting, check that:
- The installation code on the website you’re connecting to matches the site or app in the site/app picker in the upper right corner.
- Your browser allows popups. Some browsers, such as Safari, block them by default.
- The necessary code is installed on your site.
- Your site address is correct and you’re connecting to the correct URL.
- Ad-blocking extensions are temporarily disabled.
6. Turn on Prevent page reload. This will stop the page from refreshing when you click elements that would normally trigger a reload.
7. Navigate to Events.
8. Click the subscribe button on your site.
9. If Tag Manager spotted the submit HTML event, you will see an event stg.formSubmit in Debug mode.
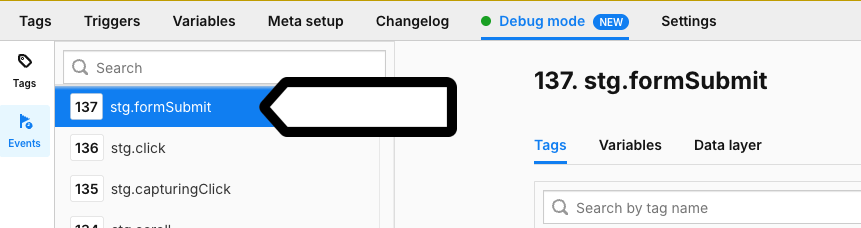
When you see the stg.formSubmit event, then you know you can use the form submission trigger.
Note: If you don’t see the stg.formSubmit event, you need to find the click class for the submit button and use the click trigger. Read more in this article.
10. Click the stg.formSubmit event.
11. Navigate to Variables.

12. In Variables, you will see many types of information that the Tag Manager can capture for this element. Among them you can find Form ID which can be used for defining the form in the submit form trigger.
Note: If there’s no Form ID, you can use Form name. In this case you’d need to set up in Event conditions, you’d use the condition Form name equals my-form.
Just to give you a different perspective, if we look for the code using an inspector for a website browser, it will appear as follows:

Set up newsletter signup tracking in Tag Manager
Once you know your newsletter signup form’s ID, you can create and define the tag and trigger.
To set up a tag and a trigger for tracking newsletter signup, follow these steps:
1. Go to Menu > Tag Manager.
2. Navigate to Tags.
3. Click Add a tag.
4. Select the following tag template: Custom event.
5. Click Next.
6. Name the tag.
7. Set category as Forms. You can use another name depending on the framework you use for organizing events in your reports.
8. Set action as Submit. You can use another label for an action depending on the framework you use for organizing events in your reports.
9. Set name as Newsletter signup.
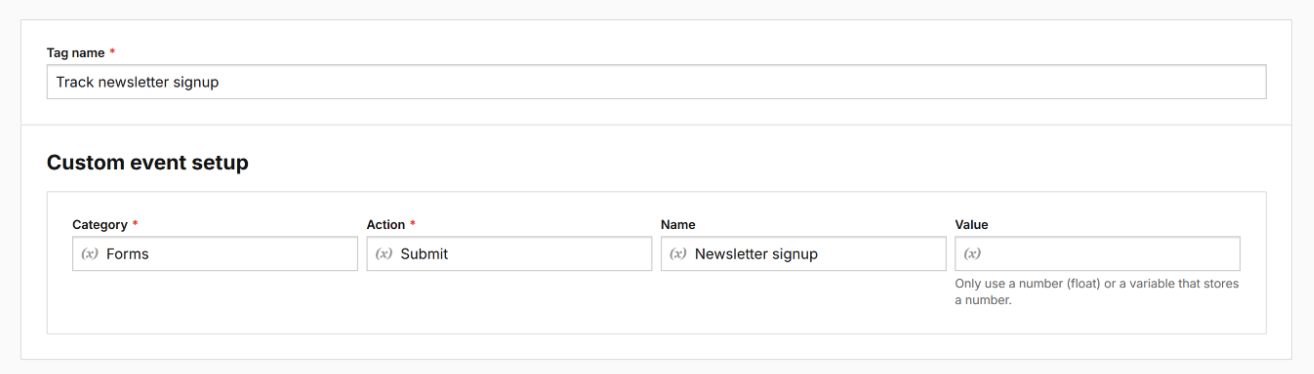
10. When you’re done, click Add.
11. In Tag triggers, click Add a trigger.
12. In Trigger type, choose the following type: Form submission.
13. Click Next.
14. Name the trigger.
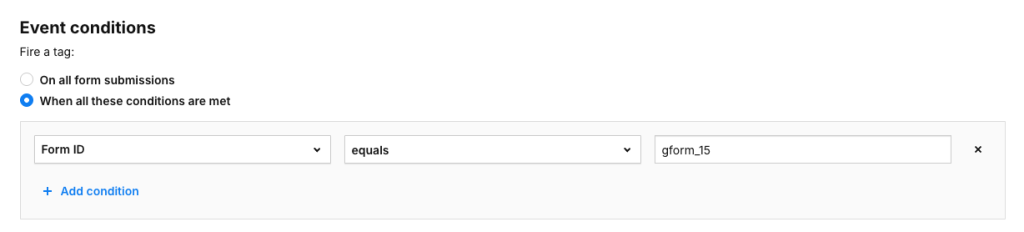
15. In Event conditions, select When all these conditions are met to define conditions for the trigger. For our example, we’ll use the condition Form ID equals gform_15. This way we’re making sure that this tag will fire only for the form with form id="gform_15".
16. When you’re done, click Save.
10. Done.
Check the setup in debug mod
With our tags and triggers ready, we can test if they work properly in debug mode in Tag Manager.
To use debug mode, follow these steps:
1. Go to Taga Manager.
2. Choose the site/app you want to work with. Use the site/app picker in the upper right corner.
3. Go to Debug mode.
4. In Your site address, type in or select your site or app address.
5. Click Connect.
6. Once your site is connected, it will open in a new tab.
Note: If you have any trouble connecting, check that:
- The installation code on the website you’re connecting to matches the site or app in the site/app picker in the upper right corner.
- Your browser allows popups. Some browsers, such as Safari, block them by default.
- The necessary code is installed on your site.
- Your site address is correct and you’re connecting to the correct URL.
- Ad-blocking extensions are temporarily disabled.
7. Toggle the Prevent page reload option. This will stop the page from refreshing when you click elements that would normally trigger a reload.
Tip: This option is useful for testing form submissions and link clicks.
8. On your site or app, perform the action you want to test to check if the tag fires. Click the sign up button.
9. Once you’ve checked that the stg.formSubmit event fires a tag, go back to Tag Manager and publish the tag.

10. Done.
View newsletter signups in a report
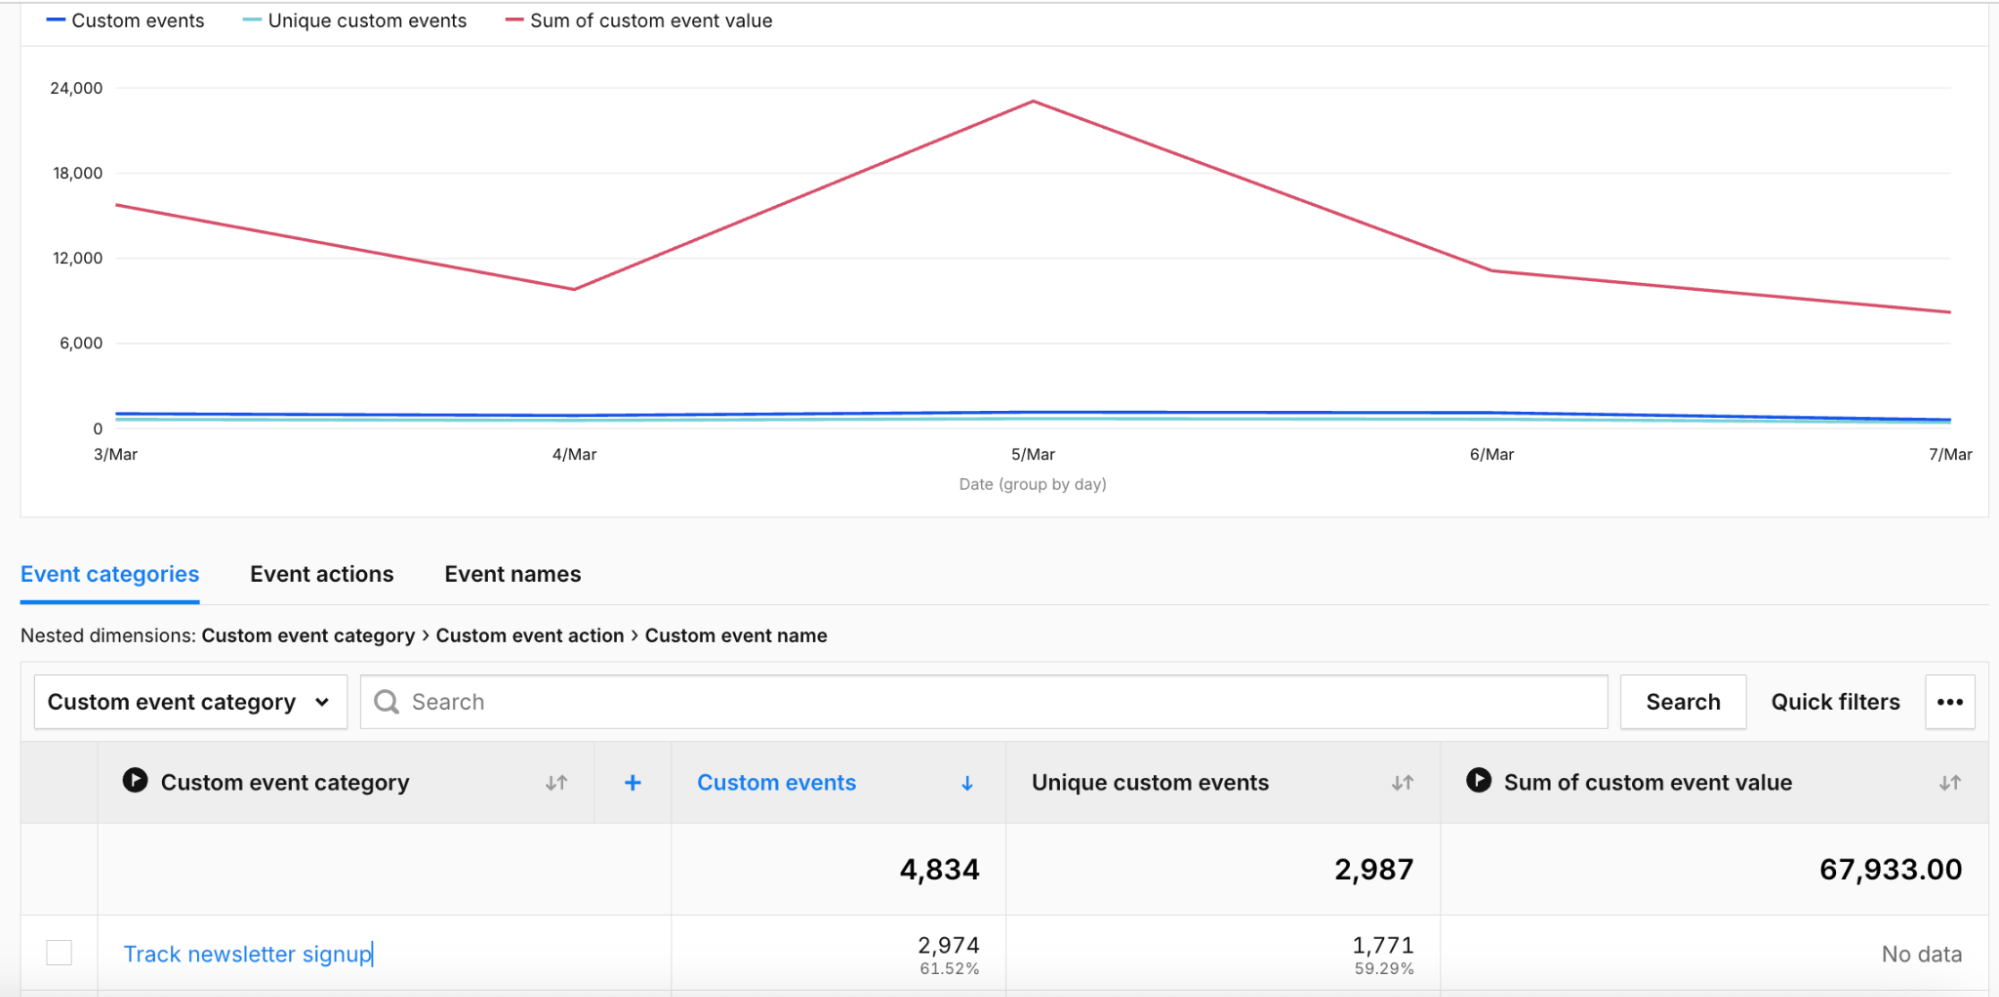
As soon as you publish the tag, Tag Manager will start collecting data about newsletter signups. After a while, you will be able to see the data in the custom event report under Menu > Analytics > Reports > Custom events. As with the tags from previous chapters, the data will appear according to the framework you use for labeling the category, action and name of an event. In our example, the report will look as follows:
Tip: You can analyze a path visitors took before they subscribed for a newsletter with the reversed user flow report. We’ll describe a user flow report in chapter 11 of this guide.
The newsletter signup is our last example of event-based tracking covered in this guide. With the knowledge you’ve gained you’re ready to track button clicks, logo, menu and footer items, measure page scrolling and record data about form submissions.
We hope that by now you can take the leap on your own to set up tracking of elements on your site. Remember to use a custom event tag or custom tag template and a page view, click, form submission or scroll trigger event.
In the next chapters we’ll tell you more about how to see several websites together in a single view, set up goals, click paths and funnels, and read the visitor log report. Stay tuned and keep reading. Bon voyage!