When Piwik PRO tracks a visitor on your website it collects basic information about the session by looking at the page load. For example, Piwik PRO reads the page path (URL), page title, counts page views, time spent on a page and sees where the user came from and which device they use.
However, a user may perform different actions on your website besides just loading a page. They can download an ebook or whitepaper. Click links that send them to external websites. Or click buttons with call to action. All these moves can’t be tracked based on a page load and need to be defined as events.
Ready-made events
In Piwik PRO, there are several ready-made events: a page view, search, outlink, download, content impression, content interaction, goal conversion, order and abandoned chart. We’ll describe a search, an outlink and a download event.
The search event occurs when a visitor types a keyword in a search bar on your website and clicks a search result. During this event, Piwik PRO captures data about the keyword and sends it to Analytics. Later, the data appears in the internal search report under Analytics > Reports > Internal search.
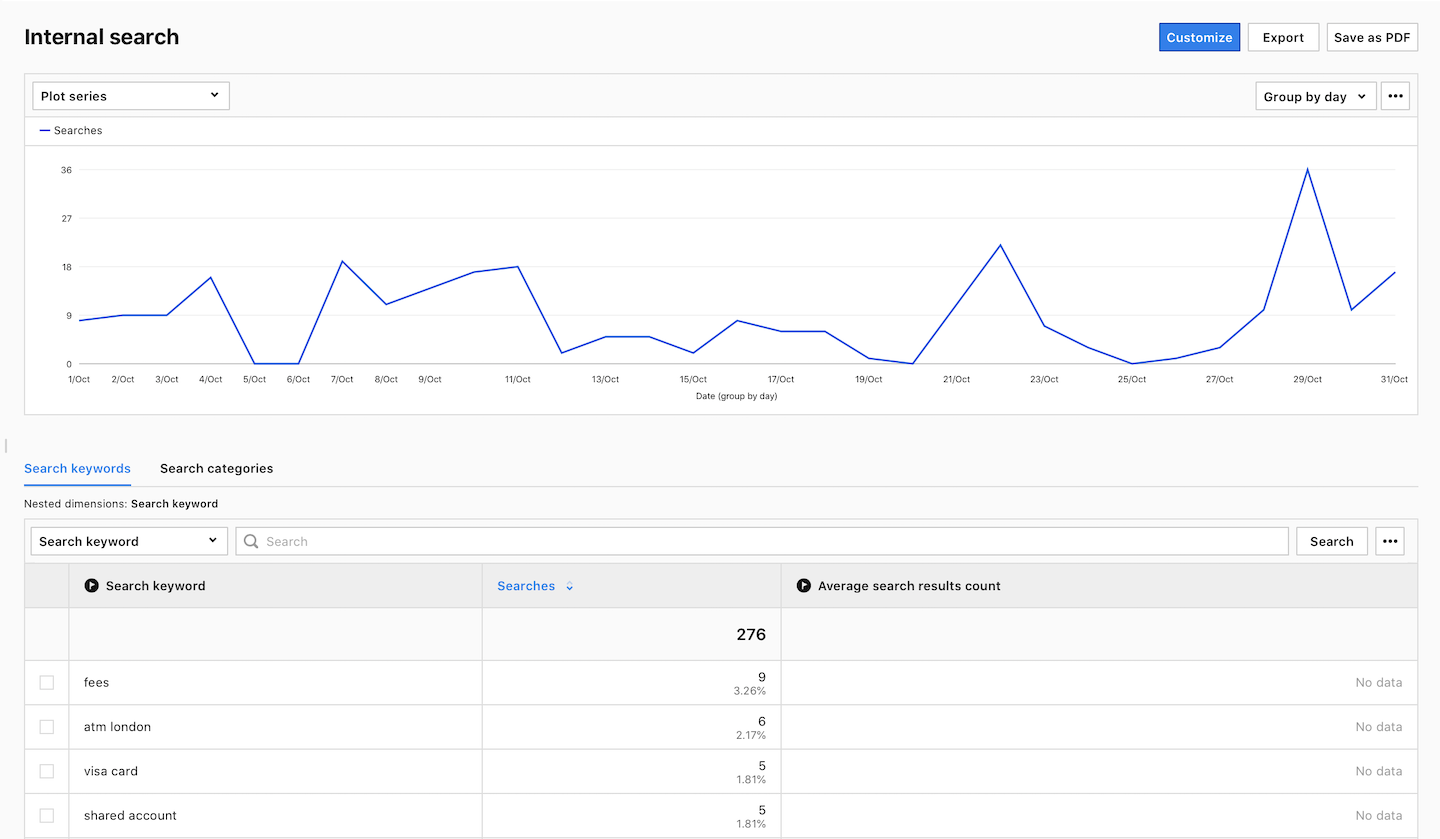
By default, internal search tracking is turned on for every website and tracks the most popular search query parameters. If you need to adjust the site search settings, go to Menu > Administration > Sites & apps > Settings > Site search tracking.
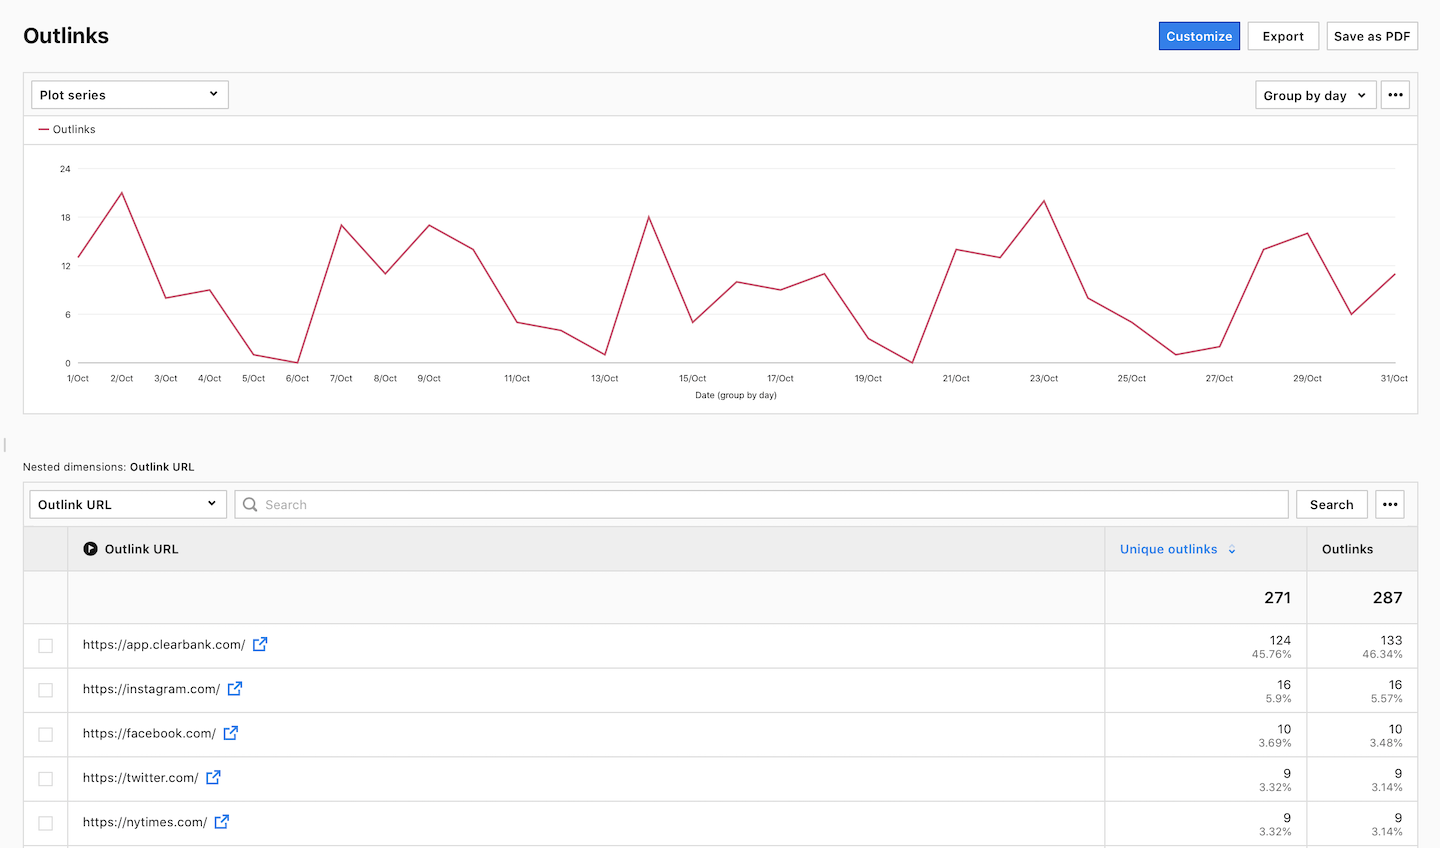
The outside link event, called outlinks in Piwik PRO, happens when a visitor clicks a link leading to an external website. This website may be a domain you track separately, for example, a help center or blog. Or it can be a foreign domain, for example, Facebook, YouTube or Medium. Once a visitor follows an outside link, Piwik PRO passes information about this event to Analytics, and later the data appear in the outlink report under Analytics > Reports > Outlinks.
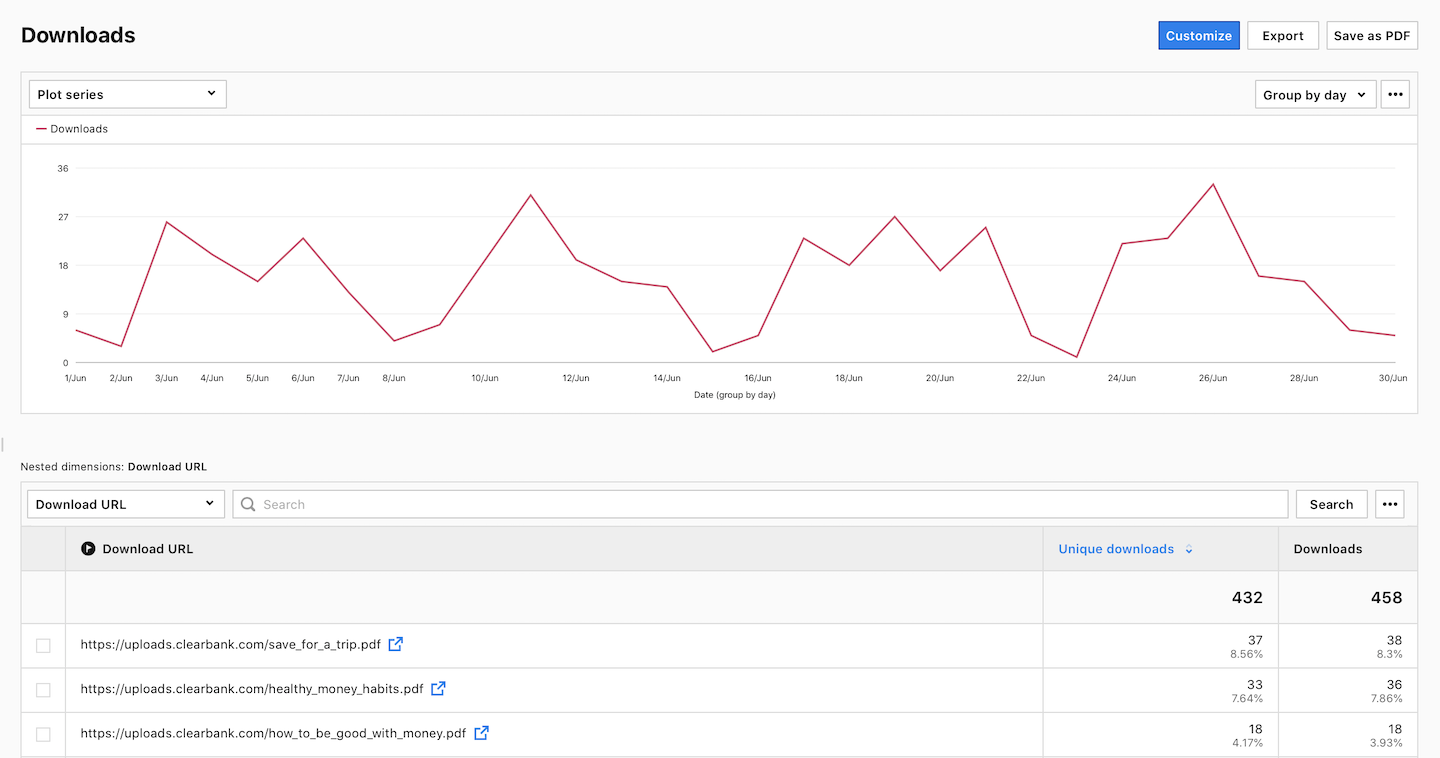
The download event is when a visitor downloads a file from your website, such as a PDF or CSV. Piwik PRO sees when a visitor clicks a download link and informs Analytics about the event. Later, data for this event show up in the download report under Analytics > Reports > Downloads.
Just keep in mind that Piwik PRO doesn’t know if the file was fully downloaded, only that the visitor clicked a download link.
Set up a custom event
For any other event than listed above, you’ll need to set up a custom event using Tag Manager. Tag Manager is a sturdy and versatile tool that works together with Analytics. One of its powers is tracking data from events.
To define an event in Tag Manager you will have to set up a tag and trigger. A tag will count the events and collect information about each event such as event category, action, and optionally name and value. A trigger will tell a tag to fire, for example, when a user clicks a button a trigger will tell the tag: “Now, capture data about this event.”
Once a tag and trigger are set, Tag Manager will pass information about an event to Analytics and you will see data about this event in an event report under Analytics > Reports > Custom events.
To create a tag for an event, follow these steps:
1. Go to Menu > Tag Manager.
2. Click Add a tag.
3. Choose following tag template: Custom event.
4. Click Next.
5. Name the tag.
6. Set category, action, and optionally name and value. (We’ll explain these elements later in this chapter.)

7. In Tag triggers, click Add a trigger.
8. Select the trigger type. Example: Click.
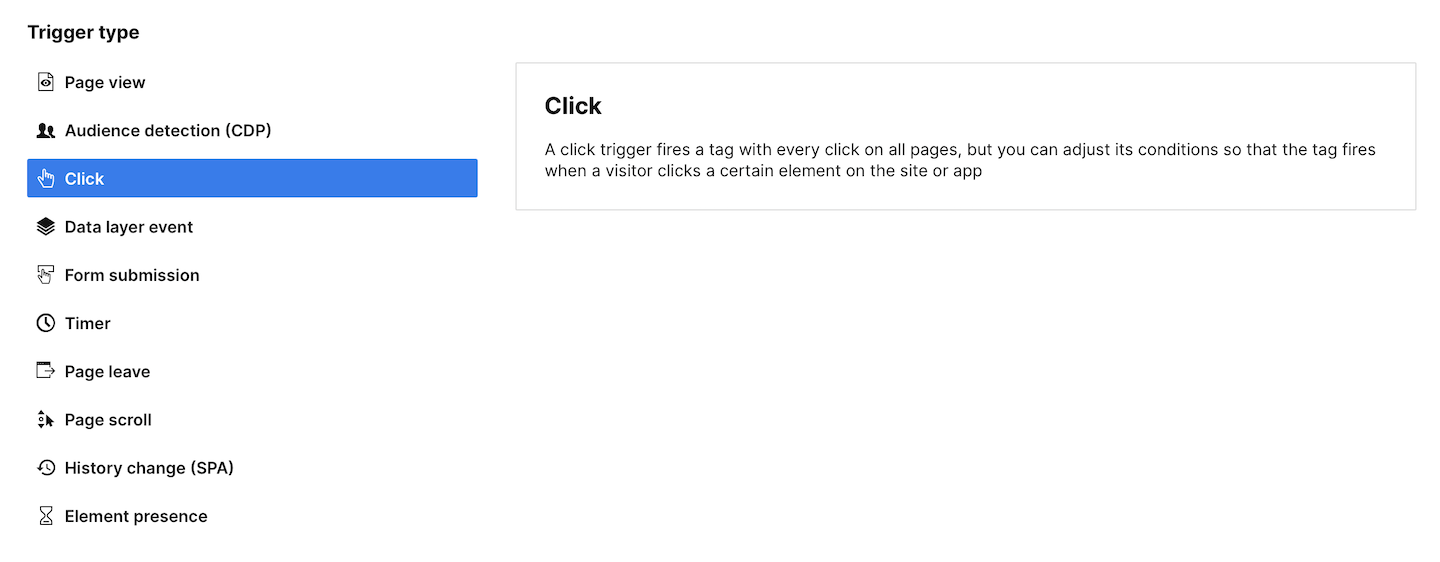
9. Click Next.
10. Name the trigger.
9. In Event conditions, select When all these conditions are met to define conditions for the trigger. For example, Click Classes contains btn.
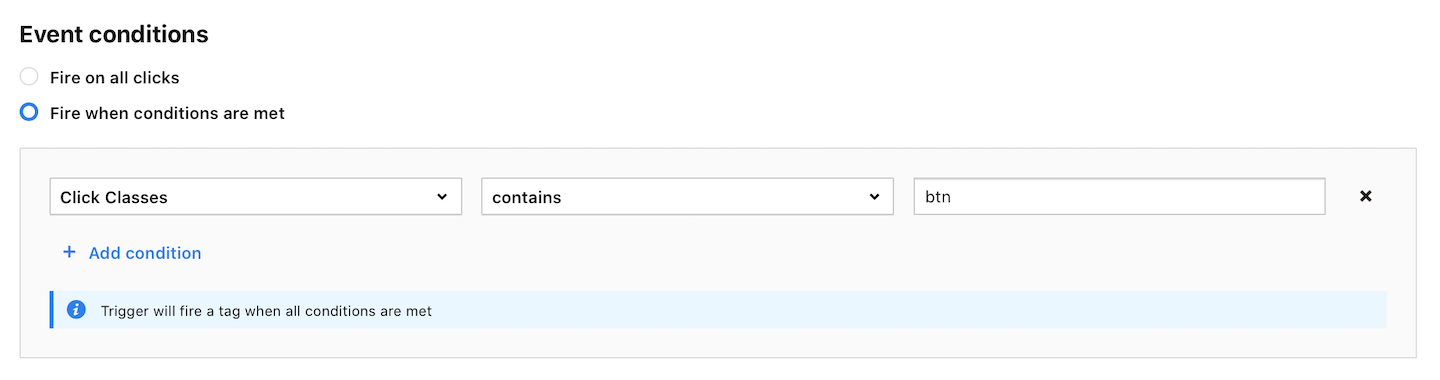
10. When you’re done, click Add.
11. Done! Your tag is now saved as a draft. It’s not yet published on your site or app.
To open debug mode, follow these steps:
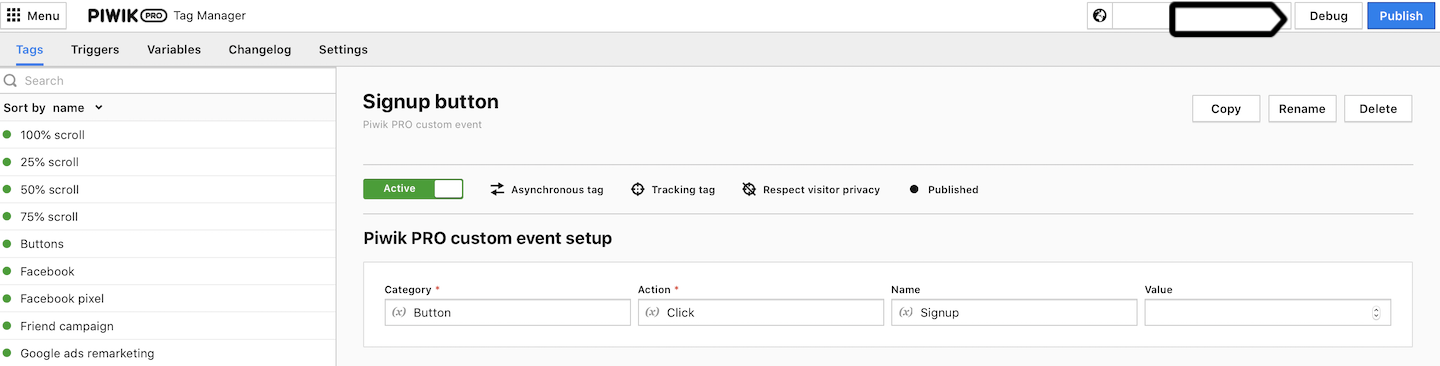
1. Go to Menu > Tag Manager.
2. Click Debug in the upper right corner.
3. Your website will open in a new tab with debug mode running.
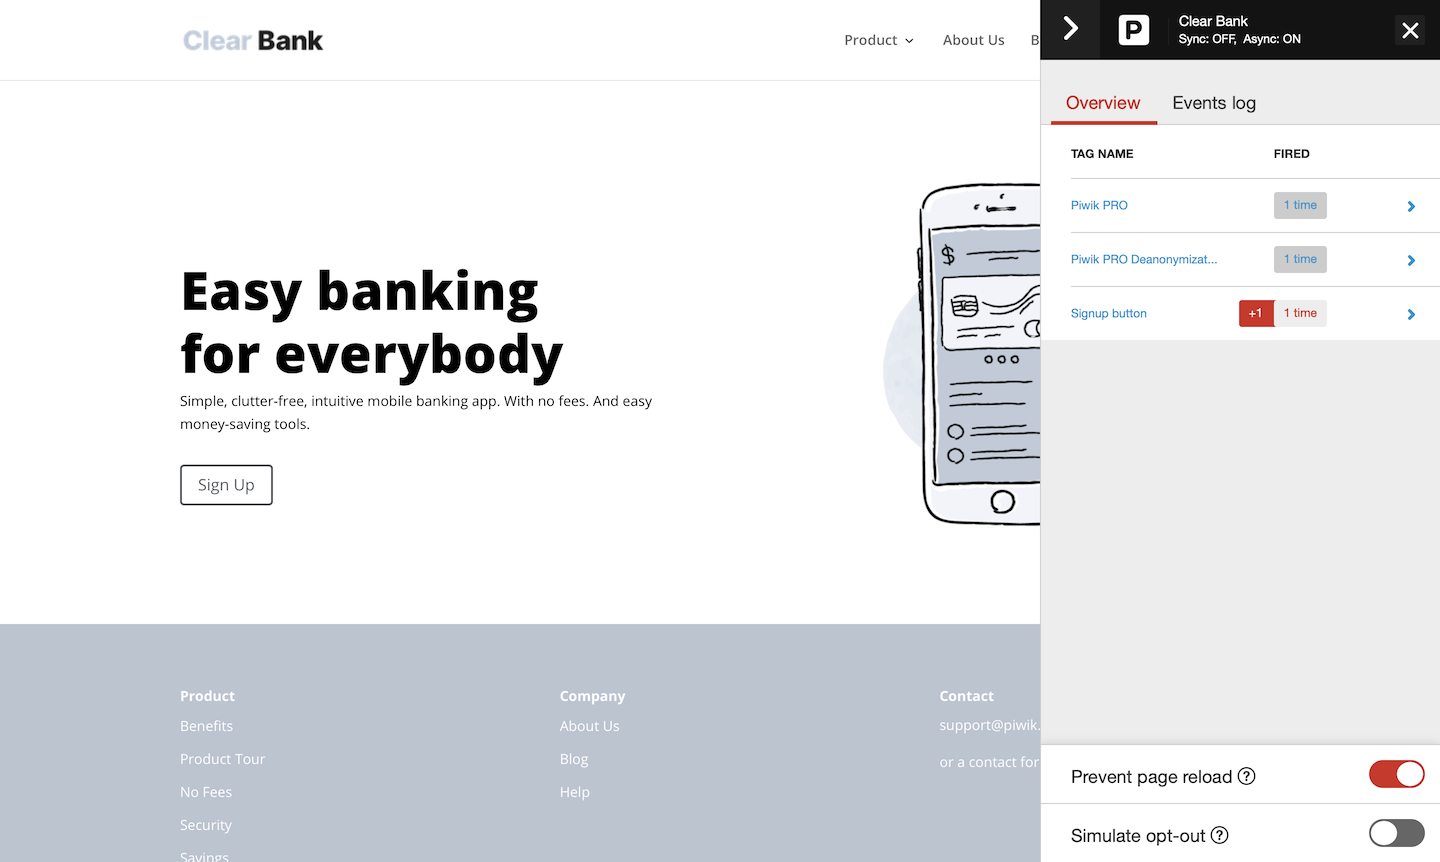
4. Try performing your defined action and see if your tag fires.
When you are happy with how the event works, you can publish the tag on your website.
To publish a tag, follow these steps:
1. Go to Menu > Tag Manager.
2. Click Publish in the upper right corner.
The tag will work straight away, but you will have to wait a bit to see an event in the event report because the data is being archived. However, you can check out the tracker debugger to see real-time sessions.
Category, action, name and value
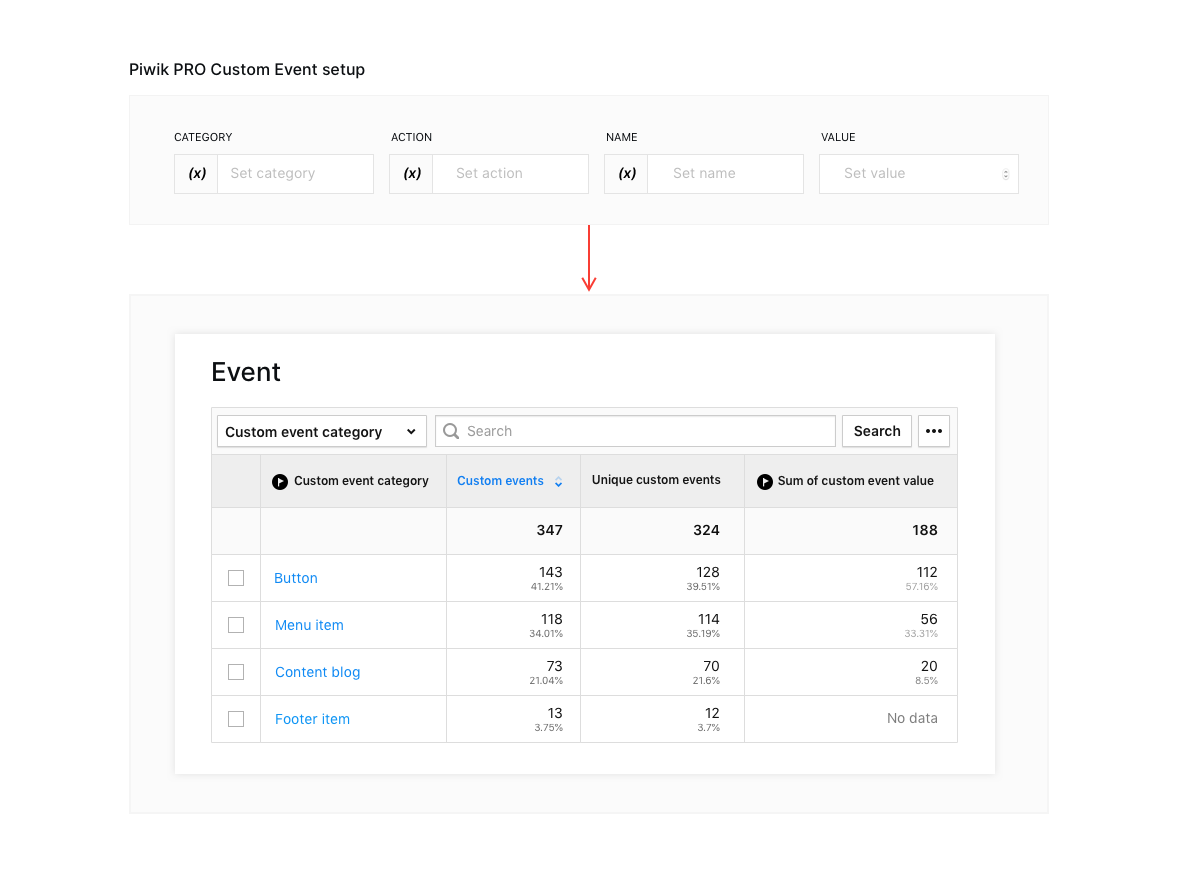
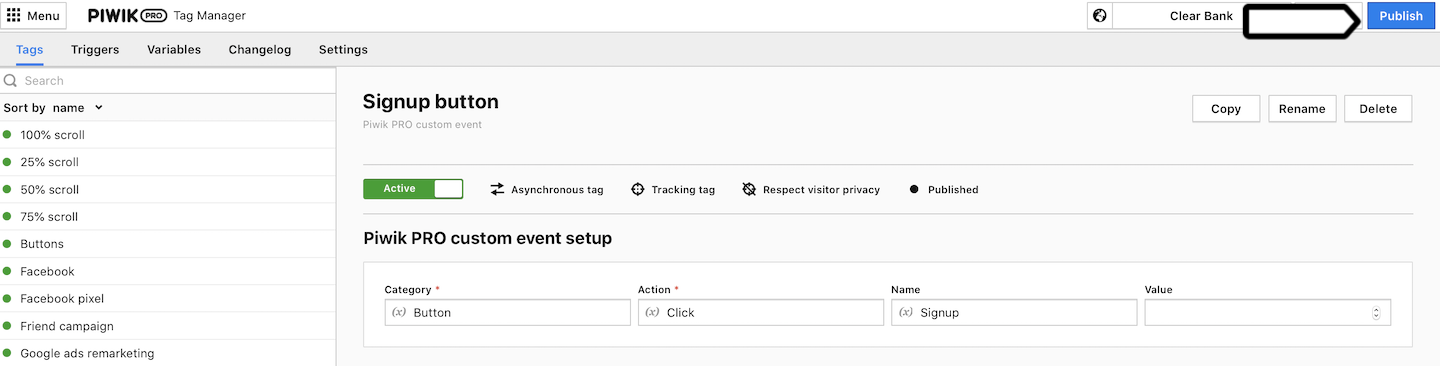
When adjusting how elements are tracked on your website you are defining four parameters: event category, action, name and value. But you might not be sure what these are. Let us explain.

A category organizes events you track into groups. For example Buttons, Videos, Social Shares and more.
An action tells you what a user did. For example, clicked, played, shared and more. If you were tracking when a user clicked a signup button, you might have a category called Buttons and an associated action called Click.
A name is an optional further description of the element you’re tracking, like the call-to-action on the button. For a signup button, a name could be Sign Up.
A value is an optional numerical value which you can add to the event. For example, a dollar amount. If an action is worth some money for your business, like a signup button click is worth 5 USD, you can assign a value for it. Every time an event happens, Piwik PRO will count the value and show the total value in an event report.
Parameters can be named manually – in other words, you can type the name in each parameter field and this name will show up in reports. But you can also define a custom variable for each parameter. A custom variable will pull out the data about the tracked element like click element, click ID, click URL and more, and pass it on to reports.
To set up a custom variable for an event category, action or name, follow these steps:
1. Open your custom event tag.
2. In Custom event setup, click (X) for category, action or name and pick the custom variable you want.
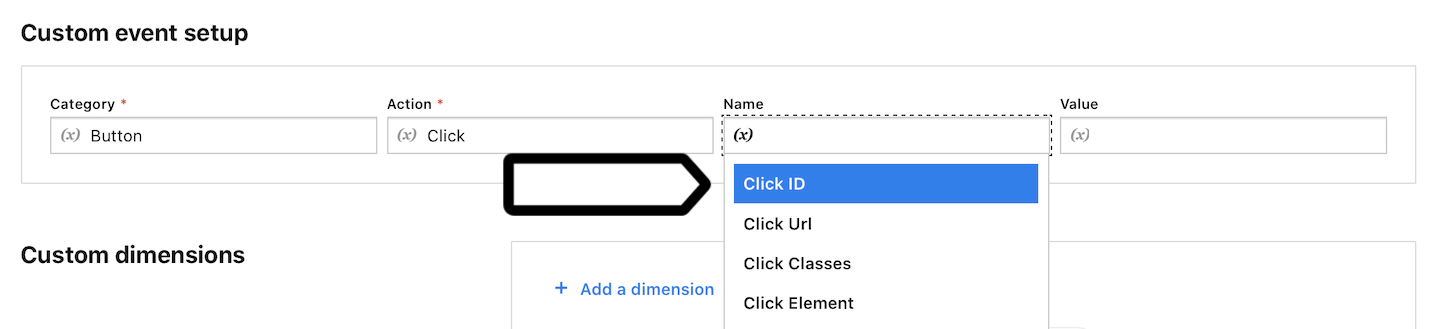
3. When you’re done, click Save.
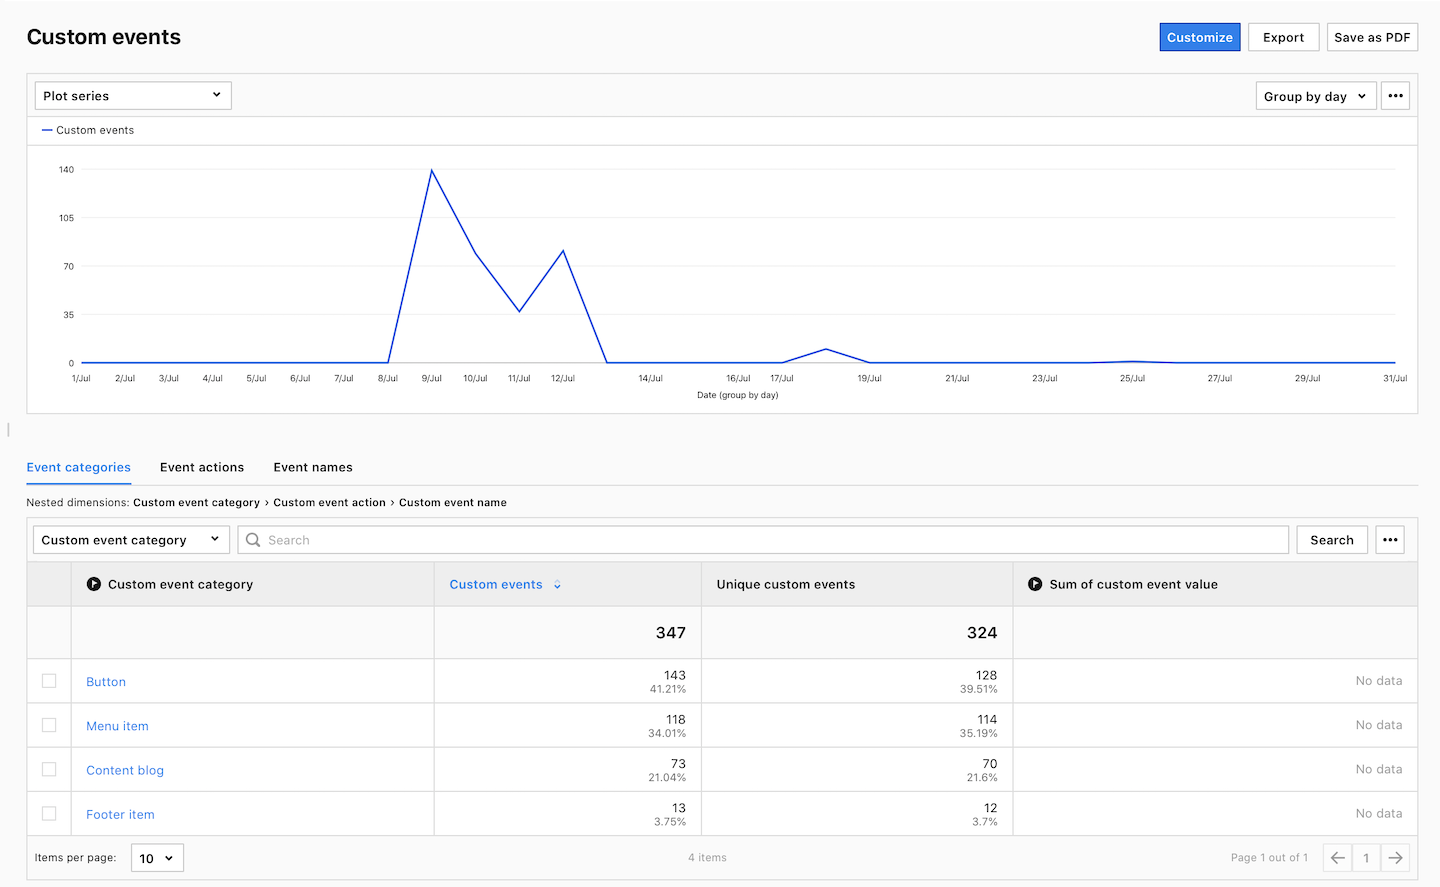
Event report
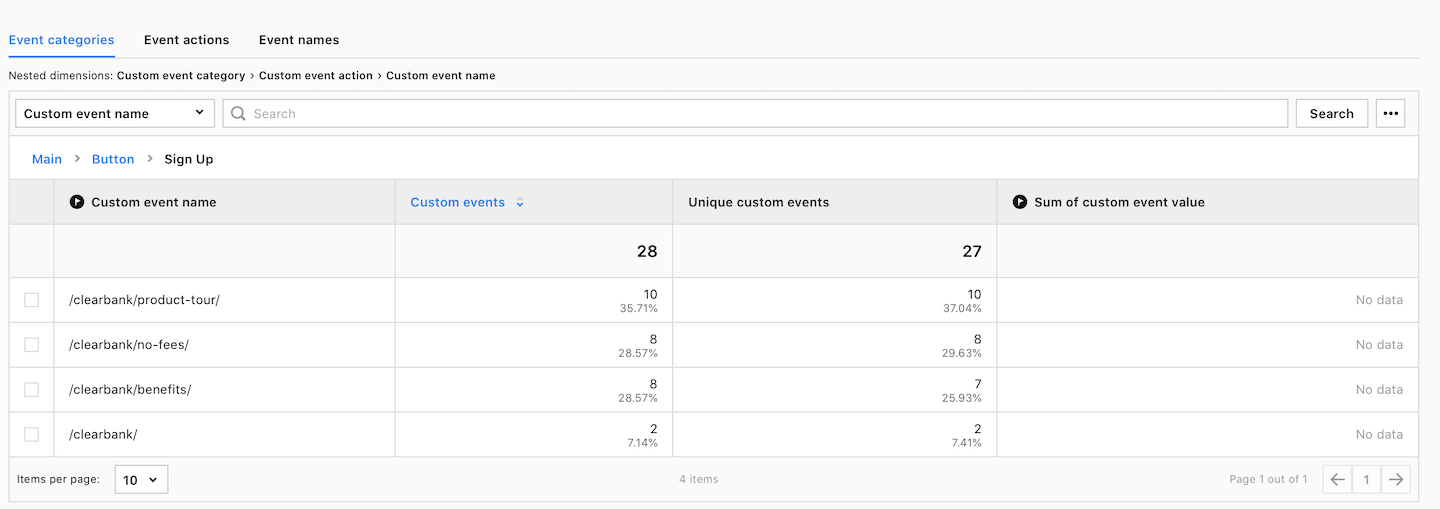
All data collected from custom events will appear in the custom event report under Analytics > Reports > Custom events. It will be organized into three levels: event categories, actions and names, and you will be able to drill down from one level to the other. In the event report, you will see the number of total events and the total value. Yet, setting the value for events doesn’t happen that often, so you may frequently see no data for that metric.
A good practice is to use a custom variable like a page path or page URL for an event name. You will then know on which page the event happened.
As you can see, custom events and event reports are tightly coupled. Data defined in one will pour into the other. Therefore, be mindful about how you name your categories, actions, and names, so when they show up in your reports the event data is easy for you and others to understand. It may take some practice to figure out the best framework for that, but you will get better with time.
We’ve gone through the basic setup for custom events. In the next few chapters we’ll look at how to track specific elements on your website like a button click, menu, contact form, page scroll and video play.